The new brand of panoramic heads Bushman Panoramic releases a new product: the panoramic head Gobi. Even lighter and more compact than the already very light Kalahari, doesn't it overdo it a little or is it the ideal transportable product?
A year ago, a new brand and a new panoramic head appeared on the market: the spherical head Kalahari. A year after, Gérald Blondy, its designer, releases a new model even more compact and lighter. Yes indeed! It was possible!
Does it keep its promises then? Is it as well thought and convenient as its big sister? Stable enough considering its ultra-light weight - 320 grs only? That's what we'll see in this page dedicated to it.
Buy the Gobi panoramic head + Yetti
Retailers
Price (€)
Excl. taxes
€235.60 *
* Your coupon code -5% : BPAF5
Presentation of the Bushman Panoramic Gobi head
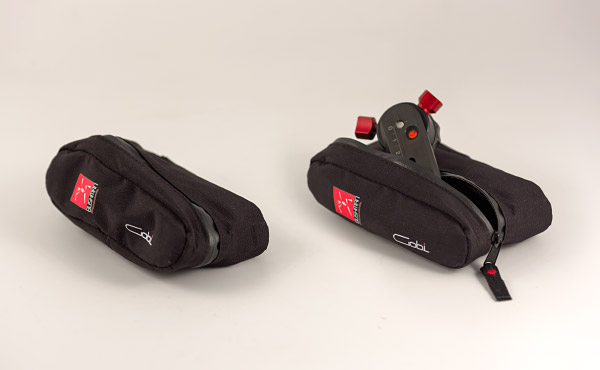
The Gobi panoramic head is thus a very compact and light spherical panoramic head since it manages to do better than its big sister Kalahari, already very light. It is sold in a case (not very convenient), in two very classic distinct parts: the horizontal arm with its notched base and its vertical arm, separable, that supports the tiltable arm on which the digital body will be fixed. It is most likely the less bulky panoramic head case on the market. I'd never seen this before: it fits into the palm of my hand!
The bulkiness of the Gobi head's travel case is really incredible: this head is almost twice less bulky than Kalahari. Not longer than a hand! The case is not very convenient to open though...
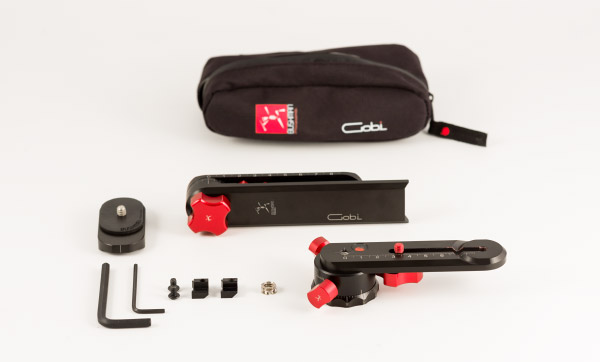
In this case, you'll find:
The Gobi head and its head Quick Click 12 notches or Multiclik Yetti New, with blocking screw,
1 clip, 15°, placed at the tilt axis (other optional ones),
A quick fastening stage for the camera,
2 rail stops,
Two Allen wrenches,
3/8 to 1/8 adapting screw for Kodak threads.
its dedicated case; (photo above).
It bears all the functionalities we could require from a panoramic head in order to make all sorts of panoramas, possibly multirange and of course, virtual tours: a depth setting stage (on 8 cm) tiltable on its vertical arm, notched at the level of the tilt axis every 15° thanks to an (interchangeable) clip, a horizontal stage with notched base of 12 notches by default and its built-in bubble level. This head also comes with marking wedges we'll talk about again later.
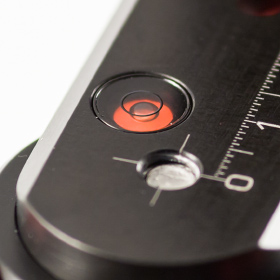
Remark about the bubble level! The bubble level of the first Kalahari models drew a lot of criticism: the bubble was very unstable and any micro movement took it away from the center... it felt like these games where you have to put a ball into a tiny hole. Really unpleasant. But it all belongs to the past! The bubble is now very accurate and moves slowly. Thank you!
The whole thing smells of manufacturing and finishing quality, better than the average. The head is made from an alloy of anodized aluminium black and red for clamping screws. Graduations are laser-marked for a high precision, very convenient in the real world. It stands out! This is of the level of Novoflex equipment, imagine! Obviously, the designers made panoramas or virtual tours and listened to their users during its design because it's even better designed than the Kalahari, imagine. Anyway, this head doesn't lack anything, I'll say it again, it's very transportable and light.
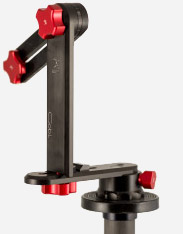
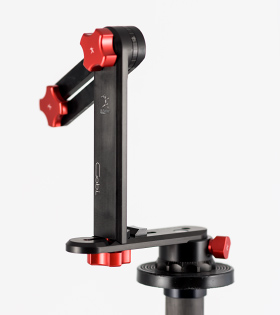
It is made of two distinct and dismountable parts. Once mounted, it's less imposing than its competitors except for its base, and, come what may, far below the average on the market; the confrontation with the reference head Nodal Ninja 4 or its big sister is striking (see fig. below)! Yet the setting ranges are enough for bodies like a Nikon D7100 or a Canon 5D Mark III. And all of this for a featherweight: 320 grs only! It is thus particularly easy to carry and you won't need to debate taking it or not!
Once the camera installed, it's 16 cm higher than the head. Its sole height being 17 cm from the tripod base.
It is also clearly visible that the vertical arm can be unscrewed very easily (big screw below the vertical arm) to turn over to photograph the nadir during the realization of a virtual tour or during transport with a new original turnover system that we'll see later... Then, note the presence of a quite compact clamping screw with the tilting head. This axis is notched and the number of notches can vary by simply changing the clip inside.
And finally, time will tell if it remains accurate but its sisters did their best to enhance its reliability and avoid wear points. Anyway, as for now, it seems trustable. One last remark about the paint that seems to come off a little, as with all painted or anodized heads at friction points, between vertical and horizontal arms. No miracles as for that but how to do it to paint it from the block?
Comparison between the reference panoramic head in this niche, the Nodal Ninja 4 and the new and compact Bushman Panoramic Kalahari.
Two distinct and dismountable parts
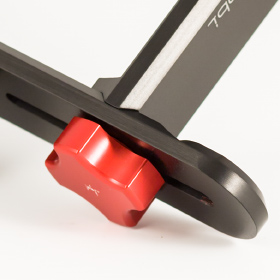
The Gobi head can be dismounted in two distinct parts: the bottom stage on its base and the vertical arm and the tilting stage. That's a precious asset to fit this equipment in your photo bag or even directly in your pocket considering its size. 17 cm high is the size of a pocket book fitting... in the pocket! It is even better than its big sister, the Kalahari head, not known to be bulky! To separate the vertical arm from the base and the bottom rail, you just have to unscrew it. The screw is quite pleasant to manipulate because large enough and it's been improved since the Kalahari. These edges are less cutting (image above).
Once dismounted, the Gobi head comes as follows: a vertical arm (1) which rotation is notched every 15° by default supporting a fastening stage for the camera (2), a notched or smooth base (3) supporting a stage sliding in depth on 7 cm (4).
1- Vertical arm and notched/smooth tiltable stage - The whole thing enables to keep the body vertical in order to get the highest possible panorama in pixels. The framing in height, let's not forget it, is done by the focal in panoramic photography by stitching.
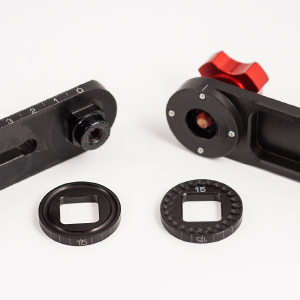
The reglet can be tilted on the vertical arm and supports the quick fastening stage for the camera. This reglet can be set on a depth of 8 cm. Enough with Fisheye lenses or fixed focals. The tilt of the arm is notched thanks to a clip notched every 15° sold with the head (photo over there). Other optional clips are sold. Changing it is particularly simple since you only have to unscrew the big arm tilt screw as show in the photo here. Note that each clip has a notched and a smooth side; well-thought!
2 - Quick release platesfor the body (3) - The quick release plates of the Bushman Panoramic Gobi is very well thought because it naturally sticks to the reglet thanks to a dovetail. It keeps the stage from tilting on the reglet. Only the camera, if it isn't properly fastened, will rotate. It slides on 8 cm. (There's also another optional plate called Xtension and listed below).
3- Smooth or notched rotary base (number of notches to be chosen when purchasing) - Since the Quick Click model of the Kalahari, the notched base has been noticeably improved. On the photo below, we can see in a first time that the base of the base was very thin on the previous model and much higher on the new one. Moreover, quite like a nut, it is much easier to take in hand for the clamping of the base on a tripod.
The base now supports two screws:
One screw to choose to use the notches (number to choose when purchasing: 15, 12, 10, 8, 6, 4). Clamp this screw to use the notches and unscrew to use it smooth.
One screw to blok the head to unscrew it from the tripod.
4- Bottom stage with rotary system of the vertical arm - New! - The low stage of the Gobi head enables to slide the camera on 7 cm "only". It's well enough as long as you don't boost your reflex body.
Clever rotary system of the arm! The singularity of this stage comes from its original rotary system of the vertical arm without needing to dismount it completely (animation over there). A clever slotting of the stage enables to turn the arm over by sliding, just by unscrewing the fastening screw below slightly.
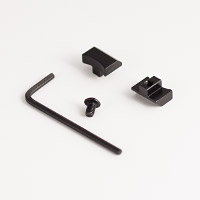
The quick release plate Xtension (option)
This camera stage can be placed on the sliding arm in two directions. It allows, above all, to set whatever camera that wouldn't be equipped with a fastening screw on its shoe right in its optical axis, especially with digital cameras that have a shifted fastening screw relatively to the optical axis hence the famous entrance pupil. It is also more robust than in the other cases and can thus support heavier pairs body/lens.
Buy on... Support this site, buy this advice from affiliate retaillers !
Xtension-U or M
Price excl. taxes
Seller
€33.06 *
* Your coupon code -5% : BPAF5
Use of the head Bushman Panoramic Gobi
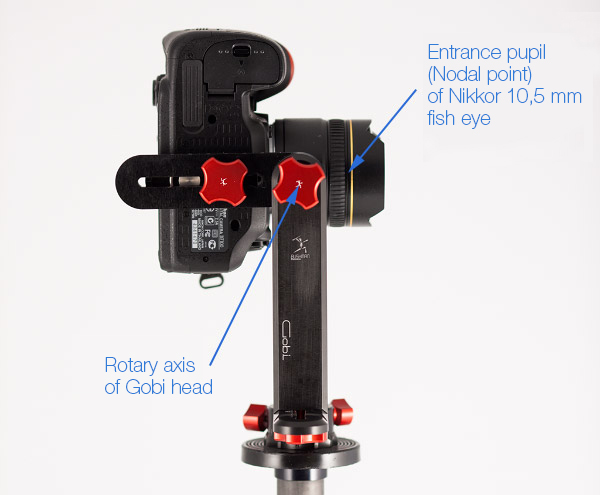
Like all panoramic heads, the head Bushman Panoramic Gobi is used to place the entrance pupil of the lens above the rotary axis of the lens and in the tilting axis of the vertical arm to get perfect overlap zones, even in spherical photography. This manual panoramic head is one of the most simple heads to manipulate, especially thanks to its new vertical arm that rotates very easily. Let's see this in details now...
Setting of the Gobi head at the nodal point
Let's start with an essential point, the fastening of the body on the upper stage. Indeed, depending on whether the screw thread of the sole of the camera is in the axis of the lens or not, its fastening on the panoramic head won't be the same:
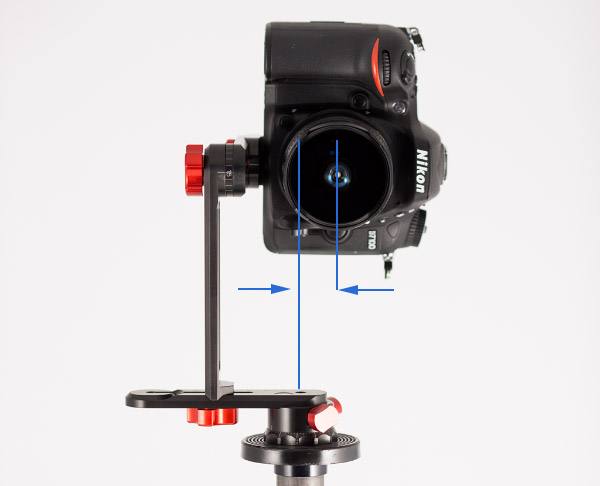
1 - The fastening of the camera is in the axis of the lens (most common case with reflex cameras): you just have to fasten the camera directly on the dedicated stage sold with the Gobi head and it will all be in the tilting axis. The nodal point can thus be above the rotary axis BUT also in the tilting axis. (image below).
With both stages, Standard and Xtension, when you set a camera that has a fastening screw which is not in the axis of the lens, it is possible to place the camera into a tilting axis. The optional accessory Xtension isn't essential for that functionality.
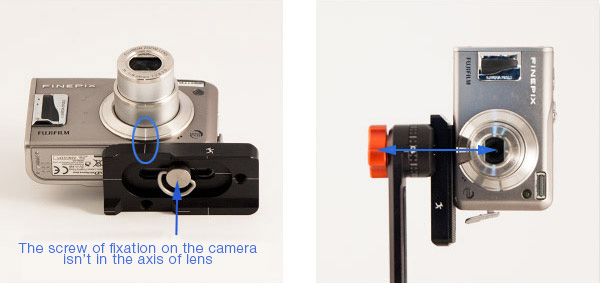
2 - The fastening nut of the camera isn't in the axis of the lens(most common case with point-and-shoot cameras and when you put a grip on a reflex): the use of the optional stage Xtension is then absolutely necessary because its fastening screw can slide on about three centimeters. It is then easy to set the stage so that, with the body mounted, it ends in the tilting axis. (image below).
Note that the clamping system of the stage under the body doesn't require any screwdriver or coin. Very convenient!
3 - Move the optical center above the rotary axis of your head - Once the camera fastened on the upper stage (possibly Xtension), itself on the tiltable arm, you only need to center the lens just above the rotary axis of the notched base thanks to the movement of the vertical arm on which the camera is fastened for now. For that, you only need to move the arm a little on the right in this example after unscrewing the clamping screw below the arm...
The bottom stage is long enough for most reflex bodies on the market in 2013. Hover your mouse to see before/after.
4 - Set your camera in depth- Now, you need to find the setting in depth depending on your lens and if it is a zoom lens, you need to find the setting(s) depending on the focals usually used. This is done via the upper reglet, very easily!
The upper stage is long enough for short fixed focals but won't be enough for zoom lenses like the 24-70 mm F2.8. Hover your mouse to see before/after.
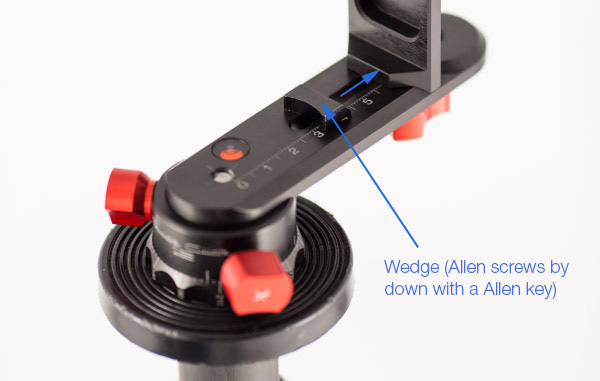
The nodal point now perfectly set for all the axis hence in 3D on this panoramic head and for this lens. You only have to write the settings below to find them easily or to use the wedges sold with the head as we'll see now...
Defining the settings of the head Bushman Panoramic Gobi
Once the settings made for your pair camera/lens and unlike the Manfrotto303SPH heads especially, there's no need to trace marks (at least when you only work with one lens), by reading the marks on the graduated stage, very accurate moreover because laser engraved, because the Gobi head is sold with two little metallic wedges. They're screwed into the graduated reglets with an Allen wrench, stopped against the vertical arm AND the stage supporting the camera once set. To replace the vertical arm and the camera in the right position when you take your equipment out... of your pocket (!), you just need to replace the vertical arm and the camera against these small wedges. Unbeatable even in the dark!
Piece of advice! However you'll have noted that you need an Allen wrench to fasten everything with a tiny screw... so avoid to make your settings in the field! However and here again, it's consistent with the philosophy of the brand because there's not much on and under the stages and it's about having an operational head in the field while keeping its first quality: compactness. Was it possible to do otherwise?
The small wedge comes against the vertical arm at the bottom and against the stage of the camera at the top, once set at the entrance pupil. It's very convenient to find your setting quickly out in the field! Hover your mouse to see before/after.
Note! The wedges have a rounded side to stick against the stage supporting the camera and one flat side to stick to the vertical arm.
Turn the vertical arm over to shoot the nadir
In the tutorial dedicated to the creation of virtual tours on this site, I wrote an article about shooting the nadir on a tripod. To do so, you have to turn the vertical arm of 180° in order to tie the camera above an empty space by putting it as far as possible from the arms of the tripod. On the head Bushman Panoramic Gobi, you just have to unscrew the screw under the vertical arm slightly, turn it of 180° (animation below). And all of this without a screwdriver because the screw is large enough. It is very convenient and original!
Note! The compactness of the Gobi head gives it real robustness despite its featherweight. When you turn the arm over, the body doesn't bend or very slightly, unlike its big sister, the Kalahari head.
So this Gobi head does it keep all its promises? Better than that, it's an excellent surprise. How pleasant to review such well-designed equipment. Everything is thought in the smallest detail and superbly manufactured. You wanted a light, not bulky panoramic head, don't look any further!
Ratings
Bushman Panoramic
Gobi
Manufacturing quality
Robustness/stability
Bulkiness once mounted
dismantled
Base setting
Value for money
PROS...
Very well designed and manufactured
therweight: 320 grs and yet robust enough
Bulkiness mounted and folded down
The vertical arm can be turned over very easily, great idea
Obviously, stability isn't its strong side but you just have to shoot using the self-timer if the exposure time is rather large
the rest is trivial...
OVERALL RATING
9.0/10
My opinion: Here is according to me the best panoramic head on the market, very light and transportable. Hikers have found their panoramic head! It has three very striking qualities: very well designed, extra light and yet very convenient and versatile. If it doesn't achieve the stability of a Nodal Ninja 4 noticeably heavier and bulkier, it is very acceptable and even remarkable for this level of weight.
Impressive product I really enjoyed reviewing. I strongly recommend this favorite product!
Buy the Gobi panoramic head + YETTI
Retailers
Price (€)
€235.60 *
* Your coupon code -5% : BPAF5
Pratical Guide N°1 : The Nodal Point
$12.90 USD
My practical guides in e-books - N° 1!
"Find the nodal point or no parallax point accurately in less than an hour"... whether you are photographing a simple panorama or a 360° photo - PDF of 100 pages -More information...
This website is almost entirely free and yet almost free of ads. Why? Because they look so bad! It is lucrative though, and enables many websites to keep on living. So I asked myself: what can I do? To keep on developing this website, I'm going to need a regular income just like everyone else. How can I keep on giving access to free information like I've been doing since April 2002?
And I finally found the answer: affiliation. Every time you click on a link from this site to one of my partners' shops, they know you've been referred by me and give me a small percentage on your purchase, be it something I recommend on my website or anything else. Remember to use my links when you shop on these sites! It doesn't cost you anything and it's a win-win deal – for me, them, and you!


 Remark about the bubble level!
 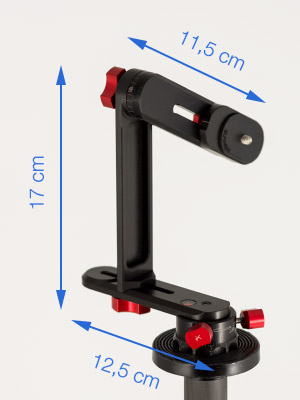 It is made of two distinct and dismountable parts. Once mounted, it's less imposing than its competitors except for its base, and, come what may, far below the average on the market; the confrontation with the reference head Nodal Ninja 4 or its big sister is striking (see
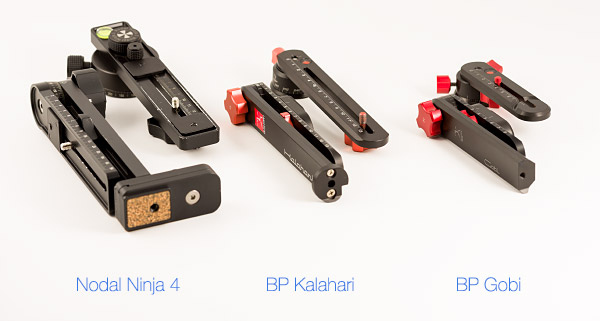
 The
The 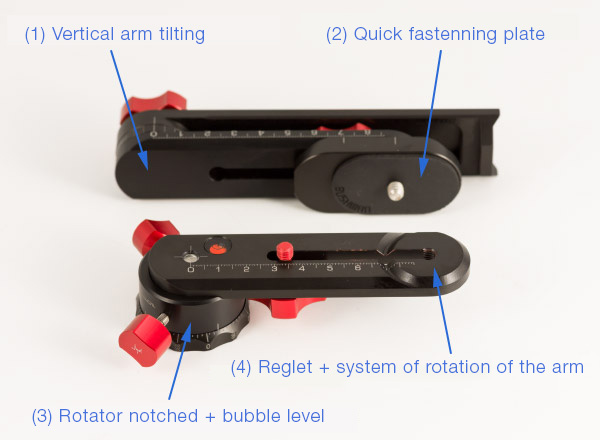
 1
1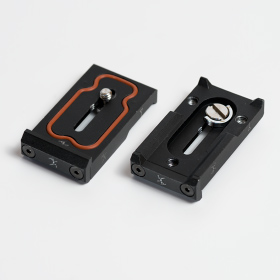 2
2 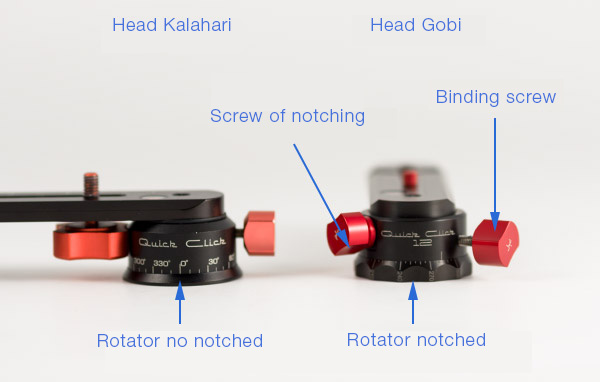
 4
4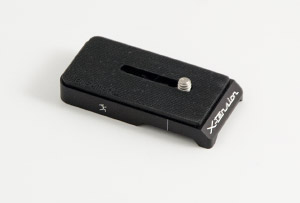 This camera stage can be placed on the sliding arm in two directions. It allows, above all, to set whatever camera that wouldn't be equipped with a fastening screw on its shoe right in its optical axis, especially with digital cameras that have a shifted fastening screw relatively to the optical axis hence the famous
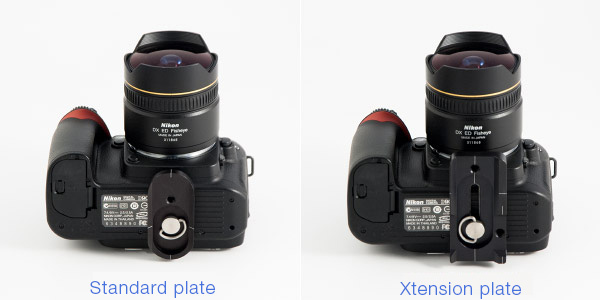
 Once the settings made for your pair camera/lens and unlike the
  Piece of advice!