The notion of geometric projection is very important in panoramic photography because it's what's going to distort the image and give it its "visual signature". There are three main categories nowadays, very different as we'll see...
These three main categories of geometric projections are:
The straight geometric projection called rectilinear,
The curved projection called tiled,
The "special" projections.
The curved projection is itself declined in at least three main subcategories:
The spherical projection
The Mercator projection
The cylindric projection.
Special projections - that only make sense if you photographed a whole sphere - are declined in several variations:
The Panini projection
The Hammer projection
The Mirror Ball projection
The orthographic projection
And the famous Little Planet.
These geometric projections are due to a choice of a stitching mode in the panorama software. This choice thus depends a lot on the software used. the distortions of the image will be more or less important depending on:
the focal used;
the inclination of the body during the shooting.
In film-based times, these geometric "distortions" were a consequence of the rotation or not of the lens in the camera. When the lens didn't move, we would get a straight projection and when the lens rotated during the exposure time in order to include a very wide field, the image was curved. By photo stitching it's almost the same, with slight differences very important though. That's what we'll see now.
Two main categories of geometries: straight/curved
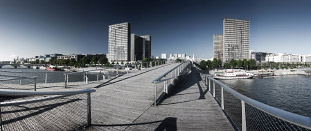
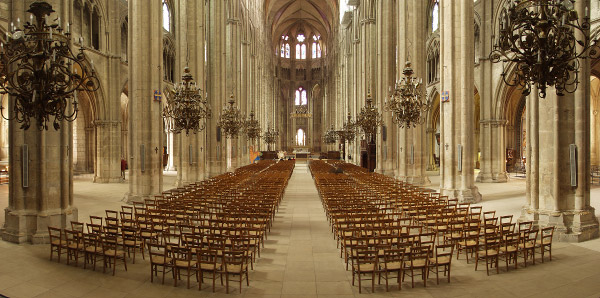
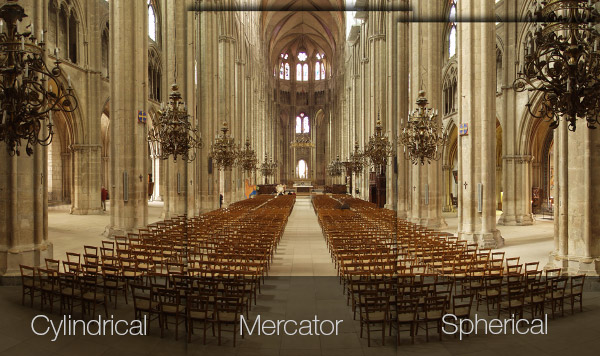
To understand better this notion of geometric projection and above all, visualize it better, we'll start by stitching these three photos taken in the nave of a cathedral with a classic wide-angle 35mm focal. The horizontal field of view is more or less 90°.
These three photos overlap slightly in order to preserve a stitching zone where the software will look for all the common points between these two consecutive photos to stitch them automatically. In Autopano Giga, I stitched these three photos firstly with a straight projection, called rectilinear, below.
The visual signature of the photo is typical from a photo shot with a very wide-angle (under 21 mm in 24x36 hence over 80° of horizontal field). All of the straight lines remain straight but we can note a stretching of the subjects at the edges of the photo. The pillars, on the right and on the left of the photo are particularly stretched and distorted. We would thus have gotten the same visual result with a classic photo shot with a 21 mm and reframed at the top and the bottom.
Secondly, I stitched this same raw material but this time in curved projection, called tiled, mode.
The visual signature of the photo is typical from a photo shot with a rotation of the lens, at least in film-based photography. All straight lines are curved but the skyline. However, the pillars have regained their homothety.
To conclude at that point, we can claim fearlessly that the two modes possess a pronounced visual signature even if in our collective unconscious, we're a lot more used to seeing photos with straight lines. The photographer is thus confronted to a real artistic choice that he used to make, in film-based photography, by the choice of his panoramic camera (fixed or rotary lens) and that he can now make at home, in front of his computer, from the same raw material, the three photos at the top of this post.
Let's now detail a bit more these different geometric projections...
The straight - rectilinear projections
Straight projections are such a part of our visual environment that we don't even pay them any attention anymore and yet they sometimes present serious distortions. They obviously have a huge asset: straight lines remain so on the whole field, but they also have a big drawback: when we want to shoot a very wide scene, possibly correcting perspectives as in the example below, the edges and above all the bottom corners are particularly distorted because stretched. With this projection mode, you don't necessarily want to use too short focals or try to include a too wide field of view (traditionally 90°).
Rectilinear projection and downwards shift - All of the inferior part of the image and above all the corners are particularly stretched. When we shoot a very geometric subject as we could find in a city landscape, we need to be particularly vigilant because the pair wide field / strong inclination of the body / short focal is very distorting!
Straight projection and reframing of one photo
Of a strictly geometric point of view, there's no difference between several photos stitched together in rectilinear mode (for a field of view including 80°/90°) and one only photo reframed taken with a very wide-angle including an equivalent field of view.
There's only one photo 24x36 but reframed in panoramic format. The digital camera wasn't rotating during the shooting. All straight lines are straight.
This photo, very similar to the photo over there, results of the stitching of several photos. The camera was thus rotating around the entrance pupil during the shooting. Yet, the geometric projection mode chosen - rectilinear - allowed to get an identical result. So unlike film-based photography, a rotation of the camera during the shooting doesn't necessarily mean that horizontal straight lines, apart from the skyline, are curved.
Curved - tiled projection
When we stitch photos together, most of the time the stitching is made in curved geometry mode (spherical or cylindric). It's the one that suits photos which field of view goes past 100° horizontally. In our digital era, it's so easy to stitch numerous photos together that we see more and more curved images our eye finally gets used to. Here again, depending on the focal we're going to use, on the inclination of the body we're going to have when shooting, the distortions of the photo will be very different and will depend a lot on the version of curved geometric projection used: Spherical, Mercator or Cylindric, with Autopano Giga at least.
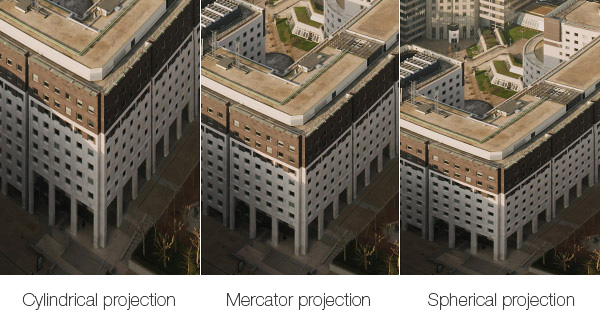
The different curved versions
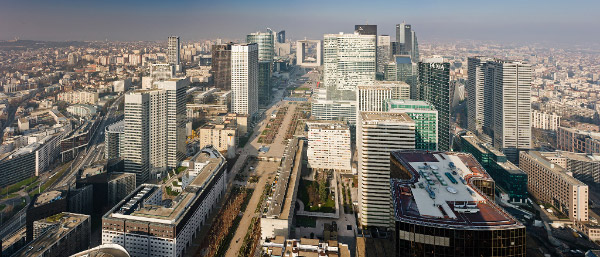
In best panorama software, it's possible to choose between three versions of curved geometric projections: Spherical, Mercator and cylindric. And that difference is sometimes very important. This visual difference in the final image will be visible through the stretching in height of the panorama - and thus above all through the stretching of the top and bottom parts of the final stitched photo. Depending on the focal used and the inclination of the body during the shooting, the effect will be more or less pronounced. If I take my first example about the cathedral again, shot, may I remind you, with a 35 mm, the differences are not very pronounced.
Three different stitchings in Autopano Giga choosing in turn the Cylindric, Mercator and Spherical modes.
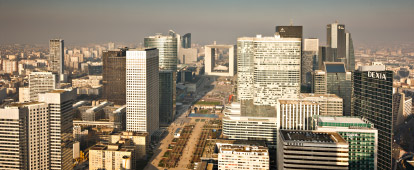
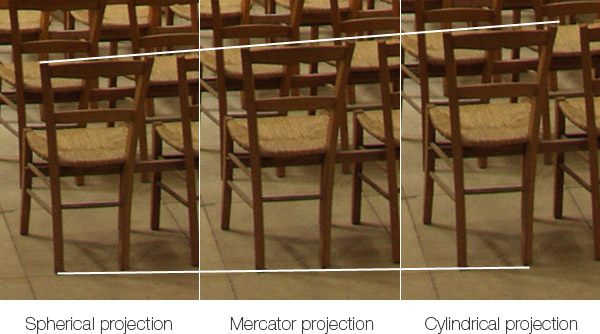
On a close-up on the lower part of the photo, where the visual effect is the more pronounced, the differences appearing are more visible:
The chair seems shrunk in spherical mode, well proportioned in Mercator mode and slightly stretched in cylindric mode, without it being very pronounced here.
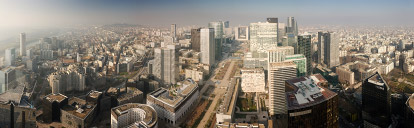
Differences with short focals or a shift
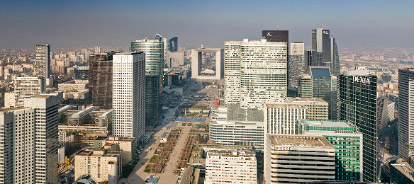
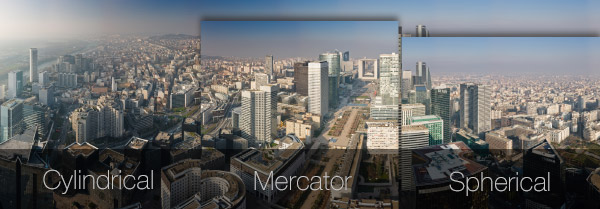
Now if we go back to our example of the Défense, shot this time with a 35 mm but with a strong inclination of the body downwards to imitate a strong shift of the lens, we'll see first that the difference in height of the photo is more important than for the photo of the cathedral.
Moreover, by watching closely the lower part of the photo - on a very geometric subject like this one - the distortions are very pronounced and the choice of the curved version is crucial.
Here again, the Mercator projection seems an excellent compromise!The spherical projection looks particularly shrunk here.
Conclusion of curved versions
If the focal used is over 35 mm in 24x36 with a camera placed vertically and aimed at the skyline, the cylindric projection is interesting to give dynamism in height to the photo. If we shift the lens while aiming down or upwards, then the more discreet choice is the Mercator projection, still at 35 mm or over. If the focal used is shorter than 35 mm or very short, the best choice is Mercator in any case - except if we want to get an exaggerated effect!
Take a close look at the bottom of the photo, the buildings are quite well proportioned despite the strong shift downwards. (Mercator projection).
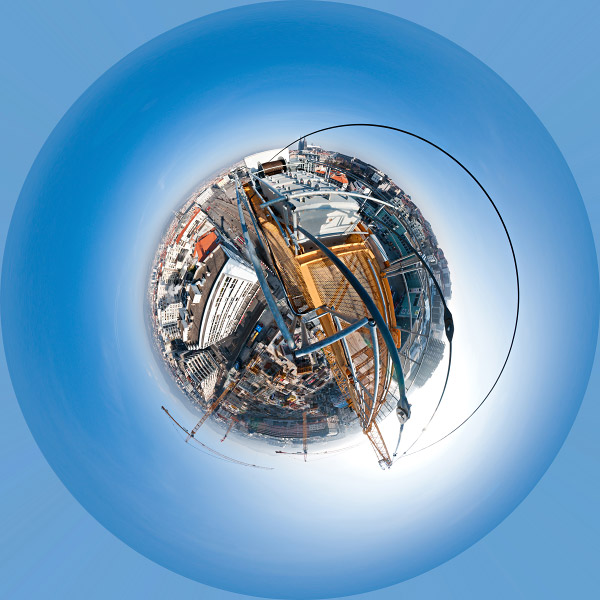
Last particular case: "Little planet" or polar coordinates... and the others
Finally, it's possible but only from a complete spherical panorama (360 x 180°) to get other "special" geometric projection, which most famous is the projection Little planet. Until the release of Autopano Giga 3.5 (December 2012), this rendering could be generated by Photoshop or with the help of special software. This projection is now accessible very easily in Autopano Giga 4.2. This projection is also called polar projection or "Little planet" and also stereographic panorama. (example below).
"Polar coordinates" projection, also called "little planet" or "stereographic panorama".
To get this little planet, the process is easy enough via Photoshop and even easier with Autopano Giga 3.7. Let's start with Photoshop:
1 - Open a 360° x 180° panorama. 2 - By the > Image >Image size menu, resize this photo into a square photo. For that, choose the same values in pixels in height and width. Be sure to uncheck the box "Keep proportions". 3 - Then, rotate your square image at 180°. Image Menu > Rotation > 180°. 4 - Finally, apply the filter "Polar coordinates" to this square photo turned over. Filters Menu > Distortion > Polar Coordinates. Make sure to choose the option " Rectangular in polar". OK.
The image now looks like the example above. To make it perfect, it can be interesting to remove the angles with the stamp in Photoshop. And here, Autopano Giga 4.2 offers a big asset, the rendering is perfect without Photoshop edits. Once you've opened your panorama in the panorama editor of Autopano Giga 3.7, you just have to choose the projection "Little Planet" of the tool "Geometric projections". Very easy and efficient!
The continuation of this big part dedicated to generalities of panoramic photography will be with a page dedicated to the nodal point and a page dedicated to the entrance pupil
Pratical Guide N°1 : The Nodal Point
$12.90 USD
My practical guides in e-books - N° 1!
"Find the nodal point or no parallax point accurately in less than an hour"... whether you are photographing a simple panorama or a 360° photo - PDF of 100 pages -More information...
This website is almost entirely free and yet almost free of ads. Why? Because they look so bad! It is lucrative though, and enables many websites to keep on living. So I asked myself: what can I do? To keep on developing this website, I'm going to need a regular income just like everyone else. How can I keep on giving access to free information like I've been doing since April 2002?
And I finally found the answer: affiliation. Every time you click on a link from this site to one of my partners' shops, they know you've been referred by me and give me a small percentage on your purchase, be it something I recommend on my website or anything else. Remember to use my links when you shop on these sites! It doesn't cost you anything and it's a win-win deal – for me, them, and you!