Here is the most interesting part: it is during the edition of the panorama that it will appear and that you'll be able to do everything you want with it. The strengths of Autopano Giga then appear...
It's time we go down to the serious and above all fascinating part! We'll finally work on our panorama before making the final rendering. In this page, it's all about choosing among different geometric projections, in real time if display calculations are done by your GPU - Option in software preferences -, making varied alignments, necessary reframings, editing the checkpoints in order to optimize the stitching quality and finally work on the harmonization of luminosities and colors of our panorama. You'll see that these steps can go quickly if you own a recent computer. It's almost frustrating because we'll finally not spend so much time on the most interesting part.
Note! The main new features in the last version of Autopano Pro and Giga 4.0/4.2/4.4 will now appear clearly...
Watch this video tutorial (in English)
(This tutorial was made with the version 2.5 of Autopano)
(Contribute to the development of this site by buying this DVD from the link over there.)
Open the panorama editor - Update 4.0
When you want to edit a panorama, click the icon "Edit a panorama" and a new window will open. We saw in the previous page that it changed the menus accessible via the classic menu of the software. If you click "Preferences", it will open a new window of setting of the preferences of the panorama editor described in the page Appendixes of this tutorial. In the main window, the pre-stitched panorama is naturally at the center. Around it are numerous parts, menu bars, that we'll detail as the panorama edition goes along.
New feature 4.0! Let me remind you that this version 4.0 integrates the brand new stitching algorithms of Autopano in order to improve what could still be! We'll especially note the edition speed subsequently increased when working on a gigapixel integrating over 100 photos.
Interface of the panorama editor version Autopano 3.6
The interface of the panorama editor hasn't changed its looks but several new icons have appeared...
The tools and functionalities are gathered in four distinct parts. Each part can be separated and placed in another screen. It is even possible to save your workspace now, as in Photoshop, but you have to leave the panorama editor: File / Save workspace. Here are now the new icons of the menu bar (not in this order):
The new icons - new feature since 3.0!
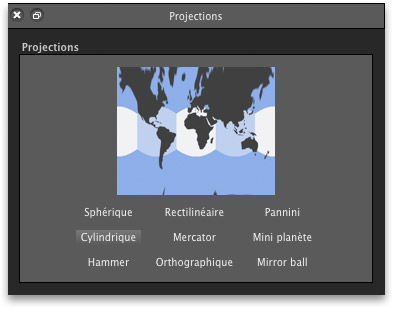
The button "Projections" allows to change the geometric projection of the pre-stitched panorama. To the four now classic projections (spherical, cylindric, Mercator and rectilinear) have been added: the famous little planet, Panini, orthoscopic, Hammer and Mirror Ball. An example illustrates each possibility. Very convenient! Please note that the little planet is now easier to get than in Photoshop as I describe it in my page dedicated to geometric projections
The button "Masks" allows to activate theMasks tool as we'll see later in this page. It allows to choose the details we want to keep or discard in the overlap zone BEFORE the final stitching or in Photoshop. Very convenient!
The button "Exposure fusion" was already present but the tool has been improved a lot and above all, the final rendering is now visible BEFORE the Photoshop rendering thanks to the function "Quick Rendering" below.
The button "Quick Preview" allows to activate the launching of the final rendering to the pixel BEFORE clicking the button "Final rendering". We can now almost work live and without waiting for the final rendering to be available. It could be laborious when we had to make tries hence returns Autopano/Photoshop. This functionality, paired to other new functionalities, allows to work even faster. BRAVO!
Instead of reviewing each tool right now, we'll edit this panorama and use all the tools progressively...
Information and checkpoints editor
When you open the panorama editor, the first thing to do is to check the stitching quality. For that, you'll have to go to the palette "info", at the left of the editor. When the flag is green, it means that the RMS (average error) is inferior to 5 pixels. It's true that below 3, the result is often very good or even perfect.
Piece of advice! You can have an RMS of 2,5 and yet a less good stitching than at 3 paradoxically for instance. It depends mostly on the nature of the distortions of your lens.
The RMS is thus only an interesting information but not a definite value!
When the numbers are not good, the flag is orange or worse, red. It can have multiple reasons it's not necessary to detail here. These cases will be developed in the page Particular cases coming soon. To improve the stitching quality, we'll use the "checkpoints editor".
Note about version 4.2! Detection is so automatically good since version 3.7 that it often becomes risky to optimize the checkpoints manually as I suggested in my old DVDs. The result is often worse than the "problem". I only use them when I'm forced to place them manually.
Important remark!Since version 3.0, it's possible thanks to the "Quick Review" mode to see in real time, in a part of the panorama, how this zone will finally be rendered. It's not necessary anymore to launch the final rendering to know how the stitching in this zone went. It's very convenient at the time of editing the checkpoints. You see a zone that poorly stitches; you zoom in; you activate the Quick Review and you replace new checkpoints. The result will display very quickly before your eyes!
Checkpoints editor
The checkpoints editor button now allows to fix even some of the most complicated cases thanks to how it improved. It's possible to add new checkpoints manually with a loop, automatically if you select a zone of points research, or even automatically in the whole panorama. You really have to have very distorted lenses like very short focals to overcome this tool AND YET, since the last version 3.5 and its new algorithms, the results have made a spectacular jump. Very numerous lenses that stitched just correctly are now perfectly stitched. The version 3.5 is thus a very important update.
Note about V4.0! I even want to stress that the correction of checkpoints can even be worse than Autopano's automatic solution. Be careful not to overuse them!
My opinion! Since version 3.5 then 3.7 and now 4.0, the algorithms are so good that the checkpoints editor is reduced to its minimum. Finally, note that the cloud of points is now perfectly spread on the whole height of the photo and not in one zone anymore as in the example below.
(Contribute to the development of this site by buying this DVD from the link over here.)
Geometric projections
Once the panorama correctly stitched by the sole point of view of the RMS, we'll now see the most interesting part for the photographer: its geometric projections. As we saw at length in the pages dedicated to panoramic photography in general, in the page dedicated to panoramic framing and composition and finally in the page dedicated to geometric projections, the nature of the geometric projection chosen in Autopano Giga depends of course a lot on the field of view included in the panorama but above all on the will of the photographer to share with us his vision. There's thus a rational and an irrational part in this choice. The photographer is free. Even more that since the 3.0 version of Autopano Giga , five new geometric projections have appeared: little planet, Hammer, Mirror Ball, orthoscopic and Panini. These five projections allow to have flat projections effects. The most renowned is the famous little planet, so easy to get now!
(Contribute to the development of this site by buying this DVD from the link above.)
In Autopano, when the GPU calculation option in preferences of the software is activated, the edition of the panorama is almost live. With the new "Quick Preview" functionality, it's even possible to see the final result to the pixel in the panorama editor WITHOUT LAUNCHING THE FINAL RENDERING. It is thus easy to try different possible geometric projection between the straight projection, called rectilinear, and the three variations of curved projections: spherical, cylindric and Mercator or even the new ones. To do so, you only have to click the new icon of geometric projection below in the toolbar of the panorama editor.
Geometry of the panorama
The button Geometric projections allows to choose among nine different projections. It is now possible to see what the panorama will look like thanks to an illustration. 5 new projections.
See the illustrations of these different projections in the page geometric projections
The buttons left/right allow to easily rotate the photo at -90° or +90°. It's very convenient when the spherical photo 360 x 180° is upside down.
The rotation button is used to freely rotate the panorama in all directions or to enter numeric values in the info fields, in the left column.
The auto-adjustment button enables the panorama to fill the whole main window of the panorama editor. The panorama is thus displayed in a bigger side.
So this is how this part dedicated to the edition of the panorama in Autopano Giga / Pro ends. We'll now launch the final rendering in the next page.Edit a panorama - 2nd part
"Find the nodal point or no parallax point accurately in less than an hour"... whether you are photographing a simple panorama or a 360° photo - PDF of 100 pages -More information...
This website is almost entirely free and yet almost free of ads. Why? Because they look so bad! It is lucrative though, and enables many websites to keep on living. So I asked myself: what can I do? To keep on developing this website, I'm going to need a regular income just like everyone else. How can I keep on giving access to free information like I've been doing since April 2002?
And I finally found the answer: affiliation. Every time you click on a link from this site to one of my partners' shops, they know you've been referred by me and give me a small percentage on your purchase, be it something I recommend on my website or anything else. Remember to use my links when you shop on these sites! It doesn't cost you anything and it's a win-win deal – for me, them, and you!


 New feature 4.0!
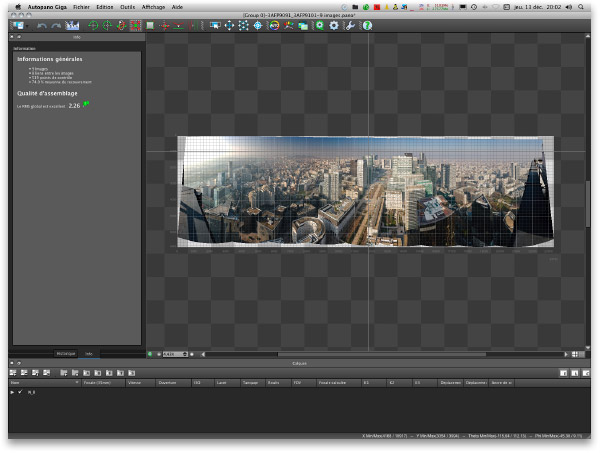
 The
The  The
The  The
The  The
The 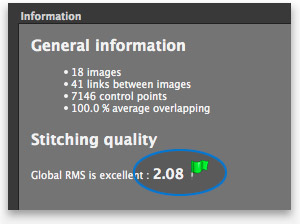 When you open the panorama editor, the first thing to do is to check the stitching quality. For that, you'll have to go to the palette "
 Piece of advice!
 The
The 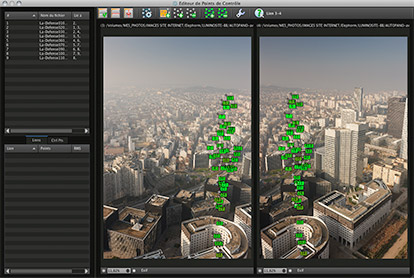
 Once the panorama correctly stitched by the sole point of view of the RMS, we'll now see the most interesting part for the photographer: its

 The
The  The
The  The
The 


