Depending on whether you're going to stitch a simple panorama or a complete sphere or even a gigapixel world record, Autopano Giga will allow you to select the images to stitch in pretty different but adapted ways.
In the first part of this tutorial dedicated to photo stitching with Autopano Giga / Pro 4.4, we've studied the interface and the preferences of Autopano Giga and Autopano Pro. In this second part, I'll try to show you how to open a new project, classic or gigapixel, create a new group of images to stitch, apply the new plugin filters, save a project to reopen it later at the same stage, etc. There are indeed numerous cases that can have important consequences on the workflow.
Watch this video tutorial (in English)
(This tutorial was made with Autopano version 2.5)
(Contribute to the development of this site by buying this DVD from the link over here.)
Choose the images to stitch
Even if each piece of panorama software has its own operating mode when opening a new project, Autopano Pro / Giga's is original on more than one point because even if we still have the classic: choose images from a folder, it offers an original mode ofanalysis of a folder. Indeed, the logic of numerous pieces of panorama software is based upon the choice by the photographer of all the photos to stitch in a given folder. Against this current, Autopano Pro / Giga can also analyze a folder and gather, in the groups column, all the photos that have been taken in a given period of time. It is indeed quite logical! Even if most of the time, only a few seconds separate two consecutive photos, a few minutes or more separate two different panoramas. Unbeatable!
However, it is obviously also possible to open and stitch all the photos we want by selecting them from the folder(s) we want, in a much more classic way.
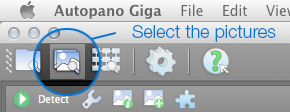
The usual: "Select photos"
As in any piece of software dedicated to image editing, it's possible to select the images to stitch directly from your hard drive. For that, Autopano Giga / Pro 2.6 offers the usual path: File / Select images. It is also possible to use shortcuts icons from the menu bar of Autopano Giga. By clicking the second icon "Select images", a new window opens: the Finder on MAC and the Explorer on Windows. You only have to choose the different images to stitch: at least two.
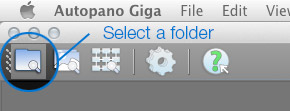
The original: "Analyze a folder"
In Autopano Giga or Autopano Pro, it is thus possible to ask the software to analyze all the images in a folder - of your last vacations for instance - and to automatically place all the photos logically belonging to a panorama in separate groups. For that, Autopano reads the EXIF data of each photo and extracts the time of shooting. If several photos have been shot in a short period of time - up to 120 seconds - it deduces quite logically that they must belong to the same panorama. Judicious!
To analyze a folder, it is also possible to use the classic menu File / Analyze a folder or the corresponding icon in the Menu bar below. When you choose the automatic analysis of a folder by Autopano Giga, a new window opens. It features numerous options we'll detail here:
Choose directory (1) : you only have to look for the folder where your photos are on your hard drive.
Detection (2) : it's possible to launch the pre-stitching automatically at the end of the analysis of the folder. It's not always very sensible!
Group creation criteria (3) : you can indicate the average number of images that must make a group, the average time lapse, from 1 to 2', making sure to separate portrait and landscape images en portrait or even in focal. All these options normally allow to make a very good sorting.All the images will then be put in different groups, ready to be pre-stitched in the panorama column, to the right in the main interface.
The new one: "Stitch... from Bridge, Aperture, Lightroom...
If you have the GIGA version of Autopano and not only the PRO version, it's possible to launch Autopano then to open a new group with the images of a panorama to stitch directly from these pieces of software. For that you need to select the images in one of these pieces of software then, in Photoshop for instance, you click the Tools Menu > Autopano Giga > Stitch... The group belongs to the groups column in Autopano Giga. Very convenient!
When a group of images is created, it comes under the form of a block giving access to a few options that we'll now see in details but if you want, you can launch the pre-stitching directly by clicking the button "Detection". The process of pre-stitching is launched and the panorama appears in the right column, the one of the panoramas.
The left column gives information about the conditions of shooting, especially the focal used and the time needed to take all the photos.
Menu bar of a group
The button Launch detection in the menu bar allows to launch the pre-stitching of the panorama. It's possible to launch several pre-stitchings after changing certain parameters or to add a photo.
The button Stitching preferences allows to punctually change the settings made in the preferences of the piece of software described in the previous page.
The button Image information allows to open a new window giving information about the images: focal, sensor size, etc. The most interesting remains the image tab and the lens model.
The button Add a photo allows just as it says to add one or several photos to a group before pre-stitching.
The button Plugin gives access to plugins hence functionalities or filters that can be applied to one or all the photos before pre-stitching. The functioning is simple and described below.
Groups footer
The button Launch detection of all the groups is a shortcut allowing to launch the pre-stitching of all the groups in the groups column. Handy!
The button Add a group allows to add an empty group to the groups column. I never use it!
The button Shut all groups is a shortcut that allows to shut at the same time all the groups in the groups column. Quite convenient too!
(Contribute to the development of this site by buying this DVD from the link above.)
The plugins are of two types. The first type is an export assistant that can be installed at the same time that Autopano in the following pieces of software if they're installed on your computer:
Picasa
Lightroom
Bridge
Aperture
They allow to choose to export photos from these four pieces of software to Autopano Pro or Giga. Very convenient!
The second type represents functionalities or filters that can be applied to one or all the images of a group BEFORE pre-stitching directly from Autopano Giga only. By the way, using them and applying the filter first creates a new group with the images corrected before launching pre-stitching. The logic of the tool makes it more an application for all the images of a panorama. Nowadays, there are three but they're meant to become more numerous. Even if the third - External stack processing - will only interest HDR users, the second - Distortions correction - is in fact an implementation of new tools Lens Correction of Photoshop CS6. It works very well but it's so much easier to make this correction directly in Photoshop's Camera Raw since its version 6. The most interesting and original is the Neutralhazer filter! It allows to remove a good part of the misty veil in photos shot at high altitudes in particular. It works "intelligently" because it's able to detect if it's confronted to distant or close pixels to apply the filter more or less. Impressive!
1 - After checking "Preview before/after", move the cursor of power of the effect (1) while watching the result live.
2 - When you're pleased with the result, remember to click the button "Apply to all images".
3 - Click "Terminate". A few seconds to a few minutes later, depending on the number of images and the power of your computer, a new group formed just below your original group of images and each image now has a new name xxx_plugin.jpg. You only have to go on with the classic process, which is click the button Detection in the groups column to launch pre-stitching then click the button Edit the panorama in the panoramas column, on the right.
(Contribute to the development of this site by buying this DVD from the link over there.)
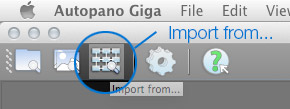
When you want to stitch a gigapixel panorama - only made with a motorized panoramic head -, this menu is essential. It allows to select a folder where all the photos of the gigapixel project are and above all to pre-stitch them where it's convenient without worrying, at first, about the raw material to stitch in overlap zones. To open it, you just have to click the third icon of the menu or more classically open the menu File / Import from... A new window opens! In this window, you'll choose the make of the motorized head you used to shoot the photos. Click the button "Next".
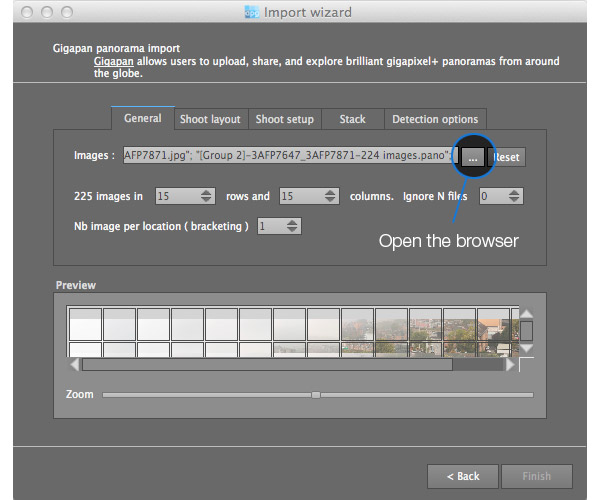
The importation assistant opens a new window with five tabs. In the first tab, we'll choose the images to stitch.
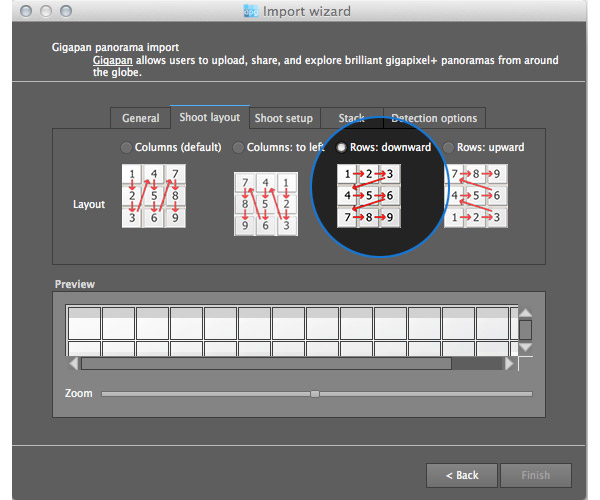
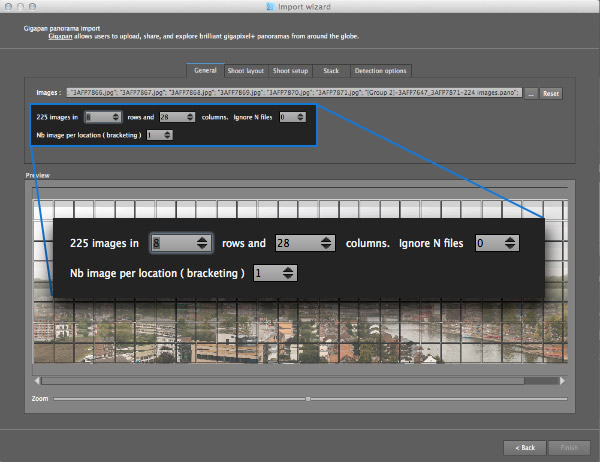
In the tab "General", go get your images thanks to the button "explorer...". Once selected, the photos open in the window "Preview" just below. Now, go right away to the second tab "Direction of the shooting". Here, choose among the different options available (that depend on the motorized head used), choose the direction of the shooting.
In our example, the photos have been shot from the top to the bottom and from the left to the right on 228 photos. Then go back to the first tab, "General". In order to pre-position the photos in the preview window, you need to fill the fields "Lines" and "Columns". If you don't remember, you just have to change the value of the number of lines for instance and the panorama stitching takes form before your eyes by ordering progressively.
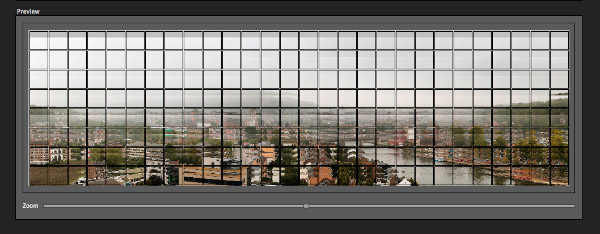
When the number of lines and columns chosen is the right one, the panorama appears.
Before clicking "Terminate", there are still possible options to select from the three last tabs:
Third tab| Shooting settings - It allows to select the option "360": if you've shot a gigapixel on 360° AND you want to create a virtual tour then, the panorama software needs to know it in order to make the right and left edges of the final panorama stitch perfectly in details and luminosity. It'll thus stitch them virtually. In a virtual tour, no gap at the level of the closing zone of the panorama will thus be visible.
The second button allows to choose a different covering rate than the one by default: 40%.
Fourth tab|Pile - Tell the software how it should manage bracketed photos. Leave default options.
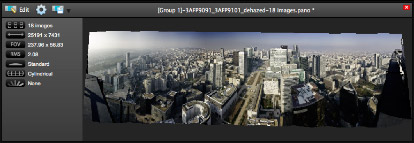
Click "Terminate". It launches the process pre-stitching automatically when it's a gigapixel stitching. This operation can take a certain amount of time. We're talking about gigapixel projects, hence very heavy! The pre-stitched panorama then appears in the panoramas window, on the right in the main window of Autopano Giga or Autopano Pro. It's ready to be edited.
To open the panorama editor
When you're in the panoramas column, it's possible to save the panoramic project(s) from that window, as we can see in the page Appendixes, but also to launch the final rendering without editing the panorama(s). That means being very self-confident, or needing to render again the panorama from an xxx.pano project, already edited and ready to be finally stitched.
Panoramas column
Panoramas menu bar
The button Edit the panorama is a shortcut allowing to launch the panorama editor for this panorama and to make numerous optimizations before launching the final rendering.
The button Render a panorama is a shortcut allowing to launch the final rendering of this panorama without editing it. It involves being quite self-confident!
The button Save a project in .pano allows to keep in memory the images of the panorama as well as their pre-stitched positions.
Panoramas footer
The button Render from the menu bar in the footer of the panorama column allows to launch the final rendering of all the panoramas pre-stitched in the panoramas column at the same time.
The button Save all projects allows to save all panoramas projects at the same time. Very convenient!
The button Shut all the panoramas allows to shut all pre-stitched panoramas in the panoramas column in one click.
So this is how this part dedicated to opening new projects and groups with Autopano Giga / Pro ends. In the next page, we'll finally edit the pre-stitched panorama. This is where the work and the vision of the photographer can be fully expressed. Edit a panorama
"Find the nodal point or no parallax point accurately in less than an hour"... whether you are photographing a simple panorama or a 360° photo - PDF of 100 pages -More information...
This website is almost entirely free and yet almost free of ads. Why? Because they look so bad! It is lucrative though, and enables many websites to keep on living. So I asked myself: what can I do? To keep on developing this website, I'm going to need a regular income just like everyone else. How can I keep on giving access to free information like I've been doing since April 2002?
And I finally found the answer: affiliation. Every time you click on a link from this site to one of my partners' shops, they know you've been referred by me and give me a small percentage on your purchase, be it something I recommend on my website or anything else. Remember to use my links when you shop on these sites! It doesn't cost you anything and it's a win-win deal – for me, them, and you!


 In Autopano Giga or Autopano Pro, it is thus possible to ask the software to analyze all the images in a folder - of your last vacations for instance - and to automatically place all the photos logically belonging to a panorama in separate groups. For that, Autopano reads the EXIF data of each photo and extracts the time of shooting. If several photos have been shot in a short period of time - up to 120 seconds - it deduces quite logically that they must belong to the same panorama. Judicious!
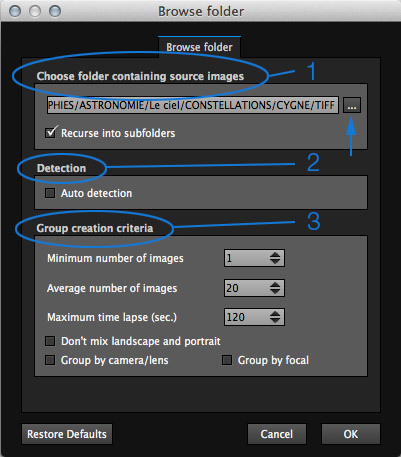 Choose directory (1)
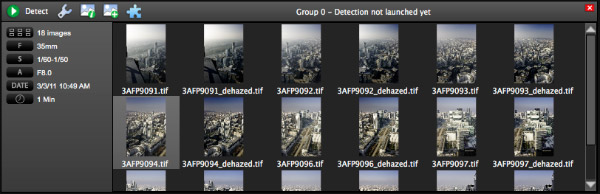
 The
The  The
The  The
The  The
The  The
The 
 The
The  The
The 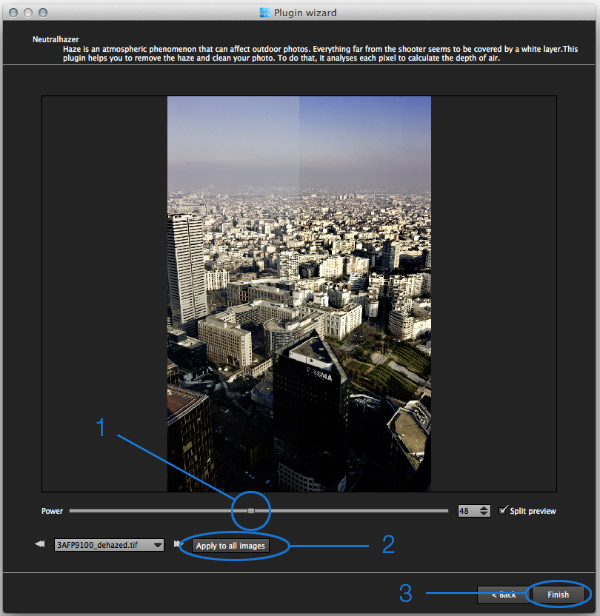
 When you want to stitch a gigapixel panorama
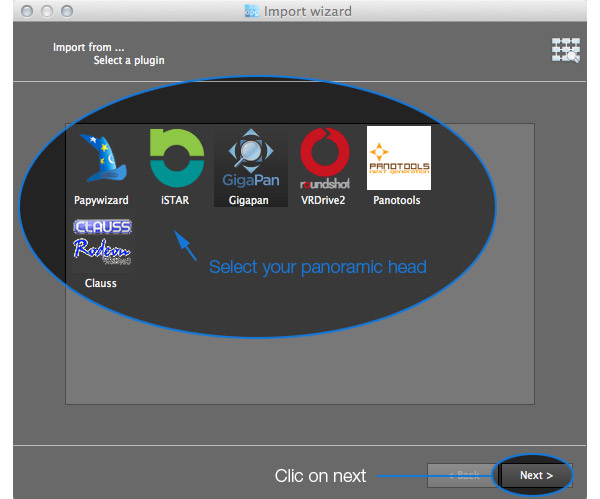
 The
The  The
The  The
The  The
The  The
The 


