Since it's about shooting a whole sphere with a good resolution, it is better, for someone who often realizes virtual tours, to make a preparatives check-list. Just forget one thing like the focusing and your virtual tour can de restarted from the beginning...
You now need to prepare the shooting, which implies making a number of aesthetic decisions, and others much more down-to-earth... The focal you'll use must be determined before, but you're only going to decide on the point of view of the future virtual tour now, as well as set up the lens at the entrance pupil, level the head and decide on the depth of field you want...
Key points if you're a beginner...
Here are the key points to remember about the preparatives before shooting a virtual tour. The rest of this page is aimed at those who want to know more.
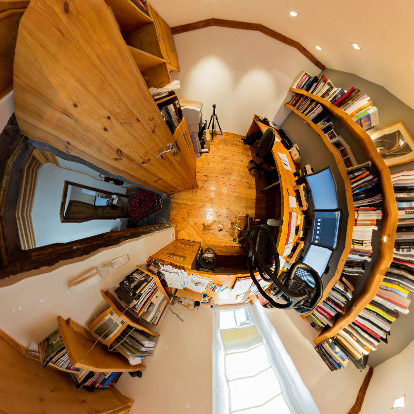
To shoot a virtual tour, especially if it's complete, there's no framing per se so the place you choose is very important. Piece of advice: avoid always placing yourself at the center of the room.
Note that I didn't place myself at the center of the room...
Focusing is very important because it mustn't be changed on pain of poor stitching quality. You do it once and for all, playing with the depth of field by closing your diaphragm around F11.0. On this criteria, APS sensors (Nikon D7200 for example) are better. Deactivate autofocus.
Remember to set your head horizontally (even if it's not that determining).
And finally, I recommend more than strongly that you set your panoramic head, meaning you sett the entrance pupil (also called nodal point) of your lens above the rotary axis - setting up the nodal point ESSENTIAL!
In a virtual tour, especially in 180° x 360°, you show a whole scene. There's no framing per se but rather a notion of point of view. It becomes primordial. The choice of the point of view will determine whether the virtual tour is "boring" or not. It is also important to choose the lens you're going to use now...
Choice of the point of view
Since you're making a complete virtual tour, you're going to show everything and the place where you set yourself becomes very important. I'd thus like to share two observations with you:
It is better not to always place yourself at the center of a room because it becomes boring after a while. Varying the points of view enables the virtual tours to offer a "camera movement" always different.
The choice of the subject and the light might be even more primordial - if it's possible! - than in classic photography as we saw before because all the photos must receive the same amount of light. Beware of big differences of luminosity between inside and outside a room unless you treated yourself to the last Nikon D810 which sensor dynamic, in 24x36, is probably the better by now. Tip! There's always a moment when indoors and outdoors lights find a balance...
Here are the only points that make the photographer become a photographer again, or even a movie director and not only a rigorous technician!
What moment?
Just a remark following a question I'm often asked: how do I do to get certain twilight lights? I just wait for the right moment, meaning when the daylight and the spotlights are balanced! It never lasts really long so you have to be there... in advance!
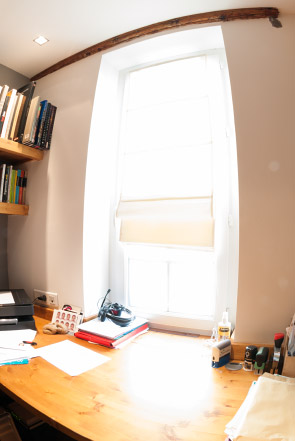
Here is for instance an indoors photo, close to a window, where time is primordial if you don't want to have to fix completely burnt highlights:
When shooting the photo in the afternoon, the amount of outdoors light is really too important compared to the amount of light inside of my office. The window zone s completely over-exposed and a high dynamic wouldn't change that considering the width of the gap...
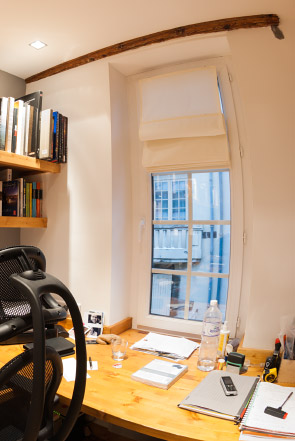
By shooting the photo at the end of the afternoon, the amount of outdoors light is balanced relatively to the amount of light inside of my office. The window zone is in harmony with the office (apart from color temperature, very easy to change in Camera Raw...).
Setting up the lens
When you're trying to shoot a complete sphere, two settings are very important on the lens: the focusing and the choice of the depth of field. The second is deeply influenced by the first, as we'll see below.
Choice of the focusing
Even if we saw that the focal could be changed on a zoom lens, well we also need to be very careful about the focusing in panoramic photography by stitching. Indeed, although it's almost invisible to the naked eye, there's a very light variation of focal when we slightly modify the point. This variation is only of a few pixels but it's fundamental in this present case. The panorama software doesn't find the same details belonging to two consecutive photos at the same place hence it can't stitch them perfectly. Quite like a moustache distortion or like the subject had moved.
Piece of advice! So once we made the focusing, we can't consider changing we can't consider changing if we want a high-definition stitching, except for defined artistic projects of course. One exception: the realization of gigapixel projects because here, we have to slightly change the point between two ranges of photos because the more the head tilts and the closer the subject is, especially with 300 or 600 mm of focal. In practice it is not really a problem then.
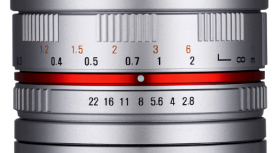
And finally, when you're shooting with a fisheye lens hence with a very short focal, the depth of field is such that at F11.0, you almost always work with a focus at about 1 m and you're sharp from the infinite to 0.50 m! So there's no need to readjust the focusing as with a teleobjective lens or even a 50 mm.
Choice of the depth of field
Since all images will need to be taken with the same focusing (see above), it won't be possible to vary the depth of field on a same photo. To choose the zone of neatness we'll thus use the depth of field of the lenses and sometimes the Hyperfocal if we want a maximal depth of field. With a fisheye lens, at the hyperfocal meaning at about 1 m of focus with 8 or 10 mm focal length, you're naturally sharp from the infinite to 50 cm at F11.0/F16.0.
With a fisheye lens, the problem of focusing and depth of field will thus quickly be solved! You can almost always use the same focus and diaphragm. Convenient even if that might mean losing a bit of sharpness because of diffraction, sharpness you can get back with an over-accentuation.
My recommendation! If your photo is sharp because you used the optimal diaphragm but the depth of field is insufficient, you'll never be able to fix this lack of sharpness with an over-accentuation. While you'll be able to fix diffraction! I prefer a neat photo lacking sharpness because it can be fixed, unlike the contrary...
Leveling the head and the camera
Leveling the panoramic head is very important as we saw in the page dedicated to tripods and leveling bases. It can be done thanks to the settings of the arms of the tripod, thanks to the inclination of the central arm of certain photo tripods or even thanks to a leveling base.
On the tripod
If you have no particular leveling accessory, the leveling of the panoramic head will be done using, very classically, the independent setting of each arm of the tripod. You only have to raise and lower the three arms of the tripod in order to level the head. It's not very convenient nor accurate when you need to be quick...
On the central column of the tripod
Few tripods include that possibility, extremely convenient though - see page tripods and leveling bases. You only have to loosen one screw, on the side or under the central column, to unlock the central column or a half-ball that can then tilt at about 15°. It is then very easy to set your panoramic head perfectly horizontally. You place a double-axis bubble level on the base of the head and it does the trick! Gitzo tripods, of the serial LVL, give this possibility. Imagine when this asset is doubled with the lightness of carbon! Finally, Manfrotto tripods now have in their catalogue two central columns ref. 555B et 556B almost adaptable to their whole range. These central columns, that can go up and down 20/30 centimeters, include a 50mm-diameter half-ball and a bubble level placed at the top of the afore mentioned columns. The locking/unlocking is now done thanks to a handle placed at the inferior end of the central column. It is the same for Benro tripods with ALC columns. My recommendation! It is not only more convenient, but it also takes less space on the nadir photo. The print on the floor is minimal as we'll see later...
On a leveling stage
There are several on the market. Manfrotto made several: the leveling base ref. 338, convenient but heavy and bulky and the leveling ball, ref. 438It's less convenient than the central column and still heavy for what it is. However, its important width allows a great stability but must be avoided in the case of virtual tour shooting becayse its important width makes it visible on the nadir photo. That's why the base EZ-Leveler-II is interesting because it's small-sized hence perfectly compatible with Nodal Ninja heads. To level the panoramic head, you only have to use the three screws placed at 120°. Nowadays, I prefer the solution of the tiltable central column.
Fastening the camera at the nodal point
To - almost! - always make a perfect stitching, I strongly recommend a combination of two things:
place your camera at the ideal rotation point while keeping in mind the focal used (and, may I remind it, don't change the focusing during the serial). It is common to call it the nodal point but it turns out it's not the right name. The exact term is the entrance pupil...
And it is essential to shoot with a lens with very few moustache optical distortions.
To ideally set the camera, we need to fasten it on a panoramic head of a spherical type - photo over there - as we saw in the previous page: panoramic heads and as I explain in the page dedicated to the nodal point. Tip! During gigapixel projects, with long focals, it's not so necessary to be at the entrance pupil but anyway, the entrance pupil is often close to the fixation point of the teleobjective lens.
Learn more about panoramic heads and the nodal point...
"Find the nodal point or no parallax point accurately in less than an hour"... whether you are photographing a simple panorama or a 360° photo - PDF of 100 pages -More information...
This website is almost entirely free and yet almost free of ads. Why? Because they look so bad! It is lucrative though, and enables many websites to keep on living. So I asked myself: what can I do? To keep on developing this website, I'm going to need a regular income just like everyone else. How can I keep on giving access to free information like I've been doing since April 2002?
And I finally found the answer: affiliation. Every time you click on a link from this site to one of my partners' shops, they know you've been referred by me and give me a small percentage on your purchase, be it something I recommend on my website or anything else. Remember to use my links when you shop on these sites! It doesn't cost you anything and it's a win-win deal – for me, them, and you!


 Even if we saw that the focal could be changed on a zoom lens, well we also need to be very careful about the focusing in panoramic photography by stitching. Indeed, although it's almost invisible to the naked eye, there's a very light variation of focal when we slightly modify the point. This variation is only of a few pixels but it's fundamental in this present case. The panorama software doesn't find the same details belonging to two consecutive photos at the same place hence it can't stitch them perfectly. Quite like a moustache distortion or like the subject had moved.
 Piece of advice!
 Leveling the panoramic head is very important as we saw in the page dedicated to
  If you have no particular leveling accessory, the leveling of the panoramic head will be done using, very classically, the independent setting of each arm of the tripod. You only have to raise and lower the three arms of the tripod in order to level the head. It's not very convenient nor accurate when you need to be quick...
 There are several on the market.
 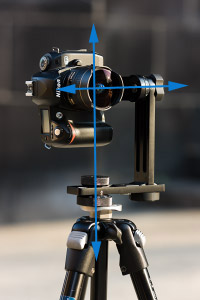 To - almost! - always make a perfect stitching, I strongly recommend a combination of two things:
 Learn more about panoramic heads and the nodal point...


