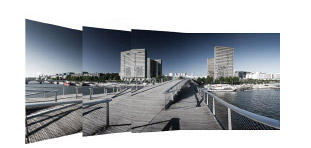
What is a panoramic head? For those who want to realize a top-quality, easy to stitch panorama, I still think it is better to place the nodal point (often wrongly called nodal point) of your lens above the rotary axis of the head. But it is impossible without a special head. This special head is called a panoramic head.
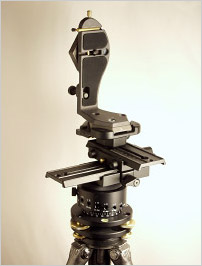
Thanks to its different marked reglets that can be configured, that you can clearly see in the photo on the right, the camera can slide as needed, and with any lens... or almost, so that the nodal point of your lens ends up above the rotary axis. I'd like to stress again that this ideal rotation point is always the same for a given camera, lens and focal and that it's important, especially if you shoot with short focals. There's no need to look for it all the time. Once you found it quietly, you just have to place your camera as needed, at the nodal point, that you'll have marked thanks to the marked reglets or wedges on the sliding stages of your panoramic head.
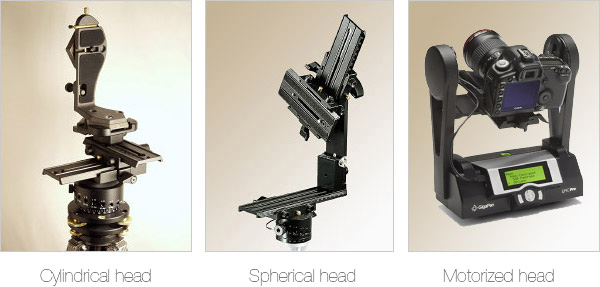
There are three categories of panoramic heads:
Cylindric heads - two stages slide at 90° to realize monorange panoramas.
Spherical heads - two stages slide but one is placed on a tiltable arm. It enables to shoot multirange panoramas.
Motorized heads - Finally, a new category of mainstream panoramic heads appeared in 2010. These motorized heads enable to realize gigapixel multirange panoramas almost automatically.
Three types of panoramic heads
There are thus three main categories of panoramic heads: cylindric heads, spherical heads and motorized heads. Even if all panoramic heads sold in the stores enable to realize a panorama by stitching, cylindric heads have a limitation that prevent them from realizing a 360° x 180° virtual tour, but they're perfectly adapted to realize top-quality monorange panoramas, especially with heavy camera body/lens pairs. They're indeed often more robust and thus support more massive cameras - top-range digital reflex cameras or middle-size digital cameras. It is also easier to make them yourself, as you can see in many examples on the web. The new motorized panoramic heads are, as for themselves, rather dedicated to the realization of gigapixel panoramas hence multirange like the project paris-26-gigapixels.com I realized with the company Kolor in March 2010.
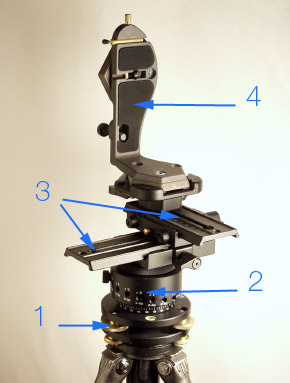
A panoramic head must ideally be made of two or three distinct parts as we'll see right away. Anyway, it must include a rotary base on 360 degrees and possibly notched or controlled electronically, then and depending on the case, one or two marked stages surmounted with a vertical arm in the case of heads said cylindric and of a sliding stage surmounted of a vertical arm (or two for certain motorized heads) and equipped with a tiltable stage in the case of spherical panoramic heads. Let's see all these different parts in details now before making a partial list of some of the panoramic heads on the market.
Cylindric heads
With a cylindric head, you can't tilt the camera body in all axis of the nodal point of the lens. They thus only enable to realize monorange panorama - even if you can tilt the camera -. These heads are more compact and stable. They're more adapted to rather heavy camera bodies. I work with a cylindric head Manfrotto 303 since 2004.
Optional levelling base (1) - Enables to level the head - essential - very fast and easy. (see previous page)
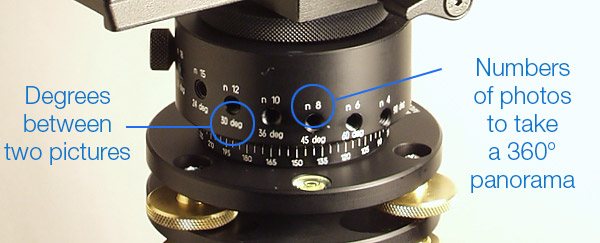
Notched and marked base (2) - not only notched on 360° but even better, notched every xx degrees depending on your needs so as to rotate of the exact number of degrees needed between two consecutive photos without looking through the viewfinder. The number of degrees depends of course on the focal used while taking into account a 25/30% overlap.
Two horizontal sliding stages, marked and mounted perpendicularly (3) - to slide the nodal point of the lens above the rotary axis.
A vertical set square (4) - in order to fasten the camera vertically to get a file as high as possible in pixels, the width of the panorama being determined by the number of photos shot.
Nodal point (PE) and cylindric head
On a cylindric head, the body is fastened with a screw thread, under the body, hence far from the nodal point. If you tilt the camera, the nodal point of the lens goes up and down. If you only want to shoot one range of photos, it doesn't matter at all, however, it prevents multirange shooting if you shoot a close foreground.
A few remarks to finish with: There are only three models of cylindric heads on the market of panoramic heads: the model Manfrotto 303 and its micro-metric version 303 PLUS, the model Novoflex-VR System and a model Really Right Stuff.
These three models are very robust and can handle heavy bodies like the Canon 1DS Mark III or Nikon D3, etc. It is thus possible to perform highly accurate stitchings using them.
Unlike cylindric heads, they enable to tilt the body in all the axis of the nodal point and thus to realize multirange panoramas. It enables to realize gigapixel panoramas or virtual tours. Tip! If you can do the big things, you can do the little things as well and it is of course possible to realize monorange panoramas. It makes them very versatile but they often lack stiffness because the camera is very often in important back overhang.
Notched and marked base (1) - Not only marked on 360° but even better, notched every xx degrees depending on your needs in order to rotate from the exact number of degrees needed between two consecutive photos without looking through the viewfinder. The number of degrees depends of course on the focal used while taking into account a 25/30% overlap.
A horizontal sliding stage, marked at the bottom (2) - to slide the center of the lens above the rotary axis.
A stage sliding in depth on which you fasten the camera if it's a reflex model (3) - The camera is fastened directly on stage 3 (no need to mount 3bis) if it's a reflex one. You just need to make the setting in depth.
An optional sliding stage where you fasten the camera if it's a point-and-shoot (3bis) - The digital point-and-shoot camera is fastened on this third sliding reglet, on the tilting arm, because the screw thread under the camera is never in the axis of the lens.
Piece of advice! These are ideal head to realize virtual tours with a Fisheye or wide-angle lens.
Nodal point and spherical head
On a spherical head, the body is fastened on a sliding reglet backwards, that can itself be tilted. Just what you need for the nodal point of the lens to end up just above the rotary axis and in the tilting axis. This enables multirange shooting, of course, because the camera rotates around the nodal point in 3D anyway.
I want to add a few remarks to this summary: there are many models of spherical heads on the market of panoramic heads. However, unlike cylindric heads, these models are noticeably less stable because the camera and its lens are in overhang. Four noteworthy exceptions: Manfrotto 303 SPH, Nodal Ninja Ultimate M1 , Nodal Ninja Ultimate M-2and Cambo CLH-500, the last three being as stable as cylindric heads.
Motorized heads
Motorized heads are in fact spherical panoramic heads which rotation and tilting are motorized and that can have two vertical arms like this head Gigapan Epic Pro. It is almost essential to realize gigapixel panoramas automatically. Come what may, it is so convenient that you don't want to try it just once! However, I still like my manual head better to shoot monorange panoramas.
Rotary base controlled electronically (1) - all shooting, field of view, range number, column, sequences parameters, and so many more... are controlled via the control box. You can see the control window.
A horizontal stage, manually sliding forward and backwards and marked (2) - to slide the nodal point of the teleobjective lens above the rotary axis (or at least get as close as possible) and above all, balance the whole thing for the engine not to force too much.
The tilting arm - two here to enhance stability - can be set in height (3) - in order to enable to center the optical center of the teleobjective lens with the tilting axis of the motorized head as much as possible.
I want to add a few remarks to this third summary: there are more and more models of motorized heads on the market of panoramic heads. These models are more or less convenient, bulky, stable, open and it will be easy to find yours!
Piece of advice! Avoid motorized heads when you just want to realize a virtual tour with a Fisheye or wide-angle lens. It is really not adapted!
Nodal point and motorized head
On a motorized head, the focal used is often very long and it has two interesting consequences:
The nodal point of long focals is always in the depths of the teleobjective lens hence close to the junction lens/camera hence at the balance point. But it is very important to place the pair lens/body at the center of gravity of the panoramic head to help its engines. Being close to the nodal point is enough.
Moreover, we saw in the page dedicated to the nodal point that it was even more important if you shoot a sharp foreground and background at the same time. But it is never the case with a long focal because of the blatant lack of depth of field!
Different parts of a panoramic head
Let's see the different parts of a manual panoramic head in details now, before detailing each panoramic head. In the particular case of motorized heads, the head controls the rotation automatically to keep one overlap rate.
1 - Marked and whenever possible, notched base
A marked rotary base and whenever possible notched is essential. It enables to rotate the camera of the number of degrees you need between two consecutive photos without needing to look through the viewfinder. It is very convenient! All panoramic heads have a rotary base now.
Tip! It is one thing that the base is notched to make your work easier during the shooting and a different thing to be able to change the number of notches easily when you change lens.
For those who'd like to make their own, it is possible to buy the base only, which I strongly recommend, but in this case, it might as well be notched. I saw three interesting ones among all head brands: the base Manfrotto Ref. 300N, the bases Novoflex Panorama and the notched model Panorama=Q Pro and finally, the bases Nodal Ninja R-D3, R-D8 and R-D16.
But why notched? Thanks to the notches, there's no need to look through the viewfinder to see if you rotated the camera enough anymore. You just need to rotate the head while feeling when it stops on the next notch. It is convenient when you need to work fast during the shooting. There are also situations when you can't look through the viewfinder because of a lack of space. It happened to me several times to shoot 360° on Paris roofs or in the mountain and I just couldn't walk around the camera because it was on the edge of the cliff. So since I couldn't look through the viewfinder, I couldn't check the rotation angle all the time... not so convenient! Moreover, with this possibility, I can shut the peephole of my viewfinder to make sure that no interfering light will come through it. I failed certain photos because of a splendid halo! So this notched base isn't essential but so convenient when you tried it.
Special case: the head Nodal Ninja
On certain panoramic heads like basic Nodal Ninjas, the notched base is made of a brass plate pierced of a certain number of holes every xx degrees. The head is sold with several brass clips, pierced differently on each side. The setting of the number of notches is thus done by dismounting the rotary base completely. You just have to place the notched clip with the right number of clips then. It is not very convenient if you want to change the number of notches often, however, it makes a very light and thus more stable base if, like me, you always use your spherical head with the same lens. Clever!
2 - Sliding and marked stages
On cylindric heads the two reglets are mounted perpendicularly, one below the other. They're surmounted of a rather robust vertical arm, effortlessly supporting heavy camera bodies. They don't allow to shoot several ranges of photos because when you tilt the body, the nodal point of the lens goes up and down, hence shifts.
On spherical heads, there's a marked reglet sliding downwards, a vertical arm with a tilting axis on which is also fastened a marked reglet sliding forward/backwards supporting the camera body. The most important is that they're marked in order to mark the settings of the lens you're using once and for all. You can't possibly have to look for the settings of the nodal point at each use of the panoramic head!
3 - Vertical arm
On cylindric heads, this arm directly supports the camera through its screw thread. You don't shift the center of gravity of the whole thing. It enables, even with heavy cameras, to realize high-quality panoramas, while keeping a certain overall stability.
On spherical heads (here a head Nodal ninja 3), this arm, more or less thick, additionally supports a sliding reglet exactly in the tilting axis, that keeps the camera back and enhances the overhang, especially with short focals which nodal point is always close to the front lens. This is not really compatible with big reflex or middle-size cameras. These ones will always slightly bend and you'll almost always need to avoid long exposure times since the vibrations transmitted take a long time to absorb. In the photos you see on the web, it works but really, as soon as it's a bit windy, it shakes. I don't recommend it... It is interesting to note that the motorized head Gigapan Epic Pro has two vertical arms in order to reinforce this instability.
All panoramic heads on the market...
In the next page, we'll review almost all panoramic heads on the market:
"Find the nodal point or no parallax point accurately in less than an hour"... whether you are photographing a simple panorama or a 360° photo - PDF of 100 pages -More information...
This website is almost entirely free and yet almost free of ads. Why? Because they look so bad! It is lucrative though, and enables many websites to keep on living. So I asked myself: what can I do? To keep on developing this website, I'm going to need a regular income just like everyone else. How can I keep on giving access to free information like I've been doing since April 2002?
And I finally found the answer: affiliation. Every time you click on a link from this site to one of my partners' shops, they know you've been referred by me and give me a small percentage on your purchase, be it something I recommend on my website or anything else. Remember to use my links when you shop on these sites! It doesn't cost you anything and it's a win-win deal – for me, them, and you!


 Optional levelling base (1)
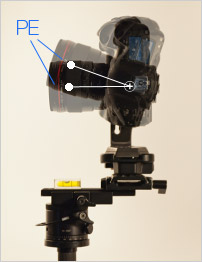 On a cylindric head, the body is fastened with a screw thread, under the body, hence far from the nodal point. If you tilt the camera, the nodal point of the lens goes up and down. If you only want to shoot one range of photos, it doesn't matter at all, however, it prevents multirange shooting if you shoot a close foreground.
  Tip!
Tip! 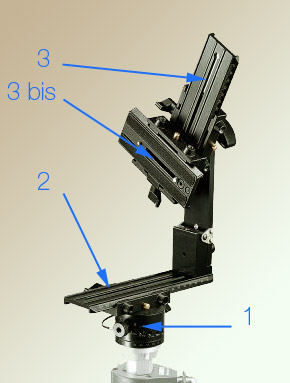 Notched and marked base (1) -
 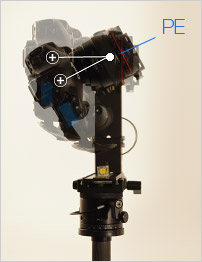 On a spherical head, the body is fastened on a sliding reglet backwards, that can itself be tilted. Just what you need for the nodal point of the lens to end up just above the rotary axis and in the tilting axis. This enables multirange shooting, of course, because the camera rotates around the nodal point in 3D anyway.
 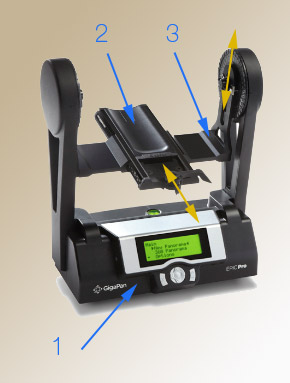 Rotary base controlled electronically (1) -
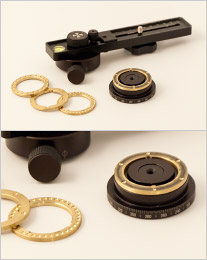 On certain panoramic heads like basic Nodal Ninjas, the notched base is made of a brass plate pierced of a certain number of holes every xx degrees. The head is sold with several brass clips, pierced differently on each side. The setting of the number of notches is thus done by dismounting the rotary base completely. You just have to place the notched clip with the right number of clips then. It is not very convenient if you want to change the number of notches often, however, it makes a very light and thus more stable base if, like me, you always use your spherical head with the same lens. Clever!
 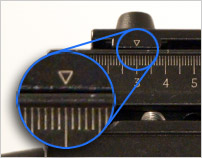 On
On 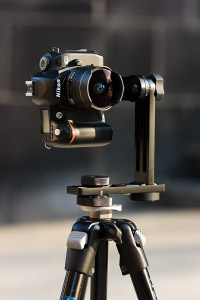 On
On 


