The most spectacular presentation of a panorama is most certainly the 360° virtual tour. To create it correctly, you'll have to follow a certain number of steps, not necessarily essential, but when they're all followed carefully, the quality and easiness of stitching is here. Unless you choose a 360° camera like the Ricoh Theta SC or Insta360 One X because it is the current Google Streetview trend that makes dream realtors ... without offering them a very good quality, still early 2020, despite the efforts of manufacturers! Here are all my advices to help you choose...
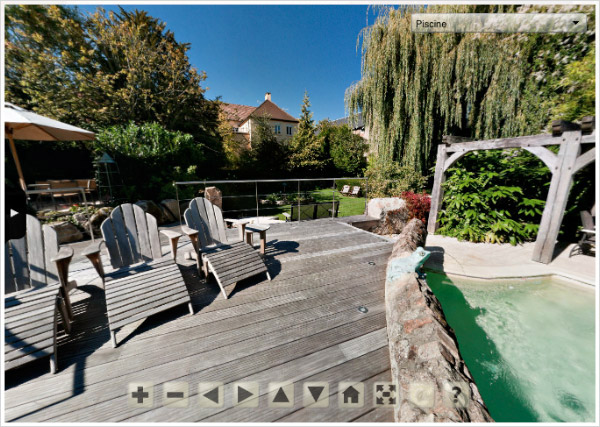
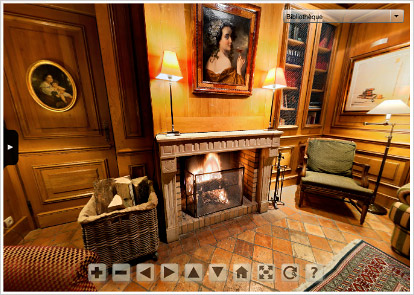
A virtual tour, possibly on 360°x180°, is a particular case in panoramic photography by stitching. It is a recent way to show panoramas in an interactive way, hence necessarily online, which participated in the digital revolution of this field of photography, by the way. When you're watching a 360° virtual tour, it is thus possible to interact with the panorama using your mouse by rotating it in all directions, from the floor to the ceiling in some cases, to go from one room to another, to zoom in the image, to read information, to watch videos, etc.
In all the pages of this tutorial in the The guide to panoramic photography, dedicated to this particular field that is the realization of virtual tours, I'll try to explain you how to proceed and what makes it so singular. As you can guess, it is quite technical when you want to do things right, but it also became a lot easier from 2011 on...
Key points if you're a beginner...
On top of each page, I'll indicate the essential points that should draw your attention if you're a beginner. The rest of the page is aimed at those who want to learn more.
To sum up, we can already say that it will be about shooting a whole sphere on 180° x 360°.
For this you can directly use a 360° camera like the Ricoh Theta SC or the Insta360 One X. The procedure is very simple but the picture quality really not great for the moment (Early 2019). The Google Streetview program is happy however. It is true that their use is very simple.
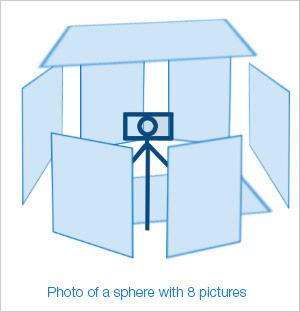
If you want a better quality then you need a camera that accepts fisheyes lenses. These "special" lenses that shoot 180 degrees by deforming the image as in the eye of a fish, allow you to shoot a sphere in only a few photos (between 4 and 8 maximum).
Another advantage, working with fisheye lenses, it will cost you a lot less - starting from $200 - because the "classic" objectives are very large angles and are very expensive and you have to take with them at least fifteen photos and not eight or even less.
It is only about shooting several photos, most of the time with a very wide-angle lens or even a fisheye, slightly overlapping in order to Stitch them with a dedicated panorama software unless you use a dedicated device like the Ricoh Theta SC or another of its 360° cameras that take care of everything (but at the expense of quality even at early 2020). But unlike more classic panoramic photography by stitching, you'll need a panoramic head of a spherical type because it is about, if you have big ambitions, shooting a whole scene from the floor to the ceiling... Of course, the tripod won't be visible in the final 360° virtual tour! The best ratio considering the number of photos, the quality and the quickness of realization is eight photos with a recent 20 Megapixels body nowadays. Still in 2019, the best ratio of photos / quality / speed is five / eight photos today with a recent box of 20 Mpixels but it's still too long for some applications (especially for Google Street photographers or agents real estate) and the Ricoh Theta SC to mention that allows him to realize a complete panorama in a single shoot if we accept a definition and a final quality much less !!!
Before / After in images
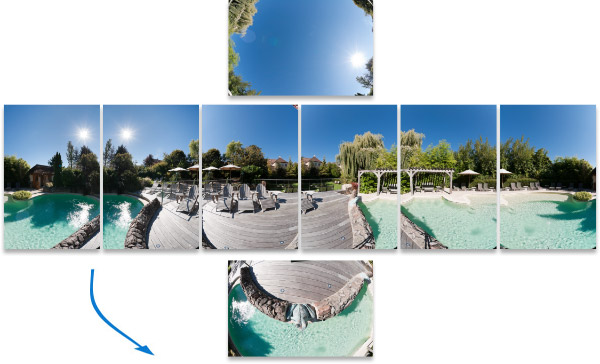
We'll take the eight photos below, shot with a fisheye full-format lens, as a starting point and observe their journey and transformations...
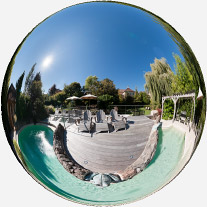
Once Stitchd by an stitching software like Autopano Giga, the photos are rendered in a spherical geometric projection below typical. Straight lines curl ...
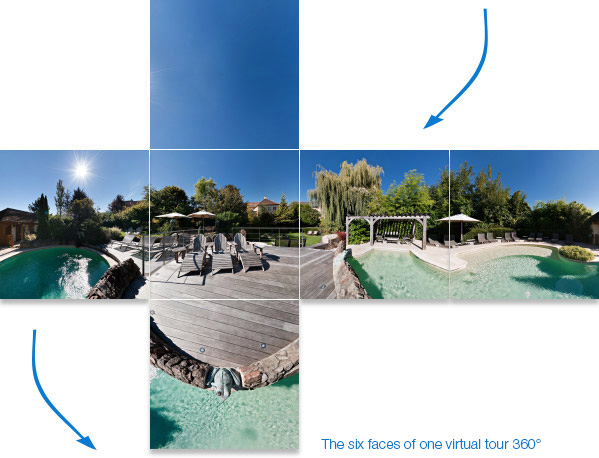
Here is typically a photo shot on 180°x360° rendered in spherical mode: the top and the bottom of the panorama are completely distorted. But once mounted as a virtual tour - in six cube faces as you can see below, and where you can notice that the floor side returns to its normal aspect - and watched online, everything gets back to normal because this photo is redistorted automatically.
Important note! The typical distortion of this 360° photo above is absolutely not due to the fact that the photos were taken with a fisheye but only because a 360° photo is necessarily Stitchd in a so-called spherical projection that rounded also necessarily all the straight lines. This photo would have the same look if it had been taken in 21 photos with a wide angle "classic" of 24 mm. She would have just more pixels. The fisheye lens just lets you work faster.
Those six cube sides are automatically distorted to be watched in an online page;
I invite you to visit it to realize all the possibilities of a virtual tour nowadays. And it keeps on evolving...
"Find the nodal point or no parallax point accurately in less than an hour"... whether you are photographing a simple panorama or a 360° photo - PDF of 100 pages -More information...
This website is almost entirely free and yet almost free of ads. Why? Because they look so bad! It is lucrative though, and enables many websites to keep on living. So I asked myself: what can I do? To keep on developing this website, I'm going to need a regular income just like everyone else. How can I keep on giving access to free information like I've been doing since April 2002?
And I finally found the answer: affiliation. Every time you click on a link from this site to one of my partners' shops, they know you've been referred by me and give me a small percentage on your purchase, be it something I recommend on my website or anything else. Remember to use my links when you shop on these sites! It doesn't cost you anything and it's a win-win deal – for me, them, and you!


 It is only about shooting several photos, most of the time with a very wide-angle lens or even a fisheye, slightly overlapping in order to Stitch them with a dedicated panorama software unless you use a dedicated device like the Ricoh Theta SC or another of its 360° cameras that take care of everything (but at the expense of quality even at early 2020). But unlike more classic panoramic photography by stitching, you'll need a