Final photo edits to the panorama before creating the virtual tour
Even if we're getting close, at that point, the stitching of the spherical panorama by the software is sometimes still full of imperfections you'll need to fix. You need to check that there are no blurred zones in overlap zones and then prepare the panorama before its integration to the virtual tour... At work!
The key points if you're a beginner...
Here are the key points to remember about optical distortions. The rest of this page is aimed at those who want to learn more.
Before opening your nice panorama in your virtual tour creation software, you'll have to remove the last stitching artefacts or the last defects in the image.
Remember to accentuate your panorama by exaggerating a little because the virtual tour viewer slightly erases details.
You can save your panorama in JPEG. In Photoshop, pick 10 to 12 quality.
Color management: your panorama must be in sRGB if you haven't done it before. When I develop my RAW files, I always do so in sRGB when I realize virtual tours.
When the panorama was just freshly stitched, it still needs a few edits before being finalized...
Panorama size
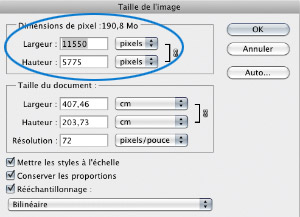
If you want users to be able to zoom in your virtual tour, it is very important for your panorama to be of a sufficient size. The image will be seen on 16:9 screens with more and more definition if you save your virtual tour in fullscreen mode. It is not unusual anymore to see HD screens 1920 pixels wide. And the screen only displays part of the panorama, about 1/4 since it displays, when you zoom out, a field about 90° if you don't want the image to be too distorted! For a good result, your panorama thus needs to be at least 2000 x 4 = 8000 pixels wide, with no zoom possibilities. With eight photos, it is the case if your camera has 6 Megapixels. With the experience, I think the rendering is really photographic with a very wide zoom (90°) from 10 Mo per photo for eight photos.
Caution!if you only take two or three photos with a circular fisheye lens, your file, even if you shot the photos with a 5D Mark III with 24 Megapixels, won't be more than 3000 x 6000 pixels. In full screen on a wide screen, the result is not striking ... from the point of view of pixels of course! So the 5700 px Ricoh Theta S and other Samsung 360 Gear are very light!
If you want to create a small size virtual tour, I advise you to reduce the size of your panorama for its height to be 4x higher than the visualization window of your webpage. This way, if you decide to show your virtual tour in a 600x800 window - without full screen button - your panorama must be at least 600x4 hence 2,400 pixels high. Your panorama will thus have to be downsized at: 2,400x4,800 pixels if it's a complete sphere (the height/length ratio is 1/2 as shown in the image above).
Levels
Luminosity: As I explained in the page Edits, it is better, theoretically, to perform this kind of edits when the image is in 16 bits. In practice, especially when source images are from RAW files, there won't be any visible difference in 99% of cases between a luminosity edit made on an 8 or 16 bits image. Moreover, I'd like to remind you that panorama software doesn't always accept all 16 bits images (allowing exception) so they can't generate a real 16 bits image from source files in 8 bits.
So we could edit the levels on a 16 bits photo after stitching only with certain pieces of software. Come what may, if the development work of RAW files has been done the right way, you'll only have to perform minor edits on the final panorama in order to finalize the image depending on its destination and 8 bits is more than merely good!
Color: it is the same for color edits, moreover JPEG, TIFF or PSD files don't like these kinds of edits too much.
Healing brush/stamp tools or how to remove stitching marks
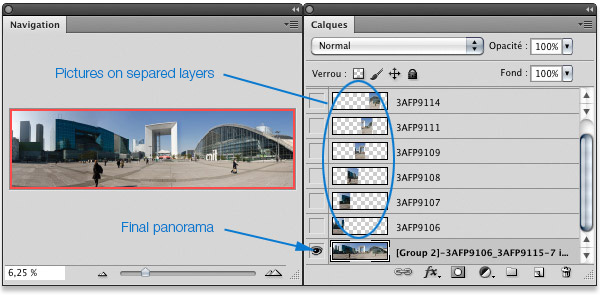
In order to correct small details you don't like in the final image, or to remove stitching artefacts due to a wrong positioning of the nodal ninja or, more often, to optical distortions problems, we'll use these two tools again. It is quite unusual that the stitching doesn't any stitching defect. Either because a detail moved between two photos, like a pedestrian or a car in town, either because the lens is really too distorted, etc. With most part of panorama software on the market, the resulting image is a JPEG. It is thus quite difficult to correct the photo in overlap zones. You'll have to work slowly, by small touches with the stamp tools, more and more clever hence efficient, I have to admit. With top-range software like Autopano Giga, PTGui or ImageAssembler, it is possible to render the final image in PSD format, hence compatible with Photoshop, but above all, of course, multilayer. So each stitched image is placed on its own layer, to which you can associate a layer mask, very easy to edit as for itself. So instead of using the stamp tool, you'll use the brush tool and paint the layer mask black or white in the places where you don't want one of the two images in an overlap zone to superimpose its neighbor.
By clicking the eye on the problematic layer, you reveal the photo over the final panorama and if you look at the related overlap zone over-sized enough (at least 50%), it is very easy to see the effect of an imperfect stitching. The zone seems sharp if you only reveal one layer as shown in the enlargements below.
Only clicking on one of the layer's eyes displays the image of a layer over the final panorama (the one stitched and given by your software if you wanted a JPEG - hence flat - rendering), at the bottom of the pile. Since one layer only becomes visible, there's no superimposition anymore and so it often solves the problem directly. You just have to find the right layer!
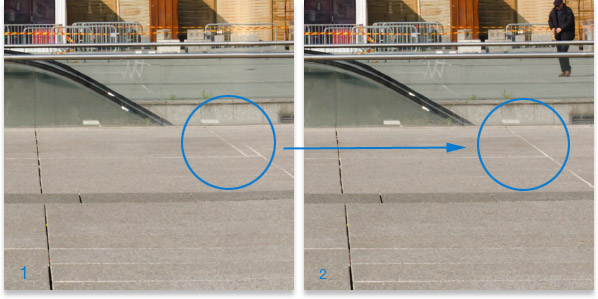
1 - The two photos are superimposed (layer and final panorama ); layers are not visible because they don't show an eye in the left column. The panorama we can see in (1) is the result you'd have had by asking the software for a JPEG image, hence flat. But you can see that the lines on the floor dualize and that the pedestrian is missing.
2 - By only keeping one of the layers and superimposing it over the final panorama, the defect disappears. The defect will be possible to fix by keeping only what you want of the related layer.
Caution though! when you're doing this without any other intervention on your part, you superimpose the WHOLE layer to your panorama at the bottom of the pile consequently. But even if displaying the layer in one zone solves your artefact problem, it can also add other problems elsewhere. So you'll need to add a third step.
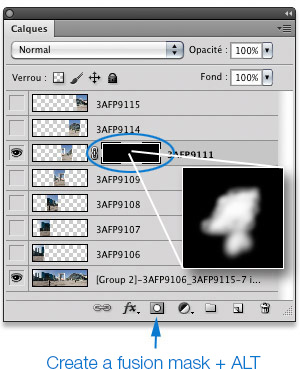
3 - Add a layer mask, preferably black (by clicking the button at the bottom of the layer palette "Add a layer mask " and hitting the ALT key at the same time) to the layer on which you want to correct a stitching artefact. Then, with the "Brush (B) " tool, you need to paint this layer mask white in order to display the layer we need over the final panorama.
It is used to display or hide a defect, a pedestrian, as in the example above with the dualization of the floor plates and the passer-by, etc. This way, you can control accurately what you leave in your panorama.
By painting with the Brush tool (shortcut B) in Photoshop, at the right size and the right sharpness, in white color - foreground color -, possibly with a 10% opacity (for the tool, not the mask) right where you want to display or hide a detail, your final panorama will take the desired look.
Final preparations for the virtual tour
You needed to check the levels of your panorama one last time anyway, but you also need to control color management, remember to accentuate it the right way for its destination and save it to the right format...
Final accentuation
You need to accentuate your panorama one last time before sending it to the virtual tour creation software. For this last accentuation, I advise you to try displaying the image at 50%, choose a 0.4 radius and choose a gain so that, visually, your photo looks good and well-accentuated. At 100%, the image will look over-accentuated but the flash viewer tends to "eat" a bit the definition of the photo, quite like an press.
Color management
My advice ! whatever happens, work in sRGB or make sure that the panorama you send in Panotour is in sRGB.
Conversion to sRGB is essential. Even if your browser can't handle ICC profiles, web browsers all behave like they are in sRGB on RGB screens or tablets! You could as well have worked in sRGB right from the start, when you developed your RAW files. For the web, it is completely useless to work in a wide gamut color space to make an RGB conversion last minute! If you're working in JPEG from your camera, remember to pick the RGB color space in its menus.
No debate here: you need to save your panorama in JPEG. It is sufficient, lighter... only assets to make a virtual tour online. However, you don't need to compress it too much - compression rate 9 or 10 - are widely sufficient in Photoshop.
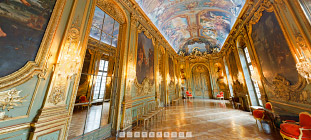
Here is how our panorama ends. It is now ready to be integrated to a virtual tour. That's what we'll see now in the last page of this tutorial: virtual tour creation
"Find the nodal point or no parallax point accurately in less than an hour"... whether you are photographing a simple panorama or a 360° photo - PDF of 100 pages -More information...
This website is almost entirely free and yet almost free of ads. Why? Because they look so bad! It is lucrative though, and enables many websites to keep on living. So I asked myself: what can I do? To keep on developing this website, I'm going to need a regular income just like everyone else. How can I keep on giving access to free information like I've been doing since April 2002?
And I finally found the answer: affiliation. Every time you click on a link from this site to one of my partners' shops, they know you've been referred by me and give me a small percentage on your purchase, be it something I recommend on my website or anything else. Remember to use my links when you shop on these sites! It doesn't cost you anything and it's a win-win deal – for me, them, and you!


 If you want users to be able to zoom in your virtual tour, it is very important for your panorama to be of a sufficient size. The image will be seen on 16:9 screens with more and more definition if you save your virtual tour in fullscreen mode. It is not unusual anymore to see HD screens 1920 pixels wide. And the screen only displays part of the panorama, about 1/4 since it displays, when you zoom out, a field about 90° if you don't want the image to be too distorted! For a good result, your panorama thus needs to be at least 2000 x 4 = 8000 pixels wide, with no zoom possibilities. With eight photos, it is the case if your camera has 6 Megapixels. With the experience, I think the rendering is really photographic with a very wide zoom (90°) from 10 Mo per photo for eight photos.
 Add a layer mask, preferably black (by clicking the button at the bottom of the layer palette "


