Here is definitely the competitor to Autopano Giga. The piece of panorama software PTGui, published by the Dutch company New House Internet Services B.V. since 1996 is very well-know in the circle of panoramic photographers. And since the last updates in 2019 and 2021 I appreciate more and more working with this software and even if my French readers know that I loved Autopano I am switching to PTGui with pleasure!
It's in English only and unfortunately quite complex to use - that is only true when you want to push it to its limits -. For a beginning amateur, it can thus be quite creepy if he clicks the buttons "Advanced". However, used in its "simple" version, it is very easy to use, convenient and already truly powerful. So like Autopano Giga, it can please a beginning amateur and an experienced professional used to vocabulary and functionalities of panorama stitching.
In this tutorial in several pages, I'll first present you its use in its simple version...
Download PTGui 12
PTGui exists in WINDOWS, 32 or 64 bits, MAC versions and now, LINUX. You can download the trial versions below, completely functional, but with "PTGui" stickers over the whole stitched photo. Comparison PTGui / PTGui Pro
Start well with PTGui
Installation and saving are really easy and don't justify any particular remarks. Possibly more information on PTGui's website.
Interface
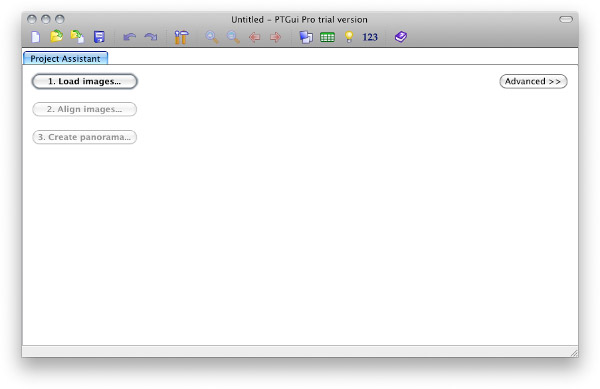
As long as you do not click on the "Advanced" button, the PTGui interface is very simple. A work to embellish icons and a new dark mode appeared in 2019. Very nice.
The rest of this tutorial has been done with PTGui version 11.9 so I have to update it - The interface is as follows, i.e. a menu bar, classic at the top, an icon bar at the bottom - shortcuts - and a large workspace divided into two parts: a left part for the content of the files and a right part for the pre-stitched panoramas, ready to be finally rendered or edited.
PTGui's interface is, according to me, more refined than in the previous versions but it's still possible to go back to the last version in software preferences.
It is thus very simple once understood how the software gathers photos from a same panorama, which we'll see again later. But first, let's see the basic software parameters and preferences together.
As any other piece of software, PTGui allows to specify certain basic options for a tailor-made and sometimes optimized functioning. A number of these basic options can be set via the Menu / Edit / Preferences with Windows or PTGui / Preferences with Mac OS. It is obvious that almost all these options can be changed one by one. This ten-tabs menu looks like this:
As you can see, the number of preferences that can be set in PTGui is impressive!
I'll detail the setting of each tab for experienced users later but first, we'll at least set one important preference for the speed of the software, its temporary folder. This preference must be set, even for an amateur use in order to optimize PTGui's functioning.
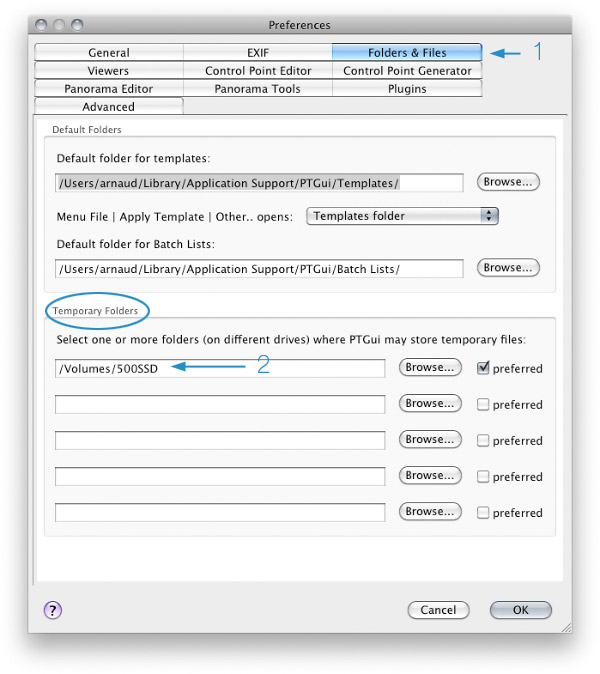
(1) - Third tab: Folders and files
Default folders : leave default folders for "Templates" and "Batch list".
Temporary Folders (2) : in order to optimize writing and reading times when the software can't dispose of enough RAM, the computer will write information directly on the hard drive, by default, with a folder created automatically by the software at the moment of its installation, hence on the main hard drive. To save time though, two things matter: a) that the hard drive where this temporary file is placed be as fast as possible so nowadays, using the SSD technology whenever possible and b) that this folder be placed on a hard drive physically different from the drive where the operating system and the programs are installed, above all if you don't have an SSD hard drive.
In the example above, I thus chose my SSD partition (in RAID 0 of 4 SSD especially quick!).
Select images to assemble
As in any other piece of software, it is possible to select the photos to assemble in different ways.The most simple is of course to click the button "Load images" fig. here, in the main interface. Your file explorer opens and you just have to search and select the names of the image files you want to stitch. Very classic. Autopano is more original on that point. But it's also possible to drag a selection of photos from another window or piece of software directly in PTGui's window.
PTGui's very simple interface enables an inexperienced photographer to work it out anyway, even if he's not so comfortable with English!
1 - Software reads images EXIF data (which means the lens focal mainly used) automatically in order to prepare the algorithms it is going to use to make the best possible stitching. If the field "Focal length" is empty, it means that it couldn't read this famous EXIF data. It is then important to fill this field yourself. If you shot with a 24x36 digital camera, the coefficient "Focal length multiplier" is 1 but if you own a digital camera of an APS, APS-C or other format, you should make sure to indicate it. With an APS, it is 1.5 most of the time.
2 - "Align images...": Then launch automatic pre-stitching by clicking this button. With a powerful and recent computer, this pre-stitching is very fast. At the end of it, the image opens in the "Panorama Editor" but it's possible to launch the final stitching directly when you know that automatic settings will be fine by clicking the button "Create panorama...". It is often the case!
When you clicked "Align images...", the pre-stitched panorama opened in "Panorama Editor" which can be opened by clicking the link "Panorama Editor".
(1) Create panorama - If you click the button "Create panorama..." directly, you'll launch the final stitching, having chosen a few options before. Here they are...
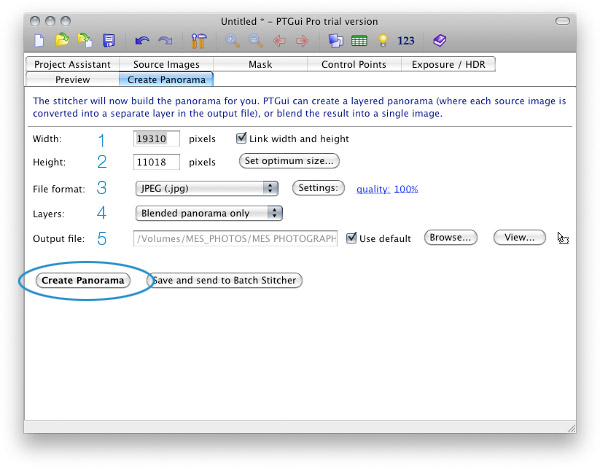
Here are the different options to select before launching final stitching in PTGui.
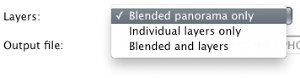
1 - "Width": Choose the height in pixels of the stitched panorama. The written value is the maximum value considering source images. 2 -"Height": if the button "Link width and height" is checked, this value will be changed automatically in order to keep the proportions of the final file. 3 - "File format": you can choose among many file formats, the most famous being JPEG, PSD, TIFF, PSB, etc... If options are available like the compression rate in JPEG, you'll have access to the "Settings" button. 4 - "Layers": you can choose to generate a stitched and flattened panorama, hence without superimposed layers "Blended panorama only". But it's possible to generate the different photos on separate layers only "Individual layers only" and, probably the most usual to facilitate Photoshop edits, "Blended and layers" (the stitched panorama and the images in separate layers). 5 - "Output file ": where do you want to save your finally stitched panorama.
Then, click the button "Create panorama...".
In the next page, we'll see how to edit the pre-stitched panorama to possibly change its aspect, I especially think about the choice of geometric projections or the placement of checkpoints... Edit a panorama in PTGui
"Find the nodal point or no parallax point accurately in less than an hour"... whether you are photographing a simple panorama or a 360° photo - PDF of 100 pages -More information...
This website is almost entirely free and yet almost free of ads. Why? Because they look so bad! It is lucrative though, and enables many websites to keep on living. So I asked myself: what can I do? To keep on developing this website, I'm going to need a regular income just like everyone else. How can I keep on giving access to free information like I've been doing since April 2002?
And I finally found the answer: affiliation. Every time you click on a link from this site to one of my partners' shops, they know you've been referred by me and give me a small percentage on your purchase, be it something I recommend on my website or anything else. Remember to use my links when you shop on these sites! It doesn't cost you anything and it's a win-win deal – for me, them, and you!


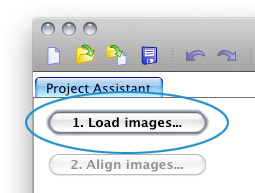 As in any other piece of software, it is possible to select the photos to assemble in different ways.The most simple is of course to click the button "

 4
4


