Photo lens: criteria of choice and what focal to choose to shoot a panorama?
I often hear about short focals to shoot panoramas. But according to my experience, it's not always the most appropriate focal. The panorama, or the field of view, is given by the number of photos we're going to stitch together and not by the focal used. Forget your 28 or 24 mm and think of your 35 or 50 mm too: you'll get less distortions!
The lens you're going to use and even more its focal is determining for the quality of your final panorama. Of course, optical quality is fundamental, especially at the edges of the photo because it's the part we're going to stitch, but its focal too is fundamental because it directly influences the distortions of horizontal lines. That's why I'd rather recommend to use a 35 mm than a 24 mm for instance. In panoramic photography by stitching, the field of view is not given by the field of view of the lens used but rather by the number of pictures we stitch together.I'd thus like to make a point here: if you need to use the shortest focal to fit a wide field of view in one photo, you can, or should, use a longer focal to shoot a panorama. This will save you ugly distortions, if they're not wanted - For more information: geometric projections. Let's see this in details now...
If you're a beginner...
A new part of this guide is now dedicated to you. You'll find simple pieces of advice to implement to stitch nice panoramas, choose your software, your equipment...
When you want to shoot a wide panorama, the temptation is "naturally" to use the shortest focals. Most of the time, it's a mistake! We'll see why in the next paragraph. But now, we'll focus on the quality of our lenses and the most important criteria when choosing a lens that will be used to shoot panoramas or the one you'll buy specifically, like me, to shoot the serials in my portfolio.
So about the quality of the lenses we'll use, it proves much more important than it first appears... and not necessarily on the criteria we think of first!
The lens on a point-and-shoot and the lens on a reflex
A very surprising thing is that the panoramic photographer is always trying to stitch the worst part of the image, its edges! That's the main principle of panorama stitching but it's here, indeed, that are gathered all of the defects of a lens:
Vignetting - sometimes a big defect - ;
Chromaticism;
Loss of definiteness in comparison with the center of the photo and above all...
Distortions, more complicated, and in certain cases, even impossible to fix.
1 - Vignetting - we'll talk about it again in a page dedicated to it because it's a very important point. You absolutely need to fix it before stitching because software can't do it afterwards, or with poor results. It's pretty easy now, most of the time automatically.
Piece of advice! Fix vignetting BEFORE stitching. It's very easy on a RAW file.
2 - Chromaticism - One more defect you'd better correct before stitching all the more since it's so easy on a RAW file.
Piece of advice! Less strategic than vignetting, there's no reason not to fix it, all the more on a RAW file!
3 - Image quality at the edges - Here's probably the main reason why it's so recommended to shoot photos with a very good lens if you often want to stitch panoramas.
Piece of advice! If you regularly shoot panoramas, like me, I "strongly"recommend to choose a very good lens on the edges!
4 - Distortions - The sneakiest defect, and also the main one for a lens because it's sometimes hard to correct.
As you can see here, this defect on the lens expresses by an imperfect alignment of the two photos and usually depends on the software used. This stitching defect is always annoying but can sometimes be fixed easily and sometimes unfixable at all, even with Photoshop masks. Correcting these optical distortions is thus the subject of a whole page.
To sum it up here, one might say that there are three main categories of distortions: barrel distortions, pincushion distortions and moustache distortions. The two first ones can be even important and even spectacular in architectural photography, they can however be fixed easily and often stitch perfectly. Moustache distortions, as for them, are sometimes impossible to fix - either before stitching either directly in the panorama software - and sometimes make stitching almost impossible, even by editing layer masks in Photoshop. Hopefully complex distortions only affect wide-angle lenses and not teleobjective lenses.
Important remark - this matter of distortions depends a lot on the panorama software used and especially on its version: if you're using PTGui or Autopano Giga/Pro in their last versions, you'll see that these pieces of software have made so much progress that distortions are almost never an issue now - Unbelievable!
Remarks about lenses distortions
Thanks to my experience as a coach who thus sees numerous pairs camera/lens - Canon, Nikkor, Sigma, Tamron, Samyang, Hasselblad mostly -, I now know that you have no way to know in advance if a lens or a zoom lens will stitch correctly. There are several cases, that also depend on the chosen software:
A - The lens has or doesn't have distortions but they're easy to fix directly in the software. There's no need to prepare the photos before stitching. The panorama is then often perfect with no need for further edits. B - The lens has distortions that don't stitch well directly but do once fixed with, for instance, Lens Correction in Camera Raw or Lightroom before stitching. The stitched image only seldom needs edits in Photoshop or they're not numerous and very easy to fix. C - The lens has distortions in "moustache" or "cop hat" - the most vicious - and whether or not they're fixed before stitching doesn't make a lot of difference most of the time. The final stitching shows numerous stitching artefacts - in the form of breaks in the lines for instance as shown in the illustration below -. Even with a multilayer rendering in Photoshop, it's sometimes very complicated to fix the panorama. In this last case, I "strongly" recommend to my trainees to change lens to realize straight stitchings.
Piece of advice! A very sharp lens and good for classic photography can be the worst choice for panorama stitching because of its "moustache" distortions hence because of its aspheric lens. Paradoxically, it's used to get a way better quality at the edges of the picture but distorts it so much that it becomes complicated to stitch!!!
Thanks to this same experience that you should always try the lens of your dreams before buying it if you decide to use it for panoramic photography by stitching regularly. There's no rule! Fixed focals are not necessarily better than zoom lenses - only talking about distortions here -. No, lenses of famous brands are not always better than adaptable ones, still from the one point of view that matters here: optical distortions
I think that the nature of the distortions of a lens is the essential point to take into account when you want to make numerous panoramas by stitching ESPECIALLY IF YOU DON'T USE PTGui OR AUTOPANO GIGA. Indeed, photographers don't always realize that it's the main cause of failure of panorama stitching, unlike the nodal ninja, which in the case of no foreground won't really matter.
If your stitchings aren't perfect, look into your lenses rather than the setting of your panoramic head!
What focal to shoot a panorama?
A photographer starting panoramic photography by stitching can be noticed all at once: he uses his shortest focal thinking it is the only way to shoot a panorama! If it's indeed a "good" reflex when shooting a landscape in one photo so as to include as much of the landscape as possible, it's far from harmless when shooting multiple photos that will then be stitched.
The angle of the panorama is given by the number of pictures.
Say we want to shoot an angle of 180°. We need 5 photos if we use a 24mm vertically and 7 if we use a 35 mm. Depending on the focal, for the same field of view, we just need more photos. What will then be the differences between those two panoramas?
1 - The vertical field of view - the vertical "covering" will obviously be more important with a short focal. The chances to photograph the top of the buildings are improved but to the detriment of the distortions we'll see hereafter.
Piece of advice! Photography implies framing but if you're shooting too wide, you can't choose...
2 - The number of pictures to take - It's then naturally reduced and allows to go faster, especially when the weather is changing. It is then an asset but it is to the detriment of the size of the final file in pixels. A 5-photos panorama will be of a smaller size in pixels than a 7-photos one (about 4500 pixels less in width for a 24 megapixels sensor).
3 - The image distortions - So important that we'll talk about them precisely in the next paragraph...
Distortions of the panorama depending on the focal
The shorter the focal, the more you can include a wide vertical field of view. Of course it allows to shoot the top of the buildings but it influences dramatically the distortions of the picture as we saw in a page dedicated to geometric projections
Mainly, here is what we can observe: the shorter the focal, the more stretched the items or buildings and the more pronounced the curves.
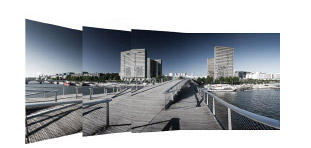
The building at the bottom of the photo is very distorted, very much stretched with the 24mm. The problem is almost fixed with 50mm.
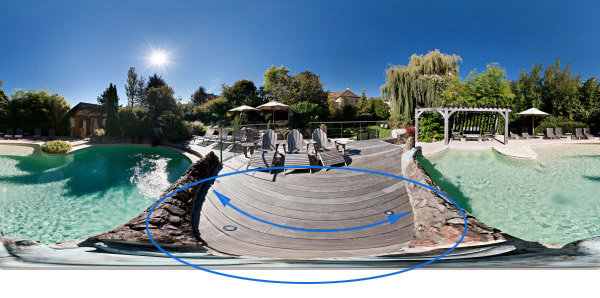
The horizontal lines of the floor are very much curved by the focal used. It's not always very gracious!
Piece of advice! I love my 35 mm (in 24x36) that includes an interesting field of view vertically, and allows me to work on the framing since it forces me to direct my camera up or downwards and thus to select what I want to show.
"Find the nodal point or no parallax point accurately in less than an hour"... whether you are photographing a simple panorama or a 360° photo - PDF of 100 pages -More information...
This website is almost entirely free and yet almost free of ads. Why? Because they look so bad! It is lucrative though, and enables many websites to keep on living. So I asked myself: what can I do? To keep on developing this website, I'm going to need a regular income just like everyone else. How can I keep on giving access to free information like I've been doing since April 2002?
And I finally found the answer: affiliation. Every time you click on a link from this site to one of my partners' shops, they know you've been referred by me and give me a small percentage on your purchase, be it something I recommend on my website or anything else. Remember to use my links when you shop on these sites! It doesn't cost you anything and it's a win-win deal – for me, them, and you!


 Piece of advice!
 Important remark
  Remarks about lenses distortions
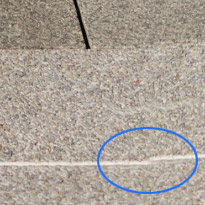 C
C