Bushman Panoramic Kalahari V2 panoramic head review
 The brand Bushman Panoramic is amending the Kalahari model with a V2 full of innovations and improvements, also more stable because a bit heavier. Compared to Gobi, its little sister, the Kalahari V2 is now better positioned in the middle-range / reflex range of rather light heads.
The panoramic head Bushman Panoramic Kalahari V1 was the "grown-up" model of a range of three panoramic heads. It was clearly positioned in the range of compact panoramic heads, thus light and easy to carry, with another striking quality: its great manufacturing quality. It wasn't especially cheap though!
And more importantly, it lacked stability. The competitors were a lot heavier but a lot more stable. Does version 2, 200 grs heavier, make up for this problem on this market of heads able to handle a camera like the Canon 70D, 7D and possibly 5D or a Nikon D5600, D7200 or even D500 and do these different improvements and optimizations make it more pleasant to use on a daily basis?

Presentation of the Bushman Panoramic Kalahari V2 panoramic head
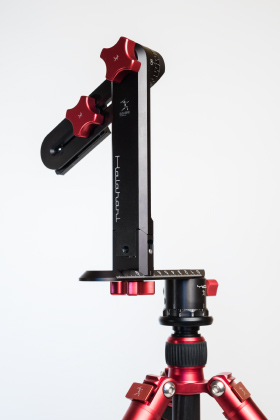
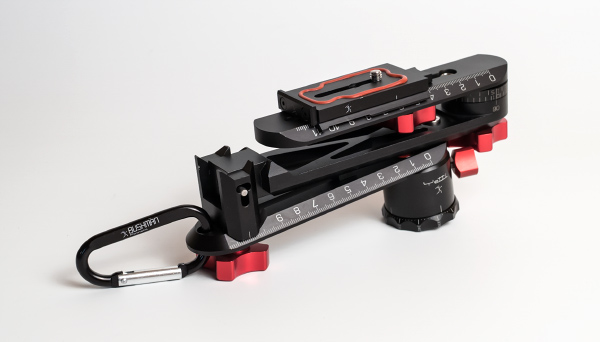
The panoramic head Kalahari V2 is still a very compact spherical head, even if it's noticeably heavier. It is sold with its case, in one whole part from now on since the manufacturer has found a way to link together all the parts in this foldable head. Clever! It is probably the less bulky panoramic head case able to handle reflex cameras on the market.
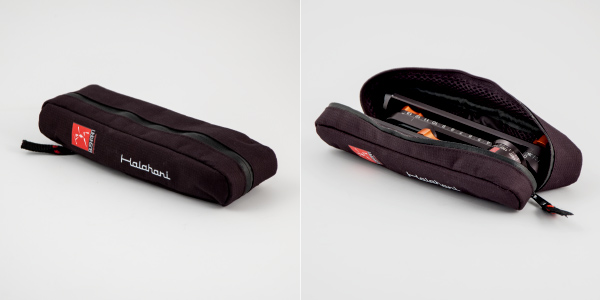
The Kalahari V2 case is so easy to carry around and of such a small size that it is truly unbelievable: a Nodal Ninja 4 is two or three times bigger!
What you'll find inside:
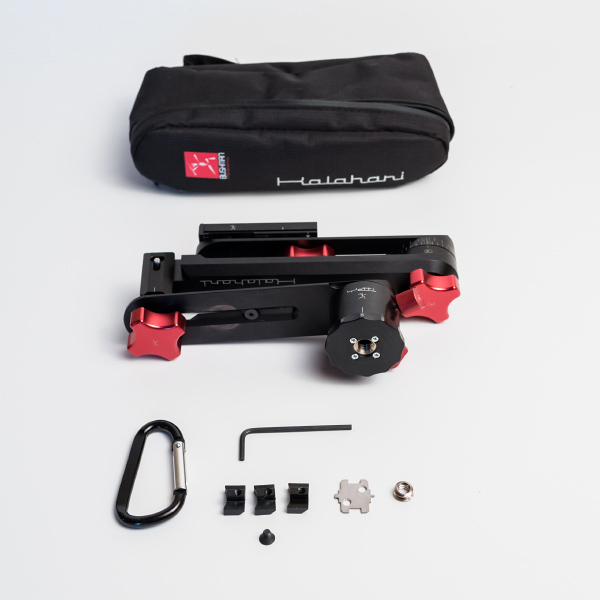
It features everyhting you could expect from a panoramic head for making all sorts of panoramas, even multirange, and of course virtual tours: a plate to adjust the depth (on 10 cm) that can tilt on a vertical arm, notched at its tilting axis thanks to a horizontal plate with a notched rotator that is now pretty famous: the notorious Yetti. The lower plate still features a bubble level, and a compass has been added. This head is still delivered with marking wedges we'll discuss again later, but among the new features you'll also find a snap to fasten your folded Kalahari V2 to your trousers as well as a small magnet and a small tool that can be used for the different settings.
The whole thing breathes manufacturing and finishing quality, above market average. The head is made from a black anodized aluminum alloy, the screws are red and the markings are laser-made for extraordinary accuracy, very useful in real life. Exceptional! The bubble level is also very accurate, although it can seem tedious to set because of its very small size. You'll also find a small compass that can be very useful sometimes. This is Novoflex-quality, imagine! Obviously, the designers shot panoramas and virtual tours while working on it because it is very well thought... Anyway, there's nothing this head misses, despite being very easy to carry even with its increased weight.
Technical specifications
| |
Kalahari V2 |
Average price of the basic model (V2) $395.00 |
|
Quick fastening |
Yes |
| |
Load capacity |
2.0 kg (3.5 with Xtension) |
| |
Height of use |
20 cm |
| |
Range of motion of the plates |
11 cm upwards and 10 cm downwards |
| |
bubble level |
Yes + compass |
| |
Dismountable |
Yes – in two parts – base and vertical arm |
| |
Number of notches |
Yetti: 5 notches of 4 to 24 photos |
| |
Material |
Aluminum |
| |
Weight |
0.580 kg |
|
Company |
|
|
Shop the Kalahari V2
| |
|
Shop |
Price
Excl. VAT
|
|
| |
|
|
€395.00 * |
|
| |
|
* 5% exclusive discount for my visitors with this coupon : BPAF5 |
| |
|
|
|
|
|
Dimensions, weight and dismounting
 It is now made of only one articulated block. It can't be separated in several parts anymore, but it can be folded completely to fit in the same case as the previous version. Impressive!
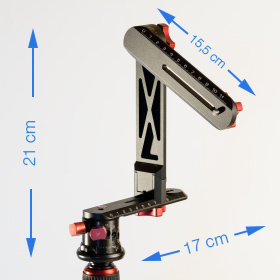
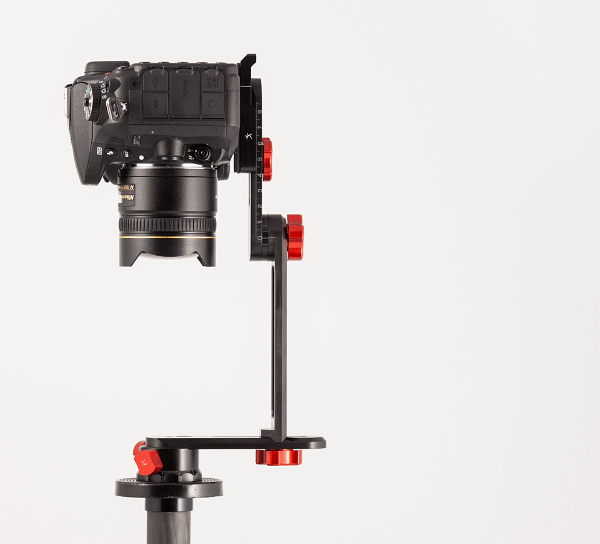
Once mounted, it is of an average size except for its base, a lot smaller than the rest with this Yetti rotator. The comparison with the reference head Nodal Ninja 4 is striking: the range of settings is identical and yet it's so much smaller. It is also still lighter than the Nodal Ninja 4 even if it gained a bit of weight: + 200 grs! But it is justified by a real improvement, as we will see... It is thus particularly easy to carry around and you won't have to debate whether to take it or not!
The camera should be about 19 cm above the head once it's properly set. The height without the camera is indeed of 21cm from the base of the tripod.
You can also clearly see that the vertical arm can be unscrewed very easily (big screw under the vertical arm) to be turned over to shoot the nadir during a virtual tour or to carry it. Finally, note that the clamping screw for the tilting head is quite compact.
Now only time will tell whether it stays accurate, but its designers worked all they could to make it reliable and avoid points of wear. Anyway, for now, it seems trustworthy. One last remark: the painting seems to fade a little at the points of wear, between the vertical and horizontal arms, like all painted or anodized heads. No miracle on this side, but the only way would probably to dye in the mass.
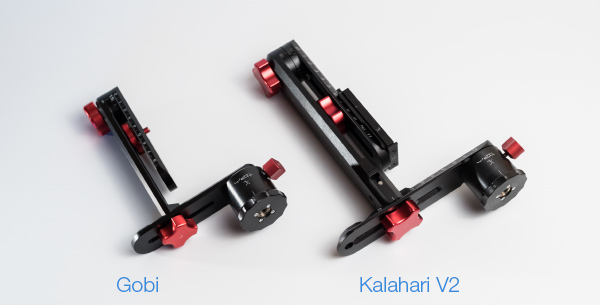
Comparison between the panoramic heads Bushman Panoramic Gobi and Kalahari V2
Monoblock... but completely foldable and with lots of new features - New V2 features
The Kalahari head V2 can't be dismounted anymore but can be folded in one compact block like you can see in the photo below.
It's very convenient when you want to put your equipment back in your photo bag quickly, or to carry it in your pocket or even fastened with the included snap. This is an exclusive feature! To separate the vertical arm from the base and the bottom rail, you just have to unscrew it (photo below). Now, the screw is quite pleasant to manipulate because the edges have been softened, just like I had suggested to its designer.
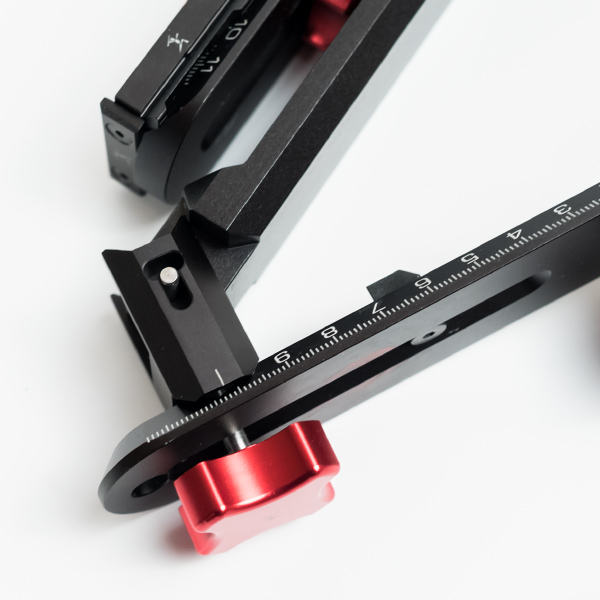
Clever mechanism allowing to fold it completely with the screw of the vertical arm and by unscrewing it
Once folded, here's how you can separate the Kalahari V2 in different parts: The Yetti rotator, which features 5 notches, a lower plate of 12 cm (of which only 11 can be used), a foldable vertical arm and a top plate of 10 cm and its plate of quick fastening Xtension-U that can optionally be replaced by a different version.
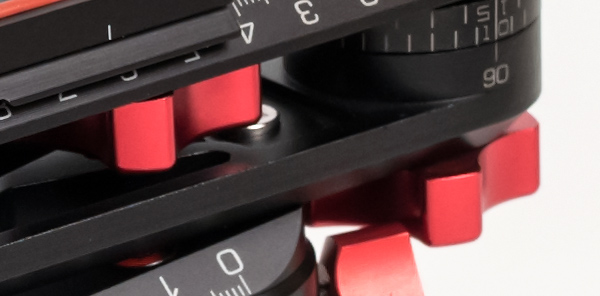
1 - Yetti rotator (8, 12, 15, 18 or 24 notches) - This rotator is now famous among panoramic photographers who own a Bushman Panoramic head. It can be used to rotate the head on 90°, 30°, 24°, 20° and 15°.
 Piece of advice! Try to stop every two or three notches to find your accurate setting very easily.
2 - The lower plate - On this marked reglet will be fastened the vertical arm with the big red clamping screw. The vertical arm can slide on 10 cm, which is remarkable for this size. Note the quality of the milling and anodization, remarkable. The dovetail design enables to block the vertical arm safely and the possibility to turn it over is very convenient, as we'll see again later. This plate has four new features:
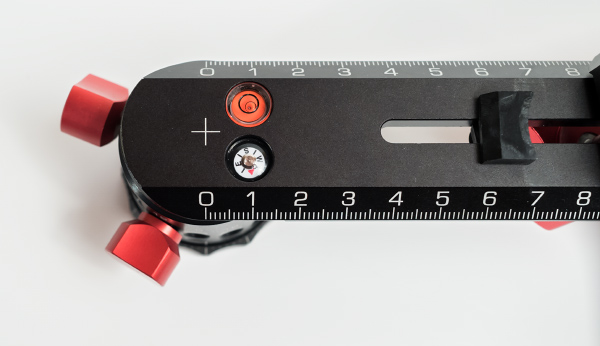
The lower plate of the Kalahari V2 now features a compass in addition to its bubble level and it is now marked on both sides.
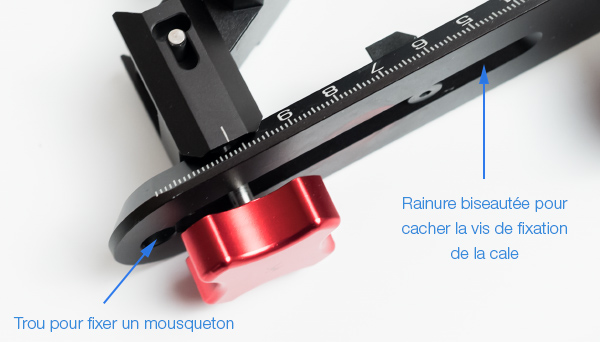
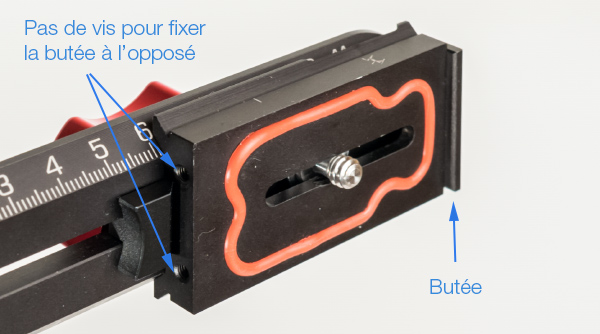
At the edge of the lower plate there's now a hole to slide a snap. Finally, note that the groove at the fastening screw of the vertical arm is now beveled in order to leave space for the conical fastening screw of the marking wedge of the nodal point. So this screw doesn't stick out anymore!
3 - The vertical arm - As we saw before or in the photo above, it is now articulated at the base in order to be easily foldable without separating it. Very convenient! And another nice and interesting new feature also appeared: a magnet is fastened on the internal arm on which you can magnetize the small universal wrench that serves as universal screwdriver:
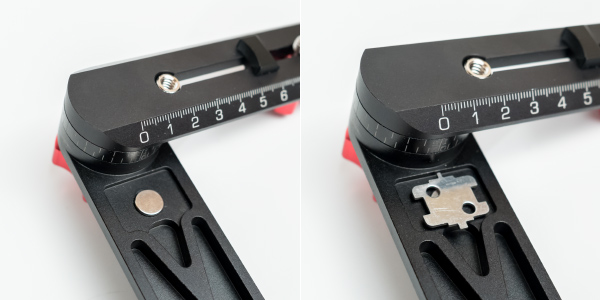
The magnet stuck on the vertical arm (on the internal side) enables to fasten the universal wrench that can be used as a screwdriver pretty well, because it is quite powerful. It can be used to clamp the screws of the marking wedges to set the nodal point.
4 - The upper stage - Counts with two improvements and one new feature The range of motion of the camera is now wider because the groove has been stretched. It will be particularly useful if your camera is a hybrid, light one.
Moreover and as you can see in the photo above, at about 1.5 cm of the marked reglet, you can see that some space has been saved for the reducer Kodak 3/4 vs 3/8, so that it stays within the reach of the hand at all times.
And finally, the red screw used to clamp the Xtension plate on the upper plate now shares the same thickness as the other clamping screws of the head and is thus more pleasant to manipulate for efficient clamping. The tilting axis is now better dimensioned and there's more space.
5 - The body plate Xtension - This camera plate can be placed on the sliding arm in two directions: "classically" and perpendicularly. Several points have been improved:
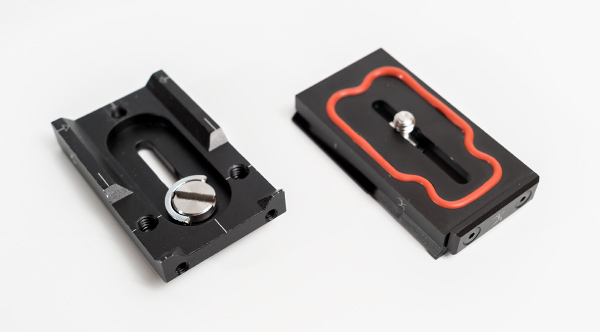
The two faces of the new plate XTension Bushman Panoramic and its rubber joint.
It now features an orange rubber joint in order to keep your camera from sliding and to avoid it being directly in contact with the metal of the plate. Well thought!
Other new feature: the small wedge in front of the XTension plate, here at the top right, that keeps the camera from tilting under its own weight, can now be placed on each side of the plate depending on your configuration.
The wedge that keeps the camera from tilting can be fastened on each side of the XTension. Another convenient improvement!
How to use the head Bushman Panoramic Kalahari V2
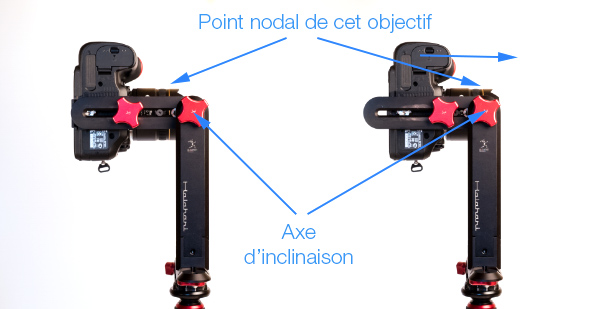
Like all the panoramic heads, the aim of the head Bushman Panoramic Kalahari V2 is to place the entrance pupil of your lens above the rotary axis of the head and in the tilting axis of the vertical arm to get perfect overlap zones, even for spherical photos. This manual panoramic head is one of the easiest ones to manipulate, especially in this version 2 that has been widely optimized according to the feedback given by the users of the V1. Let's see that in details now...
How to set the Kalahari V2 head at the entrance pupil
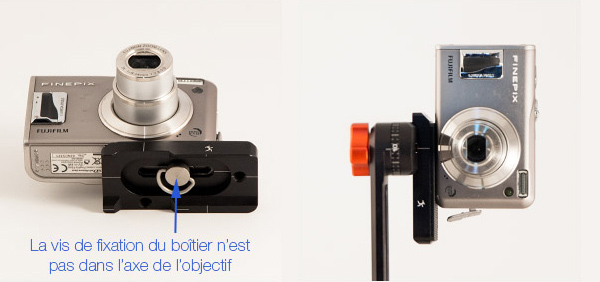
Let's start with an essential point: fastening the camera on the upper plate. Indeed, depending on whether the screw thread of the sole of the camera is into the axis of the lens or not, its fastening on the panoramic head won't be the same:
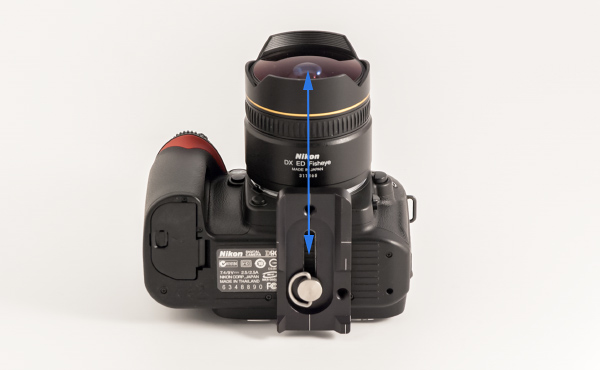
1 - The fastening of the camera is in the axis of the lens (most frequent case with reflex cameras): you just have to fasten the camera directly on the dedicated plate sold with the Kalahari head and everything will follow in the tilting axis. The entrance pupil will thus end up above the rotary axis AND also in the tilting axis. (image below).
With the Xtension plate, when you fasten a camera with a Kodak fastening screw in the axis of the lens, it is possible to place the camera in the tilting axis very naturally. The different possibilities of this plate are more interesting for camera bodies that wouldn't have a fastening screw in the axis of the lens.
2 - The fastening screw of the camera isn't in the axis of the lens (most frequent case with compact cameras and when you're mounting a grip on a reflex): then you absolutely need to use the Xtension plate in the extension of your camera like in the image below because its fastening screw can slide on about three centimeters. It is then easy to place the plate so that it ends up in the tilting axis once the camera mounted. (image below).
Note that the clamping system of the plate under the camera doesn't require a screwdriver nor coin. Very convenient!
3 - Move the optical center above the rotary axis of your head - Once the camera fastened on the upper plate (possibly the Xtension), itself on the tiltable arm, all you'll have to do first is center the lens just above the rotary axis of the notched base using the movement of the vertical arm on which the camera is fastened. In this example, all you would have to do is move the arm slightly on the left after unscrewing the clamping screw under the arm...
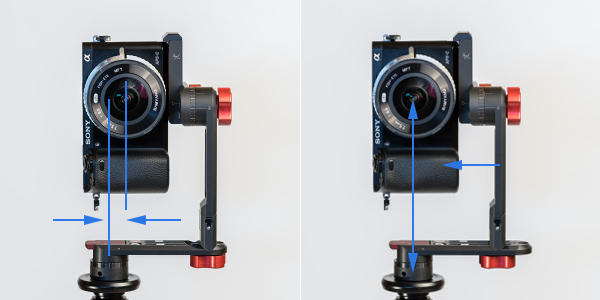
Bringing back the vertical arm of the Kalahari V2 (Please note: the photo is of a Sandbug head, which works the same way) towards the rotary center makes the optical center and the rotary axis converge.
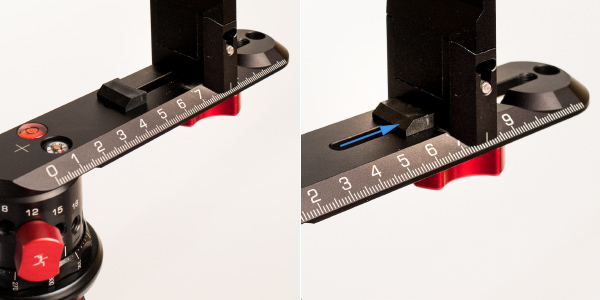
4 - How to set your camera on the depth axis - After that, you'll have to figure out the setting in depth depending on your lens. If it's a zoom lens, you'll have to find the settingS depending on which focals you mostly use. This can be done using the upper reglet, quite simply!
The entrance pupil is perfectly set on all axis hence in 3D on this panoramic head and for this lens. All you have to do now is write down the settings to be sure to remember them!
How to spot the settings of the head Bushman Panoramic Kalahari V2
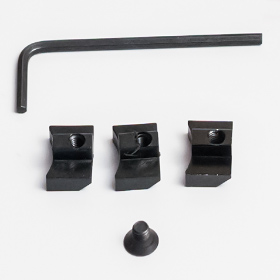 Once you've made the adjustments for your pair camera/lens and unlike the heads Manfrotto303SPH for instance, you don't have to bother taking notes to remember the settings (at least if you work with one lens only, thanks to the marks on the marked plate) because the head Kalahari V2 is sold with four little plastic wedges. They're screwed on the marked reglets with an Allen wrench, right against the vertical arm AND the Xtension plate supporting the camera once set. To place the vertical arm and the camera back in the right position when you take your equipment out of... your pocket (!), all you have to do is place them against these small plates. Unbeatable, even in the dark!
However you will have noted that you need an Allen wrench to fasten it all with a tiny screw... so better adjust your settings at home quietly! However and here again, it is consistent with the philosophy of the product because there's not much space either on or under the plates and what you want is a working head in the field that keeps its first quality: being compact. Could they have done it differently?
The small plate (now in plastic) comes against the vertical arm at the bottom and against the plate of the camera at the top, once it is set at the entrance pupil. It is very convenient if you need to remember your setting quickly in the field!
Piece of advice! Seemingly against all odds, you have to place the rounded side of the wedge and not the straight one against the base of the vertical arm, yet straight too, or you won't have access to the head of the screw from below because it will then be hidden by the big red screw.
Turning the vertical arm over to shoot the nadir
In the tutorial dedicated to virtual tours, I wrote an article about shooting the nadir with a tripod. To do so, you have to turn over the vertical arm on 180° in order to suspend the camera in the air by putting it as far as possible from the arms of the tripod. On the head Bushman Panoramic Kalahari V2, just like on the Gobi or V1, you just have to unscrew nearly completely the screw under the lower plate (image above on the right) holding the vertical arm to be able to flip it over on 180° (image below on the left). And no need for a screwdriver, the screw is big enough. It is very convenient.
This animated gif was made with the Gobi head which was the first Bushman Panoramic to feature this great design trick of flipping the vertical arm over!
 What about the robustness and stability of the head Kalahari V2? What about the robustness and stability of the head Kalahari V2?
In order to shoot the nadir without your tripod or panoramic head appearing in the photo, there's two things you need to do:
 turn the vertical arm over to suspend the camera in the air hence in overhang; turn the vertical arm over to suspend the camera in the air hence in overhang;
take it as far as possible from the rotary center in order to have as few as possible of the arms of the tripod in your field of vision.
But it can often be to the detriment of the stability of the whole thing if you want to use long exposure times, which is often the case in F11,0 indoors! So you need a head that is massive enough. It was the weakness of the Kalahari head V1, noticeably improved in this second version...

If you only use this head to shoot panoramas, then the stability will finally be completely satisfying, even with reflex cameras. In the end, the improved robustness of the V2 – only slightly heavier – emphasizes its weakness: the Yetti rotator has become slightly downsized. But let's not deny ourselves the pleasure of using this head, our complaints have been heard and this V2 version is really more stable than the V1, that had fallen in the "trap" of being too light just to be easy to carry around.
|
Conclusion and evaluation!
So, does this Kalahari V2 keep all its promises? Yes, it does: despite slightly emphasizing the relative weakness of the rotator Yetti on this noticeably improved and optimized panoramic head, this V2 now forms part of the best alternatives on the market of panoramic heads for reflex cameras.
Proving that slightly increasing the weight (+200 grs) enables this head to finally be stable without ever losing its pole position in the ranking of light heads. This small miracle I've been praying for has been granted!
And that is without counting the different optimizations that make the use of this head even more pleasant thanks to many little improvements. The Kalahari V2 finally reaches the level of finishing and convenience I've been expecting, knowing the ability of its manufacturer to innovate. Cheers and many thanks!
Evaluation
| |
Bushman Panoramic
Kalahari V2 |
|
|
|
Manufacturing quality |
|
|
| |
Robustness/Stability |
 | |  |
|
| |
Size once mounted |
|
in parts |
 |
|
| |
Setting the base |
|
|
| |
Value for money |
|
|
| |
I LOVE... |
- This head is very clever: many original ideas to make it pleasant to use and improve the V1,
- A lot more stable than version V1,
- very compact and easy to carry around (striking quality),
- Weight despite the increase (+200 grs),
- Size mounted or folded,
- The vertical arm is very easy to turn over.
|
|
| |
I REGRET... |
- The new stability of version 2 emphasizes the slight undersize of the rotator Yetti,
- The upper plate is perfect to place the nodal point of fat lenses, a bit less for smaller ones,
- Very few things finally...
|
|
| |
OVERALL RATING |
9,0 / 10 |
|
|
My opinion: Very well-thought and clever, this real improvement of version V1 is still as perfectly manufactured. Despite its increased weight, it remains the lightest in its category (imagine V1 – too light!) and the improvement of stability is obvious. However, this head could be even more stable with a heavier rotator because the Yetti reaches its limits here. This head can now be considered universal though because it fixes the main defect of V1 and can now handle effortlessly any camera body with its lens as long as they're not too heavy... Excellent product.
Shop the Kalahari V2

| |
|
Shop |
Price |
|
| |
|
|
€395.00 * |
|
| |
|
* 5% exclusive discount for my visitors with this coupon : BPAF5 |
| |
|
|
|
|
|