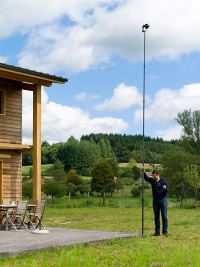
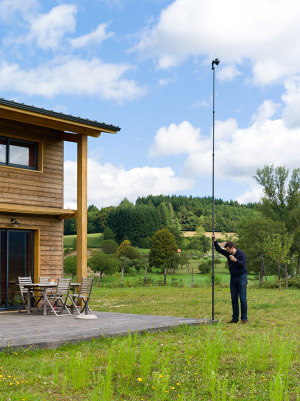
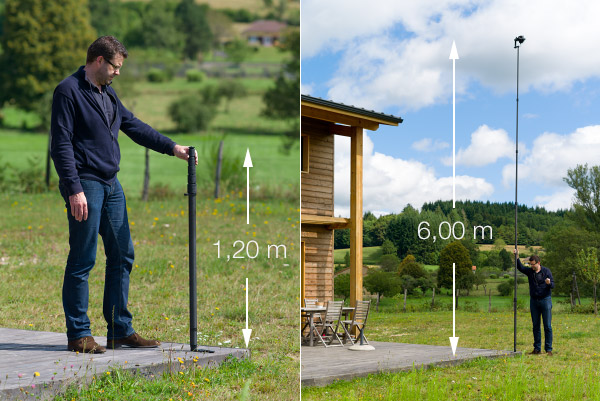
The Nodal Ninja telescopic pole series 2 complete is a kind of giant monopod enabling to take photos or making aerial panoramas up to 6 meters high in its full version. It is thus a very good complementary solution to a classic tripod that can't go way past 2m and to a balloon or a drone, that can go a lot higher of course, but then we're not in the same price range nor easiness to use...
The Nodal Ninja pole series 2 complete is a telescopic pole made of two parts - Series 2 inferior and superior - that once added in a version said full allow to shoot photos from an exclusive point of view since six meters high! We can thus say that it's a super monopod.
Four things are striking when you have it in your hands:
A very good manufacturing quality (as always with Nodal Ninja),
An impressive height,
And only 1.2 m (45.7") when folded,
Really easy to manipulate despite the height,
The weight: less than 2 kilos (4.4lbs) !
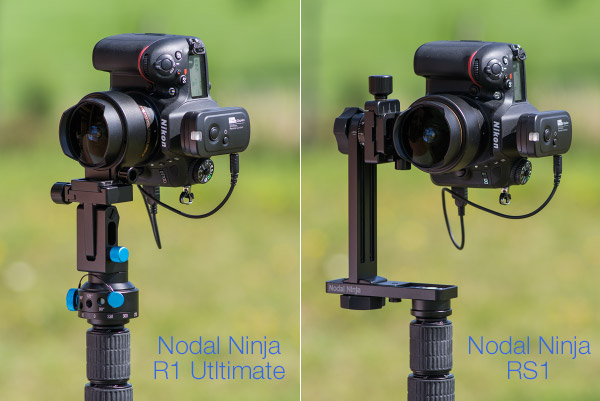
To support the camera, up there, it's possible to place several panoramic heads, preferably not too heavy nor bulky because the technical data of the pole specifies that it can't handle more than 3 kilos of photo equipment. A Nodal Ninja 3 Mk3 could still work but it will be better to place a specific head like the R1 Ultimate, the R10 Ultimate or even the very convenient RS1 and RS 2, still by Nodal Ninja...
Very important safety remarks
1 -The pole is made of carbon, very conducting material. So be careful on stormy days but above all, mind cables and power lines because the pole P-2 in its full version is 6 meters high!
2 - The pole, completely unfolded, can't be tied to a tripod without risks. The shift is very important and mind camera falls from 6 m.
Nodal Ninja pole series 2 complete presentation
The Nodal Ninja PS-2 pole is thus a telescopic pole sold in two separate parts that can of course be added in order to improve the maximum height accessible. The inferior P-2 pole only allows to achieve 2,75 m and the superior pole, 3.15m; both together achieve 5.95m (233" / 19ft5") thanks to six sections of tripod! This pole is in carbon, as expected nowadays, in order to improve its rigidity for a reasonable weight of two 2 Kg only. Sold alone, the full P-2 pole needs accessories and when it's well-accessorized, its price is a little bit over $750. For the price you'll get:
The full P-2 pole (Series 2 and Series 1); the high base (Pole adaptator) to fix an RS1 or RS2 head - not necessary with an R1 or NN3 head; the bubble level; a rotator (6, 8 or 10 clicks stop); the foot base; the travel bag.
Buy on... Support this site, buy this advice from affiliate retaillers !
Nodal Ninja pole series 2
Price Without VAT
Shop
600.55 € *
Dimensions and solidity
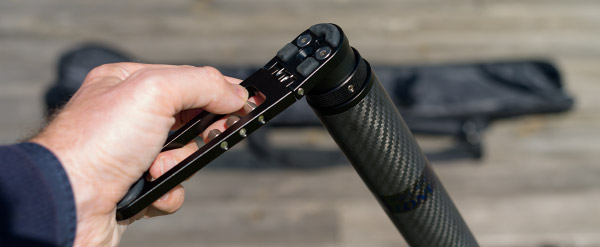
The full pole is divided into six sections of about one meter each. The bigger one has a diameter of 1.71" so this pole inspires confidence. The weight remains reasonable, just below 4.40 lbs naked so just above 4.40 lbs when ready to use. The manipulation of the clips is very pleasant and easy (on a quarter turn).
Piece of advice! Once completely unfolded, this pole completely lacks rigidity whatsoever (that the price to pay for its light weight). Practically speaking, it's not annoying at all when the pole is held completely vertical (good reason to install the bubble level) but if you tilt the pole slightly or if it's a little windy, you'll soon feel that it can bend, and with 2.20 lbs of photo equipment at the end of a 19ft7" perch, you'd better hold it tight. For that reason, I don't see how to place this pole directly on a tripod with the optional accessory. I don't recommend it. According to me, it would need a system of shrouds. It's not a toy and its use requires more attention than a simple photo tripod.
And the manufacturing quality?
As always with Nodal Ninja, the manufacturing quality is excellent. This equipment is very pleasant to use and to manipulate. The carbon seems well-made and the mechanical parts are precise, soft and perfectly adjusted. The value for money becomes excellent!
"Almost" essential accessories!
The pole, sold alone, must be equipped with a few accessories, essential from my point of view, since they really are or they change the user experience so much by making it so much easier. Here's the list:
(1)- A panoramic head + specific fastening base - It's possible to mount numerous panoramic heads or photo heads on the pole since the screw is a standard one, a 3/8". However, as we'll see later, "natural" panoramic heads are:
Nodal Ninja R1 and R10 Ultimate (over there); Nodal Ninja RS1 and RS 2 (the most "natural"); Possibly Nodal Ninja 3 Mk3 (excellent compromise).
The head must preferably be compact in order to avoid overhangs that would unbalance the pole and its 6 meters of leverage. 1 Kg of equipment at the end of 6m can be very sensible if the pole starts tilting...
(2)- the pole in three or six tubes - The pole, here in its full 6 meters version hence the P-2 upper and lower mounted together.
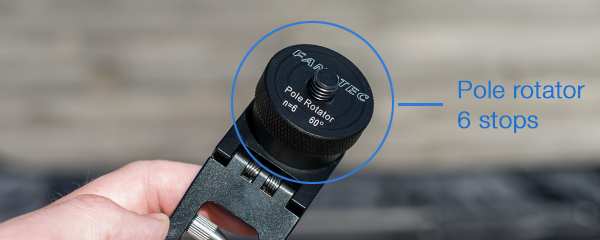
(3)- The pole rotator - This little block is naturally screwed between the foot plate and the pole base. This way, rotating the pole of the number of degrees you need between two consecutive photos (depends on the lens used and on the size of your sensor hence of the field of view photographed) becomes very easy.
Buy on... Support this site, buy this advice from affiliate retaillers !
Pole rotator 6 stops
Price
Seller
$49.95
57.75 € *
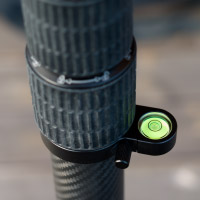
(4)- The bubble level - Almost essential to keep the pole vertical hence almost all the time at the nodal point of the lens. This bubble level is specific and goes on the first and bigger tube of the pole. With this accessory, it's almost child play to realize a virtual tour at a height of six meters, without a real tripod, while remaining close to the entrance pupil thus with photos that will stitch easily.
Buy on... Support this site, buy this advice from affiliate retaillers !
Level for Series 1 or 2
Price with VAT
Shop
$29.95
12.05 € *
(5)- The pole foot plate (photo below) - It allows to put your foot on it in order to give the pole more stability. It can be very useful on a slippery surface where the pole could slide because the base of the rotator is metallic, thus slippery. The underside of the base comes with rubber pads or points, depending on the nature of the floor. Very convenient and efficient.
Buy on... Support this site, buy this advice from affiliate retaillers !
Pole foot plate
Price with VAT
Shop
$49.95
57.75 € *
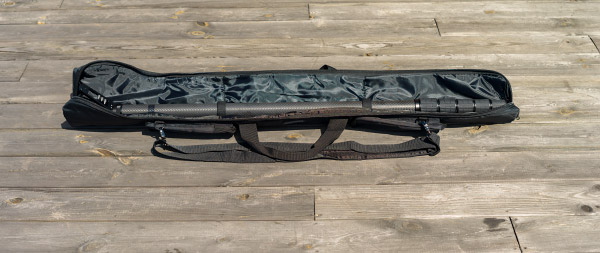
Travel bag (below) - As you could have guessed by its name, it allows to carry the pole easily and protects it. Please note that it's dimensioned to leave space for the foot base.
Buy on... Support this site, buy this advice from affiliate retaillers !
Case
Price
Shop
$59.95
60.50 € *
Use of the pole Full Nodal Ninja P-2
Thanks to its design, this pole Nodal Ninja P-2 not only enables to shoot photos from a height of 6 meters but also and maybe above all to shoot panoramas or virtual tours. For that, a number of settings must be respected and the equipment must be installed in an appropriate way. Unlike photos taken at the height of a man, five essential problems will need to be solved:
Place the camera at the entrance pupil while avoiding important overhangs; Release the shutter remotely; Hold the pole as straight and stable as possible; Rotate the pole of the number of degrees needed knowing that the panoramic head is up there! Shoot zenith and nadir.
1 - Place the camera at the nodal point at a height of six meters! What panoramic heads?
Important ! Let's start with an essential point, the fastening of the body at the top of a pole while it's primordial to avoid important overhangs, thus unbalance of the pole:
To shoot photos that will stitch correctly, it's important, above all if your foreground is close, to place the nodal point of the lens above the rotary axis of the panoramic head... so in the axis of the pole. To do that, you know you have to use preferably a quite special head: a panoramic head. There are multiple models, more or less bulky and heavy. Because of the overhang that must be avoided as much as possible, manufacturers created specific models, very compact and squat:
Nodal Ninja R1 and R10 Ultimate; Nodal Ninja RS1 and RS2; Nodal Ninja 3 Starter.
I even prefer them to compact models like the Nodal Ninja 3.
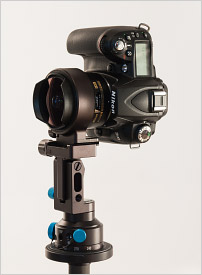
Piece of advice!The models R1 or R10 Ultimate Nodal Ninja (the R10 doesn't have a rotator, which is useless here because how would you rotate it at a height of 6 meters?!) can be used only with Fisheye lenses because they're circled by a clip as you can see in the photo above on the left. The model RS1 is more versatile and is my favorite, even with a Fisheye lens, because it's more convenient to direct the camera towards the zenith or the nadir, especially with the system of remote release installed. The models RS1 or RS2 (longer stages) are thus by far my favorites at the top of a pole. However, for its versatility, I also like the Nodal Ninja 3 Startervery much. It's still completely usable at the top of a pole and so much more convenient on a tripod on firm ground!
Tip!If you choose the model of head RS1 or RS2, you need to buy a little adapter called "adapting pole" that will come between the head and the pole.
The only way to be sure to stay close to the entrance pupil of the lens is to hold the pole as straight as possible. To do so, the easiest solution is to use the bubble level adapted to the section of your version (superior or inferior). It is then at a height of about 90 cm so just before your eyes. Since it's of course a circular level, it's easy enough to maintain the pole straight and according to my trials, the straighter the pole and the easier and above all better the stitching, without big interventions in the panorama software. As often in panoramic photography, it's just about making things right when shooting in order to save time later...
3 - Rotation of the pole...
As always in panoramic photography by image stitching, it it necessary to shoot your photos with enough overlap for the panorama software to find common pixels and to stitch without visible joins. For that you just have to rotate the pole little by little. There's still an "ideal" number of photos though, meaning the "right" number of photos allowing to have enough overlap without multiplying the shots uselessly. With a full frame Fisheye lens, 6 photos shot vertically are enough, for instance. Taking too many photos isn't a problem for stitching but it's useless and you don't always have the time to shoot "too many" photos.
For that reason, Nodal Ninja invented a rotator that has the good idea to be fixed at the bottom of the pole, between the foot base and the pole. There are at least three different rotators, with clicks stop every 60° (6 stops), 45° (8 stops) and 36° (10 stops). For the full frame Fisheye lens, you need to use the 6 stops.It is thus a completely essential accessory!
4 - Release the shutter remotely
To do that you need a remote control, as you would have guessed! Only all of them are not adapted for that distance. The wired ones, on such lengths, won't be convenient. I don't recommend them. There are still wireless remote controls and there are three categories: infrared, radio and Wifi.
A - Infrared remote control seldom go over 4m and even less in the sun. Crippling despite their small prices!
B - Radio remote controls are thus our allies even though they're often more expensive (between 15 and 45 euros averagely). They can go up to 100 m, whatever the weather, especially when they're using the frequency of 2,4 Ghz.
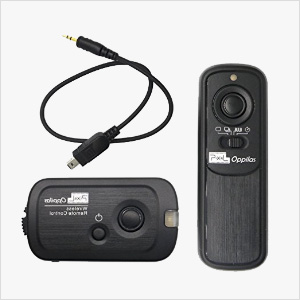
Piece of advice! I tried the model Aputure Pro Coworker Remote that I didn't find very reliable and the model Pixel RW-221 that I very much like. It's better finished, doesn't need special expensive batteries and "really" works in the sun. Phottix models also have a good reputation but they're noticeably more expensive.
Pixel RW-221
Wireless Remote
$31.90
Buy on... Support this site, buy this advice from affiliate retaillers !
This radio remote control has a range of 100m and can work on 16 channels.
Caution: the connecting cable depends on your camera body.
Radio up to 100m;
AAA batteries;
Several shooting modes;
For Canon and Nikon digital cameras.
The reliability seems good and the manufacturing quality doesn't look too Made in China. (To check later though).
C - Wifi remote controls add two functionalities, not absolutely essential for our use but that make them more versatile: the almost complete control of the shooting via your smartphone and of course a video live view; you see what you're shooting!
Piece of advice! The operating mode during the shooting - fixed focusing with a quite shut diaphragm and the exposure in manual mode make this functionality quite uninteresting for panorama shooting at the end of a pole however, for simple shootings, it's unbeatable.
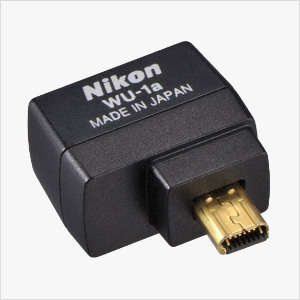
Wifi WU-1a Nikon
$39.95
Buy on... Support this site, buy this advice from affiliate retaillers !
Wifi module that can be plugged in Nikon D3200, D5300, D7200 and allows you to control your body from an app on your smartphone.
Caution: the app is compatible Android and iOS.
Wifi;
iOS and Android smartphones;
Cheap!
Management of photos even in RAW format on your phone.
The reliability seems good and the manufacturing quality doesn't look too Made in China. (To check again later though).
If you're thinking of buying this pole to shoot virtual tours, you'll have to shoot the zenith and the nadir for the immersive experience to be complete. For that and after numerous trials, I prefer to take the pole down, direct the camera towards the zenith then lift the pole again before taking the photo. You need a certain amount of time to do that but it ensures even easier stitchings of the zenith. (photo below)
Head Nodal Ninja RS1 directed towards the zenith and the nadir - In that case, I take a second photo by rotating the arm of 180°.
For the nadir, I tried to direct the camera towards the floor after taking the pole down then to lift it again before taking the photo but, as with a "regular" tripod, I prefer taking the pole down, rotating the vertical arm of 180° with a nadir adaptor then lift the tripod by slightly shifting it then shoot.
Conclusion and rating!
Product recently appeared on the market of aerial photo, it allows, quite simply and at a reasonable price, to shoot photos from another point of view, meaning, at more than six meters of distance form the floor. Spectacular effects assured!
In this category, and as always with Nodal Ninja, the product is very well made, designed hence easy to use. I own one...
Ratings
Nodal Ninja pole Series 2
Manufacturing quality
Solidity/stability
Bulk when mounted
Bulk when disassembled
Setting of the base
Value for money
PROS...
Quality of design and manufacture
Overall weight
Height achieved
Very easy to use with a bubble level (essential) and the radio remote control (also essential of course!)
Very transportable
CONS...
Still 1.20m once folded!
At almost 6m, you don't want the weather to be too windy because it rocks
Maybe a slight lack of rigidity but that would be detrimental to the weight, very reasonable here.
OVERALL RATING
10 / 10
My opinion: Very good product! Not only does this pole allow to shoot photos or virtual tours "different" but moreover, this equipment is very pleasant to use and well-designed. Sure, $800 / 700 € can look like a large sum of money but it's an excellent investment and a lens to also make "different" photos is often more expensive. It's a question of relativity!
Buy the Nodal Ninja pole Series 2 complete
Retailers
Price (€)
600.55 € *
Pratical Guide N°1 : The Nodal Point
$12.90 USD
My practical guides in e-books - N° 1!
"Find the nodal point or no parallax point accurately in less than an hour"... whether you are photographing a simple panorama or a 360° photo - PDF of 100 pages -More information...
This website is almost entirely free and yet almost free of ads. Why? Because they look so bad! It is lucrative though, and enables many websites to keep on living. So I asked myself: what can I do? To keep on developing this website, I'm going to need a regular income just like everyone else. How can I keep on giving access to free information like I've been doing since April 2002?
And I finally found the answer: affiliation. Every time you click on a link from this site to one of my partners' shops, they know you've been referred by me and give me a small percentage on your purchase, be it something I recommend on my website or anything else. Remember to use my links when you shop on these sites! It doesn't cost you anything and it's a win-win deal – for me, them, and you!


 The
The  Very important safety remarks
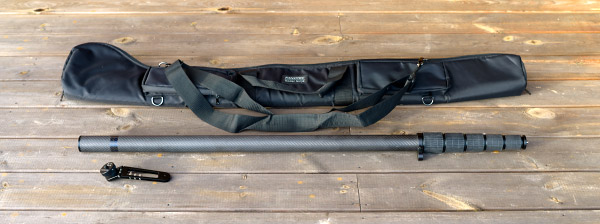
 Piece of advice!
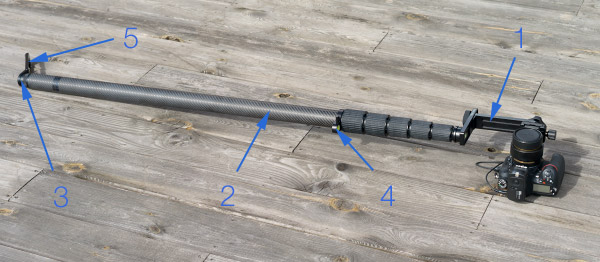
 (1)
(1)
 (4)
(4)
 Tip!
Tip!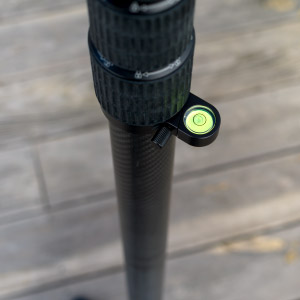 The only way to be sure to stay close to the entrance pupil of the lens is to hold the pole as straight as possible. To do so, the easiest solution is to use the bubble level adapted to the section of your version (superior or inferior). It is then at a height of about 90 cm so just before your eyes. Since it's of course a circular level, it's easy enough to maintain the pole straight and according to my trials, the straighter the pole and the easier and above all better the stitching, without big interventions in the panorama software. As often in panoramic photography, it's just about making things right when shooting in order to save time later...
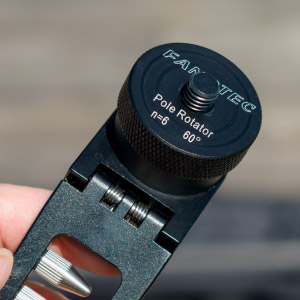 As always in panoramic photography by image stitching, it it necessary to shoot your photos with enough overlap for the panorama software to find common pixels and to stitch without visible joins. For that you just have to rotate the pole little by little. There's still an "ideal" number of photos though, meaning the "right" number of photos allowing to have enough overlap without multiplying the shots uselessly. With a full frame Fisheye lens, 6 photos shot vertically are enough, for instance. Taking too many photos isn't a problem for stitching but it's useless and you don't always have the time to shoot "too many" photos.