To take pansorama photos, we need to rotate our camera. You just don't want to mess it up if you want a good stitching quality. You don't want to "stupidly" put your camera on a classic head but rotate it around an "ideal" rotation point that is located somewhere in the lens and not below the camera. When you rotate your camera around this point, the stitching is often perfect or very good at the first try, without stitching artefacts. It's the most specific vocabulary word of panoramic photography but also the most famous and the most important.
The key points if you're a beginner...
Here are the key points to remember about the nodal point. The rest of this page is for those who want to learn more.
First of all, a little bit of vocabulary! To talk about the "ideal" rotation point, we often use the expression nodal point or no-paralax point. In fact, for opticians, you need to place your camera at the entrance pupil of its lens and not at the nodal point. In a lens, there is indeed a nodal point and an entrance pupil (which are physically at two different places in the lens) but it's around the entrance pupil you need to rotate your camera and not above the already famous nodal point. But historically, we started by talking about the nodal point and it's still very present in minds. Well, it's no big issue... and in the facts, whether you talk about nodal point or entrance pupil, it's the ideal rotation point and that's the most important.
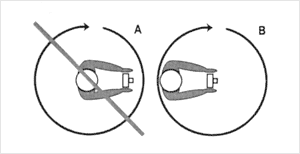
So whatever the name you want to use, it's the ideal rotation point to rotate your camera if you want perfect stitches. (There's another condition though: lenses not too distorted). When you don't rotate your camera around this famous point, here is what happens... (image over here). You'll have artefacts along overlap zones between two consecutive photos, especially visible in city landscapes where regular geometric lines are the norm.
The nodal point is essential only if you're using short or very short focals. This is not of much importance, and even of no importance at all with long focals because:
It is fundamental if you have at least a foreground and a background to shoot. In these conditions, the foreground can move in relation to the background and create defects of stitching. When shooting with a teleobjective lens, it is of course less important.
In panoramic photography by stitching, it's important that two consecutive images are shot from the same point of view to overlap well when stitching. From this point of view, perspective doesn't change. The foreground and background will overlap exactly in the same way, whatever the direction of the camera, from the left to the right (image here). Well if you rotate your camera "normally" around you to cover a panorama, you're getting pretty far from the ideal rotation point.
It's usual, to talk about this "famous" point, to talk about the nodal point. It's the common term, but as often with complex technical subjects like optics, wrong in the case of photography by stitching. The camera mustn't rotate around one of the two nodal points but around another point: the entrance pupil of the lens. (Thanks to Yves Colombe and Emmanuel Bigler for this precision and their explanations). Now we need to acknowledge the fact that the term of nodal point is still very much used and since we're talking about the same thing, it's not really a problem.
In any case, you mostly want to remember that there's an ideal rotation point in the lens that depends on its focal - focals if it's a zoom lens - around which you need to rotate the camera to realize perfect overlaps - if the lens doesn't show too many complex distortions to correct - and this furthermore that there's a close foreground. But be reassured, no need for complex calculations to find it. It's even really simple because it's done with the LCD screen or the viewfinder of the camera if it's a reflex as we'll see in the page dedicated to the entrance pupil! But let's now see what it's all about...
Buy and download my 100-pages PDF
"Find the nodal point or no parallax point accurately in less than an hour"
Fifteen years of experience shared through my unpublished detailed step-by-step advice for beginners or advanced photographers, in a 100-pages PDF in its latest version v2.2 of February 12, 2019 - More information...
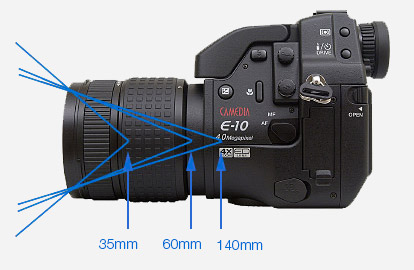
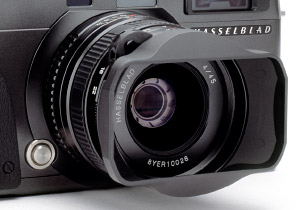
The nodal point represents in fact the point of view of the lens (its eye). It's in the plan of the diaphragm/iris seen from the front face of the lens - photos over here - through the front lens since according to the official definition, this nodal point (that should normally be called entrance pupil) is "the image of the opening diaphragm seen from the subject". When you're zooming in, we clearly see this plan move inside the latter, by the way. This point is not located at the same point, depending on the focal used in a zoom lens. There are thus several "nodal points" in a zoom lens. The search for three or four should be enough though!
The rotary axis of the head should then be located at the vertical of this nodal point. By a system of adapted perpendicular stages, you'll have to place the camera on the head for its rotary axis and the nodal point to overlap. We'll now see this in details.
Note! I show you how to find the nodal point (or more accurately the entrance pupil) with each panoramic head reviewed on this site - Category software and equipment reviews
Remarks about the nodal point and the entrance pupil
In a lens, there are two nodal points and two pupils (entrance and exit). The entrance nodal point is thus different from the entrance pupil but it's around the entrance pupil you have to rotate the camera with the stitching method to get perfect overlaps.
When we're talking about a camera with a rotating lens, this one has to rotate around the entrance nodal point.
When it's about panoramic photography by stitching, you just need to rotate the camera around the entrance pupil and not the nodal point, that can by the way be really far depending on the lenses. Unfortunately, this term is not quite about to disappear from the language of panoramic photographers.
The "nodal points" or more accurately the entrance pupils on a zoom lens:
Three different nodal points (entrance pupils) in the zoom lens of my first digital camera. Note though that the longer the focal, the farer the nodal point; it's not always the case on more modern lenses, especially with wide-angle zoom lenses with retrofocus optical formulas.
Note that the nodal point gets far from the front lens with the focal. But with certain wide angle zoom lenses of a complex optical formula like the 28-70/2,8 Nikkor for instance, the nodal point is very close to the front lens at 28 mm, gets farer at 50 mm and closer again at 70 mm !!!
Why?
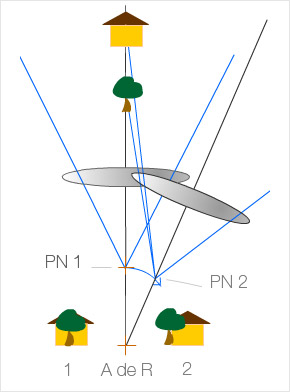
What happens when the nodal point (thus the entrance pupil or No parallax Point) of the lens and the rotary axis of the head overlap or not? What happens when you set your camera on a classic head?
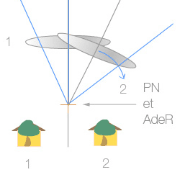
The point of view hence the perspective (parallax) change as shown in the pictures below.
PN 1 and 2 = Nodal Point 1 and 2 - AdeR = Axis of rotation
In the example on the left, the nodal point - PN - of the lens doesn't overlap the rotary axis - AdeR - of the head nor the point where the camera is set. It's like the photographer was moved to the right. There's a gap between the foreground and the background. Indeed, when we're moving above the ground, we can observe a progressive gap of the foregrounds regarding the backgrounds. In the example on the right, the nodal point of the lens and the rotary axis of the head overlap perfectly and the fore and backgrounds don't present a gap. The stitching will be perfect!
The proof by the example
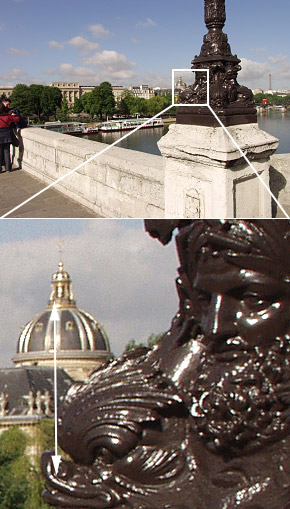
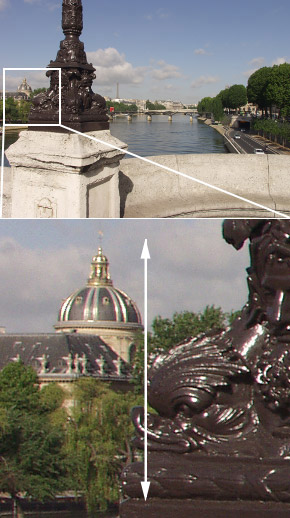
Here is the illustration of my words in a picture of example. I took a serial of photos from the famous Pont Neuf in Paris. The photos will be stitched with the panorama software Autopano Giga.
1 - The camera rotates out of the nodal point of the lens:
Let's place our camera on the "classic" head without trying to set it "correctly", so it's the classic case! It would have been the same taken in hand.
In these two photos we want to stitch to make a panorama, we just made sure to keep an overlap zone between the two photos in order to have a stitching zone.
We can clearly see a gap between the streetlamp (foreground) and the dome of the Institut de France (in the distance) when we rotated the camera (photo 2) without taking into account the way we set it on the head unless we even shot with the camera in the hand.
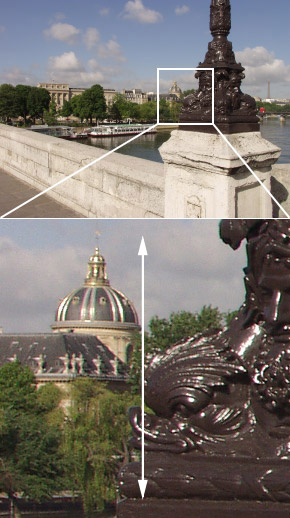
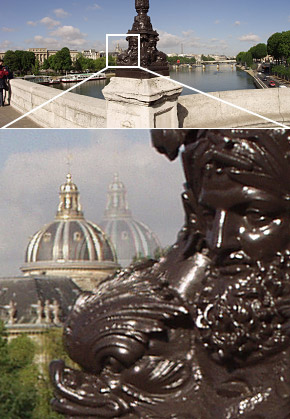
2 - The nodal point of the lens is now set just above the rotary axis of the head (on a "special" head called panoramic head) :
We now place the nodal point of the lens just above the rotary axis of its special head, a panoramic head, and the alignment doesn't move!
We can see very clearly that the fore and the background don't move at all anymore. The dome and the street lamp are also aligned on the two photos while we did rotate the camera. The panoramic head is perfectly set to make stitching easy. We placed the nodal point of this lens just above the rotary axis.
With this image of illustration, we can simply note that depending on the way we set our camera on its head, when we rotate it, we can see or not a gap of the foreground in relation to the background. Let's now take a look at the quality of the stitching realized from these four photos...
After stitching...
The two serials of two images have been stitched with the panoramic panorama software Autopano Giga. It's one of the many image panorama software on the market, but one of the most powerful if not the most powerful in my opinion (read my review).
The stitching of two photos taken carelessly...
The stitching of two photos taken at the nodal point...
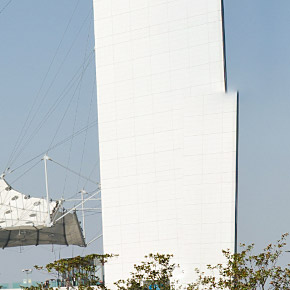
Here's typically the type of stitching defects we may find with certain panorama software, in general less powerful because the most powerful among them can "erase" this type of stitching artefact (in Autopano Giga, it's a linear stitching, for the sake of education!). However, when the camera isn't set at the nodal point and we're shooting a city landscape with numerous geometric lines as below, even the best panorama software can't do miracles!
Here are the stitching defects we can see on the final image, even stitched with the best software, when we didn't take time to set the camera correctly hence at the nodal point.
When the software stitches two images, it looks for overlap zones common to the two images. When the images are identical, the stitching is of high quality and the overlap zone completely invisible. However, when the two images haven't been taken at the ideal rotation point, what happens next is unavoidable: either the software aligns the foreground of the two photos or either the background. It picked the street lamp in this case. The final image possesses stitching artefacts in the distance that we'll have to eliminate with Photoshop, for example, using the layers and layer masks.
The result is speaking for itself. If you try with other panorama software you'll see that they make the choice of a neat foreground but don't manage very well to align the background, in numerous cases. I tried several pieces of software and if the best now manage to "erase" the splitting by masking tricks, they can't do anything for the photo of the Défense shot with the camera in-hand. Anyway an editing job, more or less important, is thus to be expected.
Importance of the ideal rotation point?
I'm often asked if it's compulsory to place one's camera at the nodal point. The answer is clearly NO, not compulsory! To me, the most important remains to take photos, technically good or not, and not to focus on one or another particular technical point and thus not to take the photo. Furthermore, it depends on the situation. Let's see this now...
However, I have to make several remarks...
I don't see how we could realize a serial of good photos without being demanding on the method and without spending time on it... Of course I sometimes happen to shoot one photo in far from ideal technical conditions because I prefer taking it anyway. But I also notice that if I show it in the middle of a serial, it won't go unnoticed and I'll be asked why this one is less good! The same who, by the way, would have explained how the nodal point is not that important...!
If you work with your camera in-hand in the country where there are few graphic elements, you'll probably get a good stitching - IF your lens doesn't have complex distortions, hence difficult to stitch, as shown in the different photos of illustration above.
If you're shooting a very graphic environment as you can find in a city, you'll probably experience big stitching difficulties.
I'll stress again, but I already explained why above, that the less you shoot close subjects, hence beautiful and distant skylines, the less the problem of the nodal point (of the entrance pupil) is raised. I still think that the same method, meaning in-hand or not at the nodal point, would be disastrous if we shot a close subject and distant at the same time. The position above the nodal point is critical above all in this case because a small difference of perspective will then be visible.
If you want to make a distant landscape panorama with your camera in-hand, I thus recommend to rotate around the camera rather than to stay at the same place and rotate the camera around you. Your panorama software will be grateful! - Illustration above -.
Last remark
It seems that if you don't try to set your camera at the nodal point, certain software like PTGui or Autopano Giga stitch better the images in the central part of the final image, rejecting quite intelligently the unavoidable defects at the edges. I said a little better! Nothing seems to replace a good setting of the camera to make a panorama by stitching. Even very clever, these pieces of software can't always perform miracles! When I'm shown images that are very well stitched with these pieces of software, I notice they're always distant panoramas without foreground...
In the second page dedicated to the entrance pupil - still often called nodal point - we'll see concretely how to find it - Find the entrance pupil
Buy and download my 100-pages PDF
"Find the nodal point or no parallax point accurately in less than an hour"
Fifteen years of experience shared through my unpublished detailed step-by-step advice for beginners or advanced photographers, in a 100-pages PDF in its latest version v2.2 of February 12, 2019 - More information...
"Find the nodal point or no parallax point accurately in less than an hour"... whether you are photographing a simple panorama or a 360° photo - PDF of 100 pages -More information...
This website is almost entirely free and yet almost free of ads. Why? Because they look so bad! It is lucrative though, and enables many websites to keep on living. So I asked myself: what can I do? To keep on developing this website, I'm going to need a regular income just like everyone else. How can I keep on giving access to free information like I've been doing since April 2002?
And I finally found the answer: affiliation. Every time you click on a link from this site to one of my partners' shops, they know you've been referred by me and give me a small percentage on your purchase, be it something I recommend on my website or anything else. Remember to use my links when you shop on these sites! It doesn't cost you anything and it's a win-win deal – for me, them, and you!


 To take pansorama photos, we need to rotate our camera. You just don't want to mess it up if you want a good stitching quality. You don't want to "stupidly" put your camera on a classic head but rotate it around an "ideal" rotation point that is located somewhere in the lens and not below the camera. When you rotate your camera around this point, the stitching is often perfect or very good at the first try, without stitching artefacts. It's the most specific vocabulary word of panoramic photography but also the most famous and the most important.
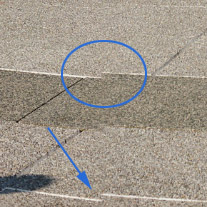
 Note!
Note!