The Nodal Ninja Ultimate M1 panoramic head must be categorized with spherical heads for heavy and bulky bodies. It easily supports a camera like the EOS 1DX Mark II or even a Pentax 645Z. It stands out thanks to a great manufacturing quality, a perfect universality and a great smoothness of functioning.
The Nodal Ninja Ultimate M1 panoramic head is a head called spherical. It can be completely disassembled in four parts which makes it choice equipment for transportation and storage in a photo bag. This is no detail! as robust as the Cambo CLH-500 it is part of my favorite duo on this criteria. It thus handles very well heavy equipment like the Canon 1DX Mark II, a Nikon D5 or even a Hasselblad H6D or Pentax 645Z.
Four things are striking when you have it in your hands:
A very good manufacturing quality (Arca standards),
A great stability,
Great modularity and universality,
And a great smoothness of use.
As with all spherical panoramic heads, it is possible to set the nodal point of the lens used in absolutely any direction. It is thus a very versatile head and absolutely universal because the vertical arm can be turned over to shoot the nadir. Doesn't it look like the perfect spherical head?
Nodal Ninja Ultimate M1or M2 ?
Nodal Ninja Ultimate M spherical heads are declined in two versions: M1, described in this page and M2, reviewed in this other page, more dedicated to gigapixel shooting.
The two big differences, literally and figuratively, are the bottom rotator: RD-16 is replaced by a RD-8-II much wider with much tighter clicks stop in order to shoot more photos with a teleobjective lens.
And also the rotator of the vertical arm. It is wider but above all, not stop.
Also note that RD8-II is noticeably shorter and heavier (450 grs instead of 400 grs) and that the influence on sensibility, without being inexistant, isn't really sensible.
Nodal Ninja Ultimate M1 panoramic head presentation
The Nodal Ninja Ultimate M1 and its M2 version panoramic head is thus a spherical head. It comes with a plate of setting in depth that can tilt on a vertical arm to shoot cylinders or multirange panoramas. And since the arm can be turned over easily, it becomes, with the Manfrotto 303 SPH head, the ideal head to shoot a complete sphere in order to realize a virtual tour, even with heavy equipment.
The rails are of pretty long dimensions which will facilitate setting it up even if certain settings might be a bit bold and will bring important overhang to the camera but this head is really more robust than the average and will deal with it effortlessly. If this head can't handle your equipment, who will?
Technical specifications
Nodal Ninja
Ultimate M1-L
Average price: $500 /€530
Quick fastening
Possible
Supported weight
10 Kg / 22 lb
Height of use
25 cm / 10 inches
Rails movements
On 16 cm upwards and 16 cm downwards
Bubble level
Yes
Dismountable
Yes - in four parts - Head, one plate and vertical arm.
It is made of four distinct and dismountable parts. In addition to classic horizontal and vertical plates, you can also dismount the vertical arm (that can thus be turned over to shoot the nadir) and that supports the tilting axis as well as the classic rotator, the famous RD-16. Please note that the rotator has 16 clicks stop which is a record and makes this head especially universal.
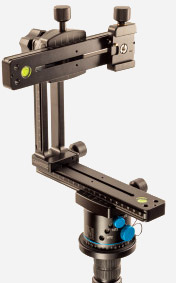
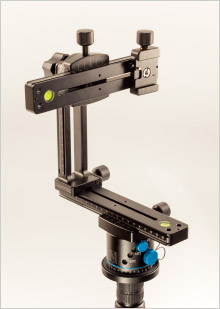
Once mounted, it is quite impressive - in standards of "serious" spherical heads like the Cambo CLH-500 and the Manfrotto 303 SPH -, but becomes easy to store in a photo bag once dismounted because each piece takes minimum space.
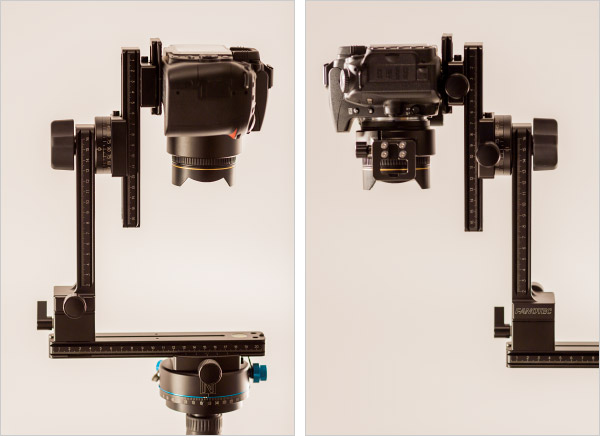
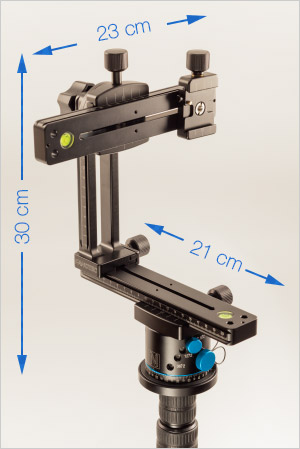
Once the camera set, it is about 25 cm (10 in) higher than the head. The height alone being 30 cm (12 in) from the base of the tripod. As you can see in the image here, its dimensions in width are rather important which enables to fasten a bulky camera like a Canon 1DX Mark II or a Nikon D5.
You can clearly see also that the vertical arm can be disassembled and can thus turn over. Very convenient to shoot the nadir.
Caution, the vertical arm isn't high enough sometimes and your body can bump into the lower rail when you shoot the zenith. Then, please note that the thickness of the rail inspires robustness, and I could indeed remark it in real life! Very few bending or torsions. Remarkable !
What about the manufacturing quality?
Finally, and unfortunately you won't be able to see it in these photos, I want to stress what a smooth functioning the clamping screws have and how they guarantee great quality clamping without forcing it. The realization of this head is really remarkable, almost like the Cambo CLH-500. With use, this head is one of the two most pleasant heads I got to review.
Four distinct and dismountable parts
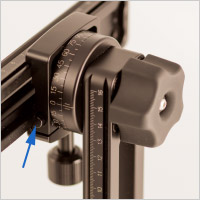
Apart from the model Manfrotto 303 PLUS which plates are micro-metric and can't be disassembled, all spherical heads on the market can break into several parts. It is a great asset to store the equipment in a photo bag. You can fit each plate in a different compartment of the bag. To place or remove the rails, you just need to unscrew the clamping screw and make them slide by pushing the rail stop at the same time (fig. here).
Once dismounted, the Nodal Ninja Ultimate M1 head breaks into: a rotator RD-16 (1), an lower horizontal plate 20 cm (8 in) long (2), the vertical arm supporting the tilting axis (3), and a upper plate sliding in depth on 20 cm to fasten the camera (4):
Once dismounted in four parts, the Nodal Ninja Ultimate M1 spherical head doesn't take much space. It will easily fit in a photo bag!
(1) - Rotator RD-16 - The base RD-16, well-known because present on numerous Nodal Ninja products thus enables to choose easily the number of stops between 2 consecutive photos with 16 possibilities. Impossible not to find what you're looking for!
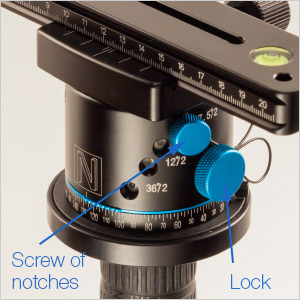
The choice of the number of stops is as simple as it can get because you just have to use the blue wheels: the big wheel (Lock) is used to block the rotator to screw/unscrew it on the tripod. The little blue wheel (there's another one hidden behind the rotator) is used to select the number of stops between two consecutive photos (here 10°/2).
(2)- Lower plate - Each rail, corresponding to ARCA standards, is really very robust. I didn't note any bending even with my heavy Pentax 645Z. Each rail enables a setting on 20 cm and integrates a bubble level.
(3)- Vertical arm and tiltable rotator block - This tilting block is fastened on the vertical arm and it can turn over on the bottom rail. Handy to shoot the nadir. Great smoothness of movement.
(4)- Sliding top rail and quick fastening plate for your camera - The upper rail on the Nodal Ninja Ultimate M1 supports the camera when it's a reflex one. It slides on 20 cm (8 in) in depth. It fits into the tiltable plate of the vertical arm. For more details, see later.
Use of the Nodal Ninja Ultimate M1 head
Like all panoramic heads, the Nodal Ninja Ultimate M1 head is used to place the entrance pupil of your lens above the rotary axis of the head and in the tilting axis of the vertical arm to get perfect overlap zones in multirange photography. This head being a manual dismountable head, its functioning is very simple and always the same if you read this type of review for the second time at least.
Setting the head at the nodal point
Let's start with an essential point, the fastening of the body on the upper plate. Indeed, depending on whether the screw thread of the sole of the camera is in the axis of the lens or not, its fastening on the panoramic head won't be the same:
1 - Fastening the camera on the upper sliding plate :
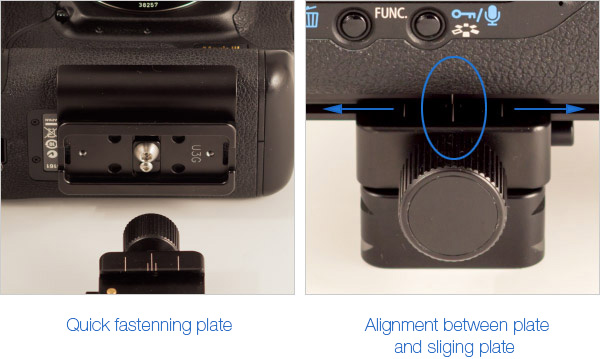
Important!To fasten your camera, you need to buy the quick fastening plate (fig. below on the left) corresponding to your body unless you fasten the quick fastening plate of your head's brand directly.
Note that since the quick fastening plate slides on a short distance (3/4 cm) into the bracket of the upper sliding plate, it is possible to place the axis of the lens exactly in the tilting axis, even if you own a point-and-shoot camera or even with a booster (on a Canon 5D Mark III/IV for instance). Indeed, in both cases, the screw thread of fastening on the head under the camera isn't in the axis of the lens anymore. (image above on the right).
Caution! When you use the Nodal Ninja quick fastening system (complying ARCA standards) then you'll have to dismount it every time you'll want to set your camera on a classic head IF it's not ARCA. Not convenient but offers more stability.
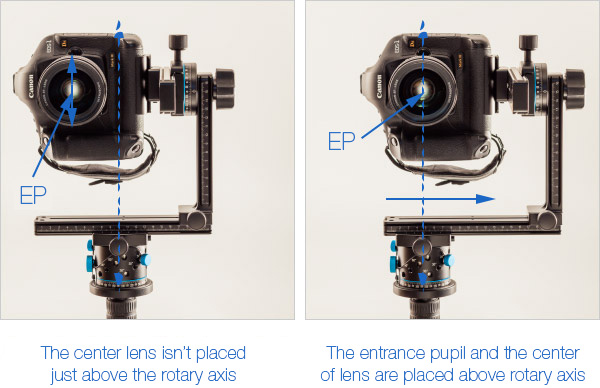
2 - Place the center of the lens just above the rotary axis of the panoramic head
Once the camera fastened on the upper plate, itself on the tiltable arm, you just have to center the lens just above the rotary axis of the rotator thanks to the movement of the lower plate on which the vertical arm is fastened in a first time. For that, you just need to move the plate a little on the left in this example after loosening the clamping screw (fig. below)...
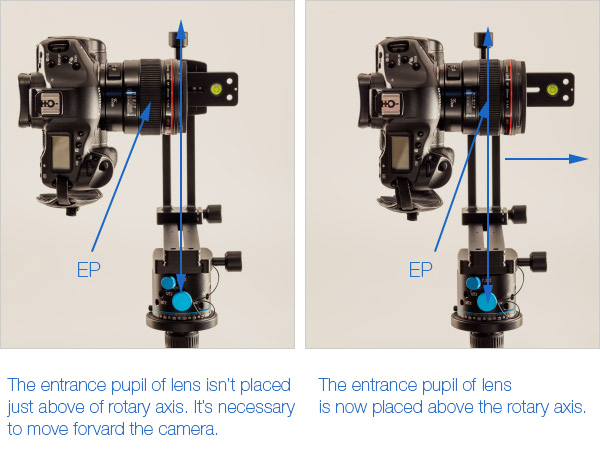
Once it is done, you need to find the setting in depth in accordance with your lens and if it's a zoom lens, you need to find the settings in accordance with the most used focals. This is done using the upper plate, quite simply!
4 - Place the nodal point (or entrance pupil EP) of your lens above the rotary axis of your panoramic head - Note that the center of your lens is in the tilting axis of your panoramic head.
The entrance pupil (nodal point) is perfectly set in all axis hence in 3D on this panoramic head for this lens. You just need to mark the settings down on the marked reglets below.
Marking the settings of the Nodal Ninja Ultimate M1 head
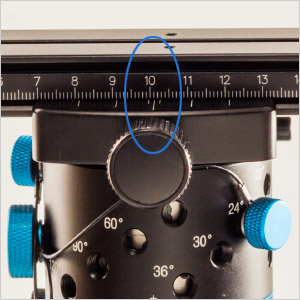
Once you found the settings for your lens, you need to make sure to mark them down in a corner of your head for the younger ones or more cautiously in a notebook for the others ;-). Who said I was making notes???
On the head Nodal Ninja Ultimate M1 , the marking is done on the marked reglets (upper and lower plates).
You can as well use a piece of tape as a marker if you don't want to take out your notebook all the time. If you use several lenses or focals, it will be more convenient to make a mark for each focal.
Markers are not very legible at night but always very accurate.
Turn the vertical arm over to shoot the nadir
In the tutorial dedicated to the creation of virtual tours on this site, I wrote an article about shooting the nadir with a tripod. To do so, you need to rotate 180° the vertical arm in order to tie the camera above empty space by putting it as far as possible from the arms of the tripod. On the Nodal Ninja Ultimate M1 or M2, you just need to unscrew the knob in the vertical arm to be able to rotate it on 180°. And for that, please note that you don't even need a screwdriver! It is very convenient. And yet Nodal Ninja does even better... Here's how.
The nadir adapter (Option)
When you're trying to shoot a complete sphere in order to realize a virtual tour and if you want to get the best possible quality, it is better to shoot the nadir while leaving the camera on the panoramic head in order to keep the camera as close as possible to the entrance pupil relatively to the ground, but also, of course, to be able to shoot photos with long exposure times.
Nodal Ninja produces a small accessory that comes between the vertical arm and the lower plate and that enables to turn it even more easily without dismounting it. You just have to unscrew the small knob on the side and to rotate 180° the plate over. It couldn't be easier!
Nowadays, the Nodal Ninja Ultimate M1 head isn't alone on the competitive market of top-range and very stable spherical heads (Cambo CLH-500 and Manfrotto 303 SPH, and let's not forget its big sister Ultimate M-2. However, it offers one of the best manufacturing quality I've ever seen with the head Cambo CLH-500. The finishing is really impressive and the settings are so smooth. It will easily handle your heavy digital camera body, even more than its M2 version if you want to make gigapixel panoramas.
As a conclusion and since it's even more universal than the Cambo head (its vertical arm turns over and a nadir adapter can be added to turn it over even more easily) it is probably the best top-range and/or robust spherical head on the market.
Ratings
Nodal Ninja
Ultimate M1-L
Manufacturing quality
Robustness/stability
Bulkiness mounted
Bulkiness dismounted
Setting of the base
Value for money
PROS...
Wonderful design and manufacturing quality
Robustness and stability (for a spherical head)
Wind sensitivity far above the average
Smoothness of the settings
The vertical arm rotate 180° (Shoot nadir)
ARCA-friendly.
CONS...
Honestly, not many if you're OK with its price, weight and bulkiness (of course since it's very robust)
Fine, then I could mention the setting on the camera on the upper plate in a dark environment, the lack of blocking wedge to mark the settings as its little sisters have (Nodal Ninja 3 Mk3 and 6), really not much finally.
OVERALL RATING
9.5 / 10
My opinion: Top-class! It is probably the best top-range spherical panoramic head on the market hence in the products over $550. It is convenient, really superbly finished, you can almost do everything with it and there is also a M2 version, gigapixel-oriented. Nodal Ninja really rocks. It hits the mark!
Buy the Nodal Ninja Ultimate M1+ RD-16
Retailers
Price without VAT
$499.00
Black Friday
418.52 € *
Pratical Guide N°1 : The Nodal Point
$12.90 USD
My practical guides in e-books - N° 1!
"Find the nodal point or no parallax point accurately in less than an hour"... whether you are photographing a simple panorama or a 360° photo - PDF of 100 pages -More information...
This website is almost entirely free and yet almost free of ads. Why? Because they look so bad! It is lucrative though, and enables many websites to keep on living. So I asked myself: what can I do? To keep on developing this website, I'm going to need a regular income just like everyone else. How can I keep on giving access to free information like I've been doing since April 2002?
And I finally found the answer: affiliation. Every time you click on a link from this site to one of my partners' shops, they know you've been referred by me and give me a small percentage on your purchase, be it something I recommend on my website or anything else. Remember to use my links when you shop on these sites! It doesn't cost you anything and it's a win-win deal – for me, them, and you!


 The
The  Nodal Ninja Ultimate M1or M2 ?
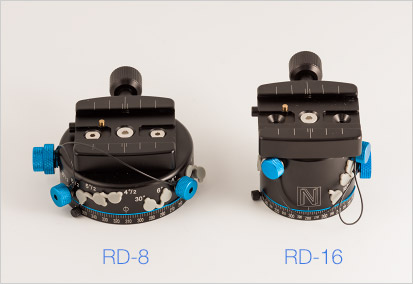

 It is made of four distinct and dismountable parts. In addition to classic horizontal and vertical plates, you can also dismount the vertical arm (that can thus be turned over to shoot the nadir) and that supports the tilting axis as well as the classic rotator, the famous RD-16. Please note that the rotator has 16 clicks stop which is a record and makes this head especially universal.
 Apart from the model Manfrotto 303 PLUS which plates are micro-metric and can't be disassembled, all spherical heads on the market can break into several parts. It is a great asset to store the equipment in a photo bag. You can fit each plate in a different compartment of the bag. To place or remove the rails, you just need to unscrew the clamping screw and make them slide by pushing the rail stop at the same time (fig. here).
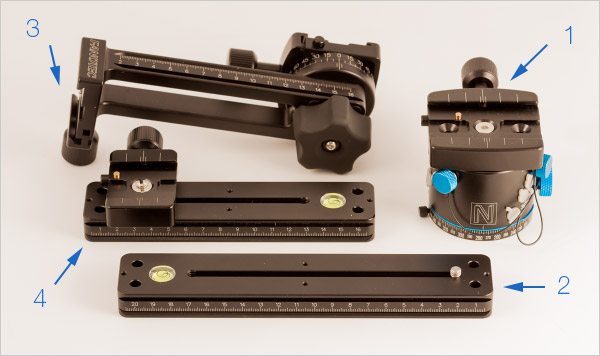
 (1)
(1)
 Once you found the settings for your lens, you need to make sure to mark them down in a corner of your head for the younger ones or more cautiously in a notebook for the others ;-). Who said I was making notes???
 When you're trying to shoot a complete sphere in order to realize a virtual tour and if you want to get the best possible quality, it is better to shoot the nadir while leaving the camera on the panoramic head in order to keep the camera as close as possible to the entrance pupil relatively to the ground, but also, of course, to be able to shoot photos with long exposure times.