It was definitely my favorite model of spherical panoramic head, especially to realize virtual tours. Robust enough for most bodies (perfect with a Canon 5D Mark IV + 8-15 mm Fisheye for instance), it is extremely well designed and manufactured. It is now discontinued and replaced by the Nodal Ninja 6 (Soon in review...).
The Nodal Ninja 4 panoramic head is a head called spherical. There's also a model 3 Mk2, very close, with only noticeably shorter marked plates in order to keep bulkiness and weight at a minimum. It can be disassembled in two parts which makes it choice equipment for travel and storage in a photo bag. This is no detail!
In the average-high rank of robustness thus stability among the heads on the market, it is perfect for a light body like the Canon 5D Mark IV and its fisheye 8-15 mm or a Nikon D850 and its new Nikkor 8-15 mm fisheye but can easily handle a heavier body if the lens is compact enough. In this case, the camera won't be positioned too far back and the stability will be preserved.
This head also has two assets, its accessories:
the classic rotator, the convenient RD-16 or the RD-3 + EZ-Leveler,
the nadir adapter.
This way, it is possible to configure a first-rate head! With the RD rotator, you change the number of stops between two consecutive photos very easily and with the nadir adapter, it is even easier - was it possible?! - to rotate 180° the vertical arm to shoot the nadir.
Like with all spherical heads, it is possible to place the nodal point of the lens used in literally all directions. It is thus a universal head.
It's a panoramic head I use since 2009 for all my projects of virtual tours other than gigapixel ones. I then pick a spherical motorized head. However, it takes little space stored or not and it's very pleasant to use. End of 2017, this panoramic head is discontinued and replaced by the Nodal Ninja 6 that I will soon reviewed.
Nodal Ninja 4 panoramic head presentation
The Nodal Ninja 4 panoramic head (there's another model Nodal Ninja 3 Mk2, less bulky) is thus a spherical head. It has a rail of setting in depth that can be tilted on a vertical arm. It is perfect to shoot a complete sphere and thus create a virtual tour, especially when shooting the nadir. The rails are of standard dimensions for model 4 and shorter for model 3 Mk2, perfect to travel light! Then, what characterizes it is the possibility in its commercial version said "complete" but simple to have a rotator thanks to brass clips pierced of xx holes depending on their sides. It makes the head very compact, less convenient sometimes but really more stable. (See my summary below: Complete, RD-8 ou RD-16, how to choose?).
It is made of two distinct and dismountable parts. Once mounted, it is usually impressive but is particularly not bulky once refolded as it's very well designed. Since it's rather light, it is especially easy to carry.
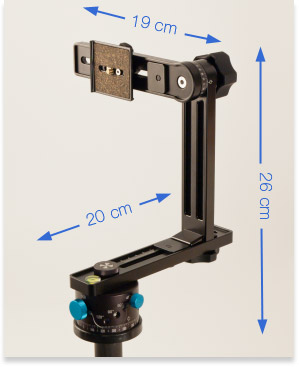
Once the camera set, it is about 23 cm (9 inch) higher than the head. The height alone being 26 cm (10.3 inch) from the base of the tripod. As you can see in the image here, its dimensions in width are classic for this model 4 and it's rather an asset to shoot the nadir as we'll see later. Model 3Mk2 is in this regard a bit short without a nadir adapter.
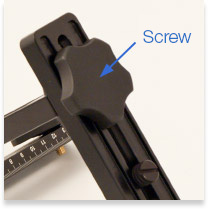
You can also see clearly that the vertical arm can be unscrewed very easily to turn over and for travel. Then, note the presence of a clamping screw for the tilting head, quite compact and easy to manipulate, here again.
Finally, it remains accurate, even after several years of intensive use and only the paint starts fading after a while as for a lot of spherical heads on the market!
Once folded, the Nodal Ninja 4 spherical head , whether be it complete (with RD and nadir adapter) or basic, is especially compact.
Two distinct and dismountable parts
The Nodal Ninja 4 head can be disassembled in two distinct parts. It's a precious asset to store the equipment in your photo bag, as shown in the image below. The Nodal Ninja is particularly exemplary regarding that point! To dissociate the vertical arm from the rotator and from the lower rail, you juste have to unscrew it, quite simply. The knob (Screw) is very pleasant to manipulate because it is very large and its coating is soft (image here).
Once folded (photo above), I fit the whole thing in a teleobjective lens case. Very convenient! The Nodal Ninja 4 head comes with a quick fastening plate for the camera which is perfect for reflex cameras. Here again, convenient!
The panoramic Nodal Ninja 4 head can be completely disassembled in two parts and can thus be stored very easily in a photo bag. It then takes the same room as a teleobjective lens, even in its full version with RD rotator. It is a striking quality.
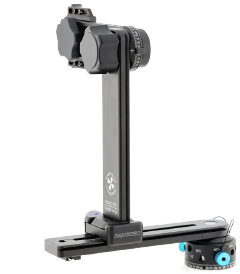
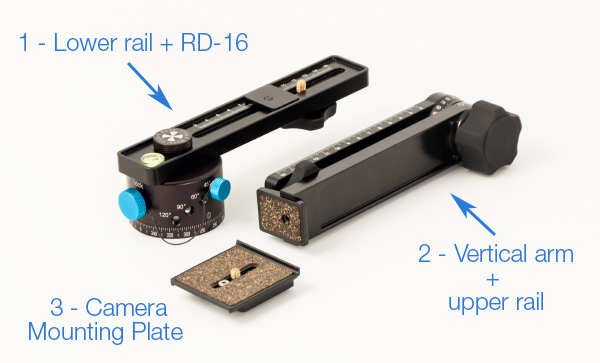
Once dismounted, the Nodal Ninja 4 head can be broken down into: a rotator that can be as shown here the RD-16 rotator (1) and its lower rail, a vertical arm (2) and a upper rail sliding in depth on 12 cm and the camera mounting plate for the camera (3).
1- Rotator and lower rail (1) - There are three solutions by Nodal Ninja: the RD-3 + EZ-Leveler rotator or the RD-16, as in the photo above. Thanks to this stoped part, you'll be able to rotate the panoramic head of the number of degrees you need between two consecutive photos without looking into the viewfinder. Thanks to a blue wheel (the smaller one held by a safety rope), you can choose the number of clicks stop you need on the RD rotators. When you rotate the whole block, it is going to block slightly on the next stop. It is very easy to feel...
You're going to fasten the vertical arm on the marked rail thanks to the big knob.
2- Upper rail and vertical arm (2) - The whole thing enables to keep the camera vertical in order to get the highest panorama possible in pixels. The framing is done by the focal.
The rail can't be separated from the vertical arm and supports the camera mounting plate. This rail can be set on 14 cm in depth.
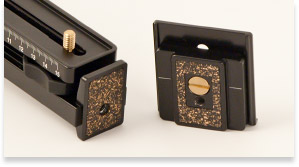
3- Camera mounting plate (3) - The camera mounting plate of the Nodal Ninja 4 is very well designed because it naturally fits on the rail thanks to a guide. It keeps the plate from tilting on the rail. Only the camera will be able to twisting, if it's not fastened correctly on the rail. It slides on 14 cm.
One Nodal Ninja 4 = 3 rotators! Advice to help you make a choice...
There are three models of rotators you'll need to choose when placing your order: small rotator base, RD-3+EZ-Leveler or RD-16. As you'll probably have guessed, it's the number of clicks stop - 3, 6 or 16 - and above all the width of the field of view that change: from 120° to a maximum of 3.75°!
1 - The small rotator base (full version)
The small rotator base is very easy to use. The clicks stop are "hidden" inside the base under the form of a detent rings more or less pierced of holes on each side. Originally the Nodal Ninja head is sold with three detent rings hence 6 possibilities.
The number of stops is thus set by dismounting the rotator base completely. You just need to place the rotator with the number of clicks stop. To change the number of stops often, it is not so convenient. However, it makes a very light base but more stable if, like me, you always use your spherical head with the same lens. Well-thought!
My opinion and purchasing advice...
Assets: the head remains very compact hence stable. It's the solution I picked because I only use it to realize virtual tours with my Nikon D7200 + 8-15 mm Nikkor Fisheye DX. I have another head for my Pentax 645Z.
Drawbacks: the change of the number of stops, so convenient to use, is really not among the most convenient.
Piece of advice: if, like me, you're always using it with the same focal AND the detent ring have the number of stops you need, I recommend you this Nodal Ninja 4 full version for its compactness, stability and bulkiness.
2 - RD-3 rotator + EZ-Leveler leveling base
The original rotator can thus be replaced by an RD-3L rotator built in the EZ-Leveler leveling base. It enables to change clicks stop easily without needing to dismount the base as shown above with the full version.
My opinion and purchasing advice...
Assets: this version of the Nodal Ninja 4 head directly integrates all you need to realize a virtual tour and the price is still reasonable.
Drawbacks: I see two serious drawbacks to this option: it really harms stability according to me and you'll only have three clicks stop setting possibilities.
Piece of advice: this all-in-one solution makes sense from a commercial point of view but stability is a real issue and the number of stops is too limited. I don't recommend it.
3 - The RD-16 rotator
The head Nodal Ninja can be bought alone, in which case you'll have to complete it with this RD-16 rotator to make it almost universal.
You can choose the number of stops you need among 16 possibilities so almost all focal combinations are compatible up to 200 mm (8").
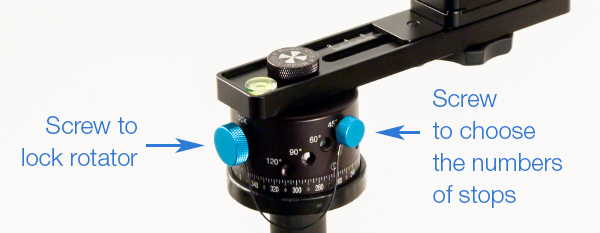
Rotator RD-16 Nodal Ninja and its two clamping screws (a third one is hidden behind).
The rotator RD-16 NODAL NINJA has three clamping screws:
1- The "Lock" blocking screw of the rotator - The biggest clamping screw is used to associate the upper of the rotator to the lower, marked rail in order to be able to dismount it from the tripod.
2- The screw for choosing the number of stops - The smallest screw is used to choose the number of degrees you want between two stops while keeping an overlap zone of at least 30% between two consecutive photos.
3- The screw for choosing the number of half-stops - A third screw is used to choose half-notches hence 7°/2 = 3.75°.
My opinion and purchasing advice...
Assets: the RD-16 makes almost all stops settings possible and turns your NN 4 into a very versatile head.
Drawbacks: it's not cheap, a bit heavy and bulky.
Piece of advice: This is THE solution you should favor if you're hesitating. You won't be blocked or limited.
Like all panoramic heads, the Nodal Ninja 4 head is used to place the nodal point of your lens above the rotary axis of your head and in the tilting axis of the vertical arm to get perfect overlap zones, even in spherical photography. This manual panoramic head is one of the simplest ones to manipulate.
Adjusting the head to the nodal point
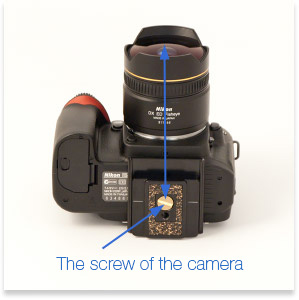
Let's start with an essential point, the fastening of the body on the upper rail. Indeed, depending on whether the screw thread of the camera sole is or not in the axis of the lens, its fastening on the panoramic head won't be the same:
1 - The camera mounting plate is in the axis of the lens (most common case with reflex cameras): you just have to tie the camera directly on the dedicated rail sold with the head Nodal Ninja and it will all end up in the tilting axis. The nodal point will then be able to be above the rotary axis BUT also in the tilting axis. (image here).
2 - The fastening is shifted from the lens: it sometimes happens when you mount a booster on a reflex but above all, it is almost always the case with point-and-shoot cameras. You then have to set a second rail perpendicularly (sold separately) to the upper rail in order to slide the body in height and thus align the center of the lens with the tilting axis.
3 - Shift the optical center of your lens towards the center of your head - Once the camera set on the upper rail, itself on the tiltable arm, you just have to center the lens just above the rotary axis of the notched base thanks to the movement of the vertical arm in a first time. To do so, you just have to move this arm a little on the left in this example after unscrewing the clamping screw under it...
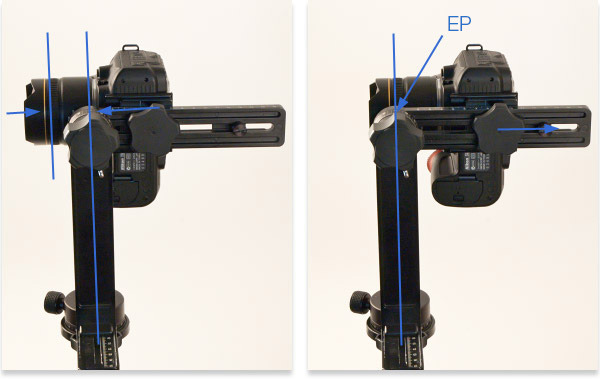
4 - Set the body in depth - Once it is done, you need to find the setting in depth, depending on your lens and if it's a zoom lens, you need to find the settings depending on the most used focals. This can be done with the upper rail, quite simply!
The entrance pupil is perfectly set in all axis hence in 3D on that panoramic head for that lens. You just need to mark the settings, below.
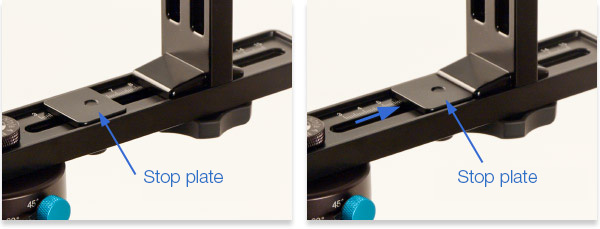
Once the settings made for your lens and unlike the heads Manfrotto303 especially, there's no need to take notes to mark the settings (at least when you only work with one lens) because the Nodal Ninja 4 head is sold (like models 3 and 5) with two small metallic plates that can be screwed in marked plates, stopped against the vertical arm AND the rail supporting the camera once they're set. To replace the vertical arm and the camera in the right position, you just have to set them against these little plates again. Unbeatable even in the dark!
The small rail that lets us see part of the clamping screw below comes against the vertical arm for the bottom and against the camera for the top, once it is set at the entrance pupil. It is very convenient!
Turn the vertical arm over to shoot the nadir
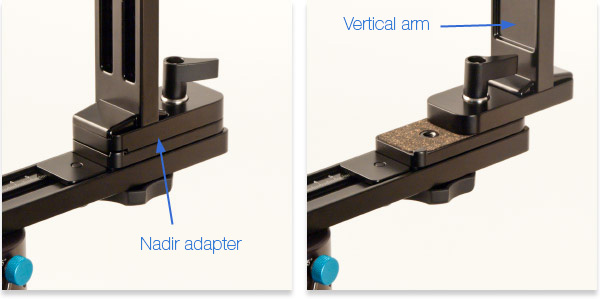
In the tutorial dedicated to the creation of virtual tours on this site, I wrote an article about shooting the nadir with a tripod. To do so, you need to rotate the vertical arm from 180° in order to tie the camera above empty space by putting it as far away as possible from the arms of the tripod. On the Nodal Ninja 4 head (as well as on models 3 and 5 even if model 3 is a bit too short), you just have to unscrew completely the screw under the inferior rail (image above on the left) holding the vertical arm to be able to rotate it from 180° (image below on the right). And for that, no need for a screwdriver because the screw is very large and pleasant to touch. It's very convenient. And yet Nodal Ninja can do even better... Here's how.
1 - First solution: turn the arm over
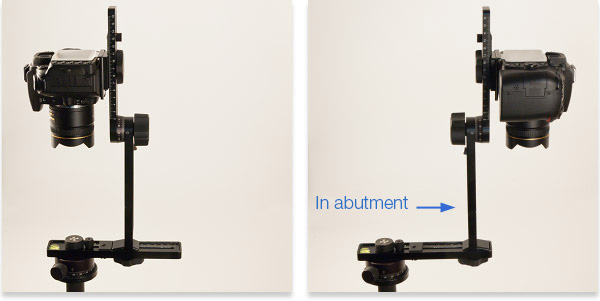
When you're trying to shoot a complete sphere in order to realize a virtual tour and if you want to get the best possible quality, it is better to shoot the nadir leaving the camera on the panoramic head in order to keep the camera close to the entrance pupil relatively to the ground but also, of course, to be able to shoot photos with long exposure times.
Note that it's no illusion that spherical heads are seldom robust enough for the arm not to bend a little under the weight of the camera as you can imagine in the picture on the left.
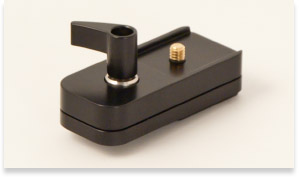
2 - Second solution: nadir adapter (Option)
Nodal Ninja produces a small accessory that comes between the vertical arm and the lower rail and that enables to rotate 180° it even more easily without dismounting it. You just have to unscrew the small knob above and rotate the vertical arm. It couldn't be easier! And it even has the good consequence to put the camera even farer from the tripod in order not to photograph its arms.
Once the adapter inserted between the lower rail and the vertical arm, you just have to unscrew the nut above and rotate 180° the arm. The movement is "marked" every 90°. Beautiful equipment.
To shoot the nadir without tripod nor panoramic head, you need two things: rotate the arm and tie the camera above empty space; put it as far as possible from the rotary center to shoot
as little as possible of the arms of the tripod.
But it's detrimental to the overall stability if you want to use long exposure times which often happens at F11.0 inside! You thus need to find an acceptable compromise BUT beware of vibrations on a Nodal Ninja 4 with the RD rotator + fast rotate of the arm rail + a quite heavy camera. Believe me! You'll have to use the self-timer/mirror raise absolutely...
However, I'm amazed by the stability of the following mounting:
Nikon D7200 (D850, 5D Mark IV) camera fisheye lens Nodal Ninja 4 (Now NN6) No rotator No rotate rail.
And even my old Canon 1DS Mark III with a compact and light lens but without shooting the nadir by turning over the vertical arm...
Conclusion and rating!
Nowadays, the Nodal Ninja 4 (and its sisters 3 Mk2 and new 6) are most certainly the best designed spherical heads on the market. They're light, not bulky at all and adaptable. The vertical arm can be turned over easily and it is possible for those who always use it with the same lens to use the rotator only hence without the RD rotator, heavier and more expensive.
As a conclusion, I love this head to shoot most conventional virtual tours (eight photos) with my D7200 Nikon and its 8-15 mm Fisheye. I don't use RD rotators because I always use the same number of stops and the 6-stop detent ring is enough. Consequently, the head is light but compact enough in this configuration hence stable. Very good product really!
Ratings
Nodal Ninja 4
Manufacturing quality
Robustness/stability
Bulkiness mounted
Bulkiness dismounted
Setting of the rotator
Value for money
PROS...
Very well designed
Stable with light cameras or heavier cameras with a compact and rather light lens
Reasonable weight
Bulkiness mounted and folded
The vertical arm can be rotate 180° easily
With or without RD rotator
Nadir adapter in option.
CONS...
A little bit too light for big cameras
Base not as complete as Manfrotto's except with RD rotator
Very few things really...
OVERALL RATING
8.5 / 10
My opinion: Long time my favorite head for light camera/lens pairs (-1,500 grs / 3.5 lb) to realize a virtual tour or support a heavier body but to make a simple panorama without a bulky lens. Convenient, rather light, well finished and designed. Fancy item!
Buy the new Nodal Ninja 6 + RD10
Retailers
Price without VAT
$359.95
Black Friday
327.55 € *
Pratical Guide N°1 : The Nodal Point
$12.90 USD
My practical guides in e-books - N° 1!
"Find the nodal point or no parallax point accurately in less than an hour"... whether you are photographing a simple panorama or a 360° photo - PDF of 100 pages -More information...
This website is almost entirely free and yet almost free of ads. Why? Because they look so bad! It is lucrative though, and enables many websites to keep on living. So I asked myself: what can I do? To keep on developing this website, I'm going to need a regular income just like everyone else. How can I keep on giving access to free information like I've been doing since April 2002?
And I finally found the answer: affiliation. Every time you click on a link from this site to one of my partners' shops, they know you've been referred by me and give me a small percentage on your purchase, be it something I recommend on my website or anything else. Remember to use my links when you shop on these sites! It doesn't cost you anything and it's a win-win deal – for me, them, and you!


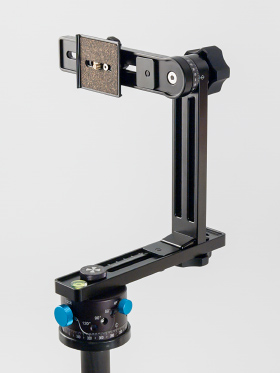

 It is made of two distinct and dismountable parts. Once mounted, it is usually impressive but is particularly not bulky once refolded as it's very well designed. Since it's rather light, it is especially easy to carry.
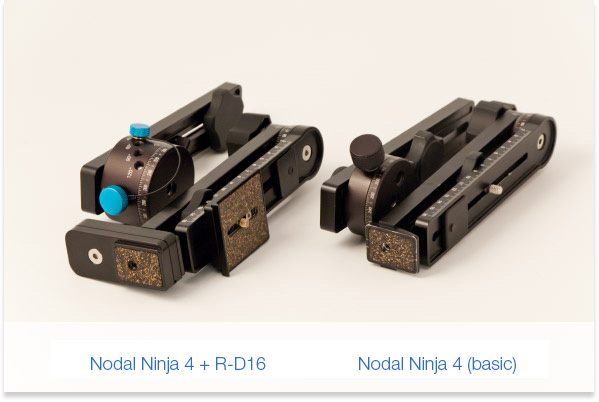
 The Nodal Ninja 4 head can be disassembled in two distinct parts. It's a precious asset to store the equipment in your photo bag, as shown in the image below.
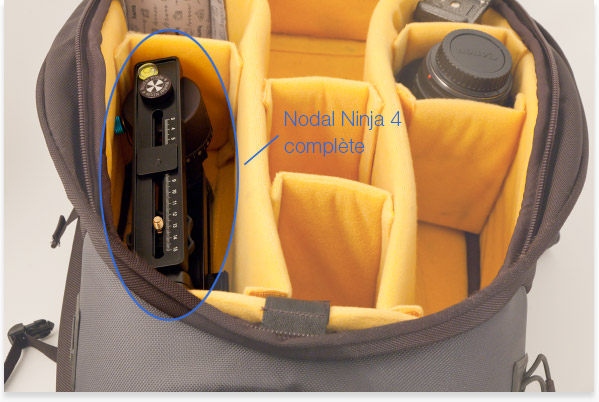
 3
3 One Nodal Ninja 4 = 3 rotators! Advice to help you make a choice...
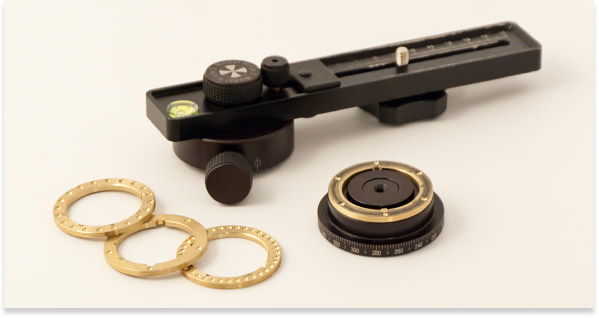
 1
1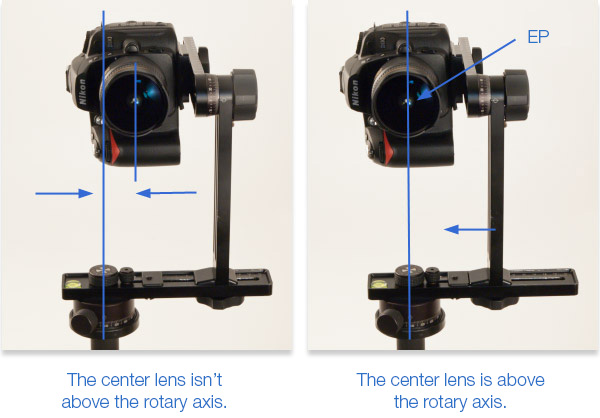
 Nodal Ninja produces a small accessory that comes between the vertical arm and the lower rail and that enables to rotate 180° it even more easily without dismounting it. You just have to unscrew the small knob above and rotate the vertical arm. It couldn't be easier! And it even has the good consequence to put the camera even farer from the tripod in order not to photograph its arms.