I used a Manfrotto 303 head for a long time because it remained the most robust on the market for quite a while... market that evolved ever since! It doesn't take away its robustness qualities to make cylindric panoramic photographies with heavy bodies like the Nikon D4 or even worse, my new Pentax 645Z. A safe bet...
The Manfrotto 303 panoramic head is a cylindric head. You can now find it under the code name MH057A5 + L bracket, more modern. It can be disassembled in four parts which makes it a choice equipment for transportation and storage in the photo bag. This is no detail! Robust, even for quite heavy equipment like middle-sized, it is of course quite heavy, but it remains acceptable. As all cylindric panoramic heads, it only enables to place the entrance pupil of the lens used on one range of photos because the vertical arm can't be tilted. The body can be tilted on that arm but at the fastening point of the camera so classically, under the shoe of the body hence far from the entrance pupil...
Manfrotto 303 panoramic head presentation
The Manfrotto 303 panoramic head also declined under the code name MH057A5 in the catalogue with a more recent L Bracket (there are two other models: 303+ and 303 SPH ) is thus a cylindric head. It doesn't have any tiltable stage on its vertical arm. It is thus perfect to support quite heavy bodies because the center of inertia of the body is in the axis of the vertical arm and not shifted at the back as with a spherical head. The stages are of standard dimensions as we'll see later.
Technical specifications
Manfrotto 303
Average price: $530
Quick fastening
Possible
Supported load
5 Kg
Height of use
31 cm
Stage movements
On 8 cm
bubble level
Yes
Dismountable
Yes - in four parts - head, two stages and vertical arm.
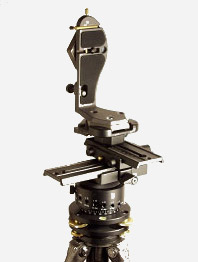
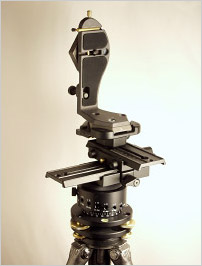
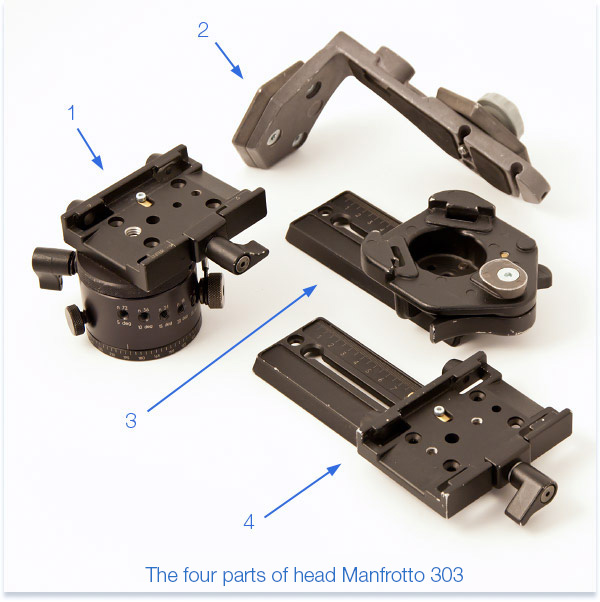
It is made of four distinct and dismountable parts. Once mounted, it is quite impressive but doesn't take too much space once dismounted and stored in a photo bag.
Once the camera set, it is about 25 cm higher than the head. The height of the head alone being 31 cm, from the tripod base. But as you can see in the image here, its dimensions in width/length are perfectly reasonable.
You can also clearly see that the vertical (or horizontal if you fasten it in the other direction) arm is thick enough, which reinforces its robustness. This is clearly not a weakness of this head... which doesn't have any on this particular criteria: the robustness/stability ratio.
And finally, it is accurate, even after several years of intensive use!
Four distinct and dismountable parts
Unlike the model Manfrotto 303 PLUS which stages are micrometric and noticeably longer than on this regular 303 model, the head Manfrotto 303 can be disassembled in four distinct parts. This is a precious asset to store the equipment in your photo bag as shown in the picture below. To remove the stages, you just have to unscrew the clamping screw and to make them slide by pressing the golden blocking ergots at the same time.
Storage tip! I fit together the vertical arm and the two stages which bulkiness becomes more or less this of a teleobjective lens that I store in a dedicated compartiment of my bag and the notched base in a compartment for less bulky accessories.
The Manfrotto 303 panoramic head can be completely disassembled in four parts (without the leveling base 338) and can thus very easily fit in a photo bag. Moreover, it is robust!
Once dismounted, the Manfrotto 303 head can be broken down as follows: a notched head (1), a vertical arm (2), and two stages sliding on 8 cm (3 and 4).
1- Rotary notched base - It's on this part that you'll be able to rotate the panoramic head from the number of degrees you need between two consecutive photos without watching through the viewfinder. Thanks to a wheel (the bigger one held by a safety rope), you can choose the number of notches you need. When you turn the whole block, it will slightly block on the next notch. It's very easy to feel... except after several years of use!
2- Vertical arm - It enables to hold the camera vertically in order to get the highest panorama possible in pixels. The framing is done by the focal. Tip!
Additionally, it also enables to avoid having too much overhang because the arm is closer to the center of gravity of the body.
New! It is possible to buy this head under the reference MH057A5 and the vertical arm then comes under a new form (photo below), which fundamentally doesn't change anything.
3- Sliding stage - The superior stage on the Manfrotto 303 supports the vertical arm. It slides on 8 cm. Tip! It is not much, but enough at the same time if you're trying to make a compact hence stable mounting. I really prefer removing the boosters and choosing a compact lens in order to avoid as much as possible these famous overhangs.
4- Sliding stage - The inferior stage, used to set the depth, is only adaptable on 8 cm. Caution! with short focal zoom lenses like 24-70 mm F2.8 hence retrofocus optical formats, it is a bit short sometimes. You need a longer stage. For a 35 mm, even a F1.4, it's perfect.
The notched base (ref. 300N)
The notched base comes with three clamping screws and three mobile parts rotating on 360° that we'll see in details now.
Notched base Manfrotto 300N and its three clamping screws.
The notched base Manfrotto 300N has three mobile parts rotating on 360° :
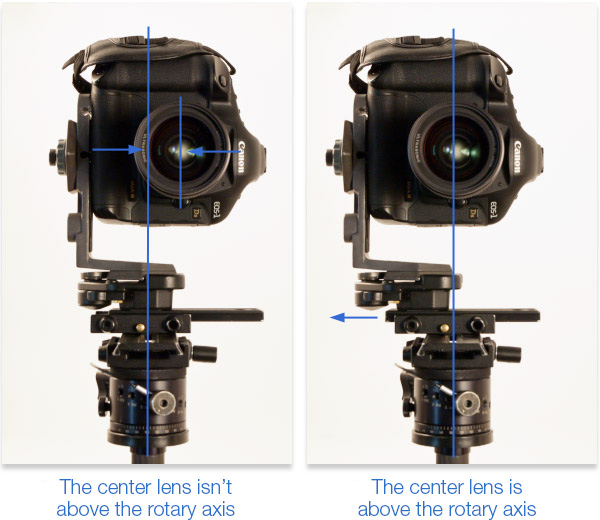
1- the upper plate - Where the first stage sliding in depth is fastened. It enables to draw the entrance pupil of the lens back above the rotary axis of the panoramic head. What for? The plate (1) can't be separated from the central part (3) if you screw the "clamping screw of the upper stage". The whole head rotates on the notches of the central part.
Tip!
If you loosen this screw, the plate (1) is free to rotate and this permits a very convenient setting: You place your head on a notch but when you look through the viewfinder you notice that a window or a singular item for instance ends up at the edge of the field of view - hence in the overlap zone -. It is then possible to dissociate temporarily the stage (1) and the central part (3) by unscrewing a little this "clamping screw from the upper stage". You just have to rotate the plate (1) of your head a little for the window to be at the center of your photo then you re-associate again the plate and the central part by screwing this screw.
It's very convenient, even more since you don't find it on any panoramic head on the market, far from that!
2- the notched central part - The notched base Manfrotto 300N is notched every: 5, 10, 15, 20, 24, 30, 36, 45, 60 and 90°. It covers a large number of cases. This choice is made using the big screw secured by a rope "choice of the number of notches". As time goes by, the notches are less marked than originally.
3- the inferior plate - It indicates the rotation of the head in degrees. It is thus an indicator that is not really useful on a notched base! How do you do that? To unscrew the whole rotary base from the tripod, you need to associate this plate (2) to the central part (3) : this is done clamping the screw "Lock", at the bottom left "Blocking the base".
Use of the Manfrotto 303 head
Like all panoramic heads, the Manfrotto 303 head is used to set the entrance pupil of your lens above the rotary axis of the head to get perfect overlap zones. This head being a dismountable manual head, its functioning is very simple.
Setting the head
Once the camera fastened on the vertical arm, you just need to center the lens just above the rotary axis of the notched base thanks to the movement of the upper stage on which is fastened the vertical arm. For that you just have to step back a little...
Once it is done, you need to find the setting in depth depending on your lens and if it's a zoom lens, you need to find the settingS depending on your most used focals. This is done thanks to the inferior stage, very easily!
Once the settings made for your lens, you just need to mark them in your head for the youngest or more cautiously in a notebook for others (!). Who said I was among those who write it down??? On Manfrotto head in general and on the Manfrotto 303 head in particular, marking is done using the marked reglets. You can very well place a piece of tape as a marker not to have to take out your notebook all the time but only if you always use the same lens and the same focal.
Conclusion and rating!
Luckily, one of the few cylindric panoramic heads on the market is excellent. With my camera body, that is quite heavy, I can't use a spherical head all the time (except the Nodal Ninja Ultimate M1 ), way more wind-sensitive. As a conclusion, I love this panoramic head even if it's not made according to Novoflex's quality standards, for instance, but functionally, it is perfect.
Ratings
Manfrotto 303
Manufacturing quality
Robustness/stability
Bulkiness mounted
Bulkiness dismounted
Setting of the base
Value for money
PROS...
Robustness
Stability - Wind sensitivity
Bulkiness mounted/dismounted
Setting of the notched base
CONS...
Slightly "rough" finishing quality
A bit bulky
Cylindric only!
Wear of the notches as time goes by...
OVERALL RATING
8.0 / 10
My opinion: I still recommend it even if I now use an even more robust model to support my new Pentax 645Z. This was my favorite cylindric head to support my former heavy Canon 1 DS Mark III and its 35 mm F1.4 and shoot photos at twilight hence with long exposure times, with a light breeze, for a long time... The Nodal Ninja Ultimate M-2 is even better but twice as expensive!
Buy the Manfrotto 303 (MH057A5) head
Retailers
Price
$559.88
$529.88
Pratical Guide N°1 : The Nodal Point
$12.90 USD
My practical guides in e-books - N° 1!
"Find the nodal point or no parallax point accurately in less than an hour"... whether you are photographing a simple panorama or a 360° photo - PDF of 100 pages -More information...
This website is almost entirely free and yet almost free of ads. Why? Because they look so bad! It is lucrative though, and enables many websites to keep on living. So I asked myself: what can I do? To keep on developing this website, I'm going to need a regular income just like everyone else. How can I keep on giving access to free information like I've been doing since April 2002?
And I finally found the answer: affiliation. Every time you click on a link from this site to one of my partners' shops, they know you've been referred by me and give me a small percentage on your purchase, be it something I recommend on my website or anything else. Remember to use my links when you shop on these sites! It doesn't cost you anything and it's a win-win deal – for me, them, and you!


 The Manfrotto 303 panoramic head is a cylindric head. You can now find it under the code name
 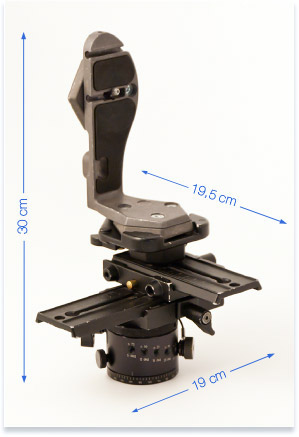 It is made of four distinct and dismountable parts. Once mounted, it is quite impressive but doesn't take too much space once dismounted and stored in a photo bag.
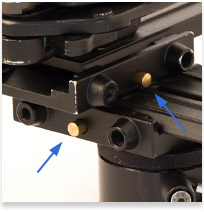 Unlike the model Manfrotto 303 PLUS which stages are micrometric and noticeably longer than on this regular 303 model, the head Manfrotto 303 can be disassembled in four distinct parts. This is a precious asset to store the equipment in your photo bag as shown in the picture below. To remove the stages, you just have to unscrew the clamping screw and to make them slide by pressing the golden blocking ergots at the same time.
  Storage tip!

 Tip!
Tip! Caution!
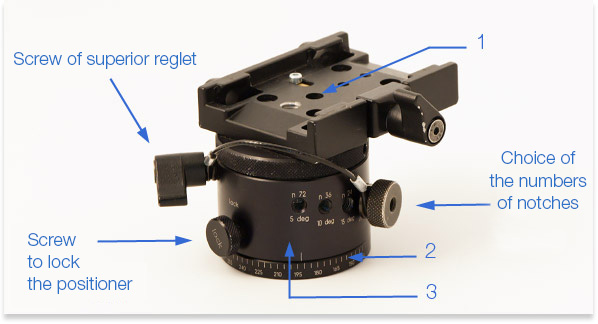
 If you loosen this screw, the plate