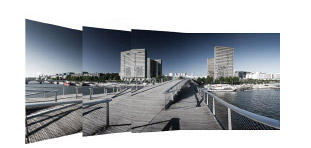
Even if we're nearing our goal, at that point, the stitching of the panorama by the software is sometimes still full of imperfections we need to correct. The photo must be reframed to erase the possible stitching elements, we need to check that there's no blur in the stitching zones and finally, we need to prepare the panorama for its final destination, to print at home, at the printer or for the Web... At work!
If you're a beginner...
A new part of this guide is now dedicated to you. There, you'll find simple pieces of advice to implement to stitch nice panoramas, choose your software, your equipment...
When the panorama has just been stitched, it still needs a few edits before being finalized...
Reframing
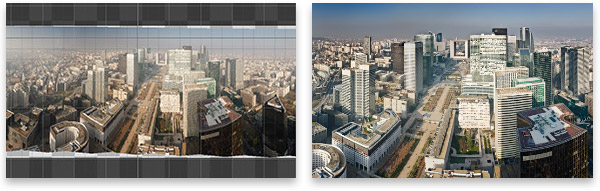
As we saw in the previous page, the image must be reframed at the end of the stitching. All pieces of software allow to do it but we can also do it in our photo editing software. We'll only have to reframe inside the image not to see the tiling effect anymore.
Levels
Luminosity: As I explained in the page edits, it's better to make these kinds of edits when the image is in 16 bits (when it's the case). I'll say it again though: stitching pieces of software don't all accept images in 16 bits (allowing exception). So we'll make the levels edits on a photo in 16 bits after stitching only with certain panorama software. If the work of development of the RAW files has been properly done, in the final image, we should only make minor edits in order to finalize the image depending on its destination.
Color: it's the same for color edits, even more since JPEG, TIFF or PSD files don't like these kinds of edits too much.
The stamp/healing brush tools or how to remove stitching marks
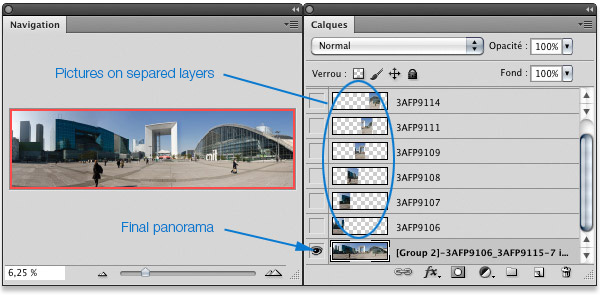
In order to correct the little unpleasant details in the final image or to remove stitching artefacts due to a wrong positioning of the entrance pupil or to matters of optical distortions, we'll use these tools once again. It's rather unusual that the stitching of the photos is done without a little stitching defect. Either because a detail has moved between two photos, like a pedestrian or a car in the city, tree leaves in the country, either because the lens is really too distorted, etc. With most pieces of panorama software on the market, the resulting image is a JPEG image. It is thus quite difficult to correct the photo in the overlap zones. It must be done carefully, with little touches of the stamp tool, more and more "clever" hence efficient, truly. With flagship software like Autopano Giga, PTGui or ImageAssembler, it's possible to render the final image in a PSD format hence compatible with Photoshop but above all, obviously, multilayers. This way, each image stitched is placed on its own layer to which is associated a layer mask, very easy to edit. So instead of using the stamp tool, we'll use the brush tool and paint the layer mask black in the places where we don't want one of the two images of the overlap zone to superimpose its neighbor.
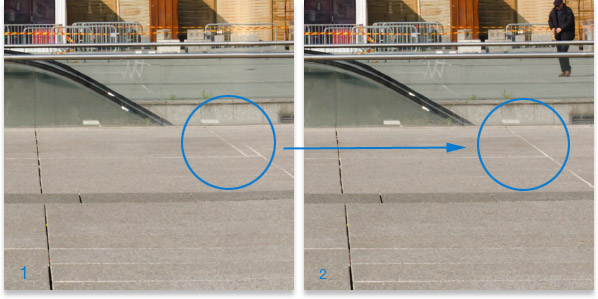
By clicking the eye on the layer of the concerned zone, we make the photo appear above the final panorama (2) and by watching the concerned overlap zone enlarged enough (at least 50%), it's very easy to see the result of an imperfect stitching. The zone seems blurred or imperfect without the layer (1) and perfect with the layer (2), as show the enlargements below. Only this one layer must be kept in this zone thanks to a work on its layer mask.
The simple action of clicking the eyes on one of the layers of the panorama makes a layer image appear (2) above the final panorama (1). The only challenge is to find the right layer!
1 - The two photos are stitched (final panorama); we can see a splitting of the lines on the ground showing an imperfect stitching.
2 - By only keeping the part of the layer that interests us above the final panorama, the defect disappears. It's the easiest case!
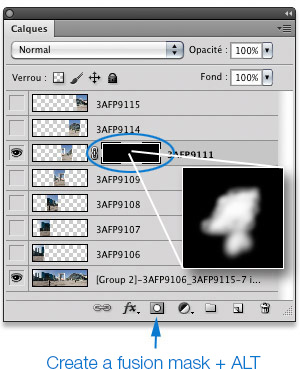
3 - In a more complex case, we'd first add a layer mask, preferably black, by clicking the button at the bottom of the layer palette "Add a layer mask " and on the key ALT, to the layer concerned by the correction of the localized stitching artefact. Then, with the "Brush" tool, we need to paint this layer mask white in order to make appear, just where we need it, the concerned layer above the final panorama.This is used to make appear or disappear a defect, a pedestrian, as in the example above with the splitting of the sheets on the ground and the pedestrian, etc.
By painting with the Brush tool (shortcut B) in Photoshop, at the right size and the right tool hardness, in white color - foreground color -, possibly with an opacity of 10% (of the tool, not the mask) just where you want to make appear or disappear a detail, your final panorama will take the desired look.
Final settings for print and web
Even if you need anyway to oversee one last time the levels of your panorama, its color management, you also need to think to enhance it correctly depending on its destination...
Offset print
If the graphic chain isn't calibrated correctly, it can be useful to rectify the overall luminosity of the image before sending it to print. This doesn't constitute a particularity of panoramic photography however!
Other point that is not a detail, you need to remember to change the resolution of the photo to 300 dpi!
The conversion to the profile of the printer can be done now only if you know the ICC profile of THAT printer. If not, let the printer take care of it and, for more safety, convert your image to sRGB... this will limit the damage!
To finish with, you need to accentuate your photo one last time before sending it to the printer. For this last accentuation, I recommend you try to display the image at 50%, you choose a radius of 0.5 and a gain so that, visually, your photo looks beautiful and correctly accentuated. At 100% the image will look over-accentuated but offset print tends to "eat" part of the definition of a photo.
Save the photo in not too compressed JPEG or in TIFF.
Bubble jet print
Nowadays, Epson, Canon or HP all have a range of bubble jet printers coherent for the print of panoramas since they have their own references of roll paper or accept other brands of paper. the last evolutions of their printers dedicated to photography have been improved even more on that point. It was never so easy to print panoramas!
If the graphic chain is not calibered correctly, it can be useful to rectify the overall luminosity of the image before sending it to print. This doesn't constitute a particularity of panoramic photography though!
Remember to set the image to the resolution you chose for your printer depending on the size of the print! In general, I like 240 dpi that is more than enough. I can of course go below but I never go above. I prefer to re-digitize my photo.
The conversion of ICC profile is done in the driver of the printer except if you're told otherwise.
Before finishing, you need to accentuate your photo one last time before printing it. For this accentuation, I recommend you try to display the image at 100%, you choose a radius of 0.2/0.3 and you choose a gain so that, visually, your photo looks beautiful and correctly accentuated.
Finally, save it in JPEG or TIFF. In JPEG 12, the compression is really invisible or almost!
For the web
The luminosity of your photo must be correct on your screen, preferably calibrated, but above all...
... you have to set your image at the right definition this time and not resolution (Read my article "To finish with 72 dpi... (in french)" on my blog). Only the printers need a resolution (240, 300 dpi, etc.). The screens display the image at its definition. PERIOD. Moreover, if you do the math, you'll see that the screens nowadays are not at 72 dpi but rather at 96! If it's for a website header, your image will likely be 800 or 1,024 pixels wide...
The conversion to sRGB is compulsory from my point of view because the most common, especially on tablets. Even if your browser can't manage ICC profiles, they all behave like they're in sRGB on a sRGB screen! So second rule: incorporate the sRGB profile to your image in case of visualization on a large gamut screen. Read my page dedicated to color management on the web
To finish with, you need to accentuate the photo one last time after setting it to the right definition and for that, display it at 100%, choose a radius of 0.2 and choose a gain so that, visually, your photo looks good and correctly accentuated. In general around 100 of gain.
Save it in JPEG, still with a light compression. Thank you ADSL or 4G!
"Find the nodal point or no parallax point accurately in less than an hour"... whether you are photographing a simple panorama or a 360° photo - PDF of 100 pages -More information...
This website is almost entirely free and yet almost free of ads. Why? Because they look so bad! It is lucrative though, and enables many websites to keep on living. So I asked myself: what can I do? To keep on developing this website, I'm going to need a regular income just like everyone else. How can I keep on giving access to free information like I've been doing since April 2002?
And I finally found the answer: affiliation. Every time you click on a link from this site to one of my partners' shops, they know you've been referred by me and give me a small percentage on your purchase, be it something I recommend on my website or anything else. Remember to use my links when you shop on these sites! It doesn't cost you anything and it's a win-win deal – for me, them, and you!


 If the graphic chain isn't calibrated correctly, it can be useful to rectify the overall luminosity of the image before sending it to print. This doesn't constitute a particularity of panoramic photography however!
 Nowadays, Epson, Canon or HP all have a range of bubble jet printers coherent for the print of panoramas since they have their own references of roll paper or accept other brands of paper. the last evolutions of their printers dedicated to photography have been improved even more on that point. It was never so easy to print panoramas!
 The luminosity of your photo must be correct on your screen, preferably calibrated, but above all...


