Despite the fact that Hugin is free - my favorite piece of software among free ones -, it is still possible to make advanced settings in order, for instance, to correct automatic stitching defects or to change default settings - geometric projections for instance -...
One of the main strengths of Panorama Tools, Open Source tools used for the realization of Hugin which presents them in a nice, pleasant to use interface, is its ability to correct lenses distortions. It is indeed one of the main problems of panorama photographers. Even if these are complex tools to use, distortion correction tools are available in Hugin. Then, the second powerful tool is the checkpoint editor. And finally, Hugin seems better than its competitor in vignetting correction...
Install and set preferences in Hugin
As with any reasonably powerful piece of software, I highly recommend to go take a look at preferences setting in order to set its parameters especially for you. I recommend it even more since certain default settings are "weird" and you'll probably be as surprised as I was, when you see that the final result of your panorama "only" represents 70% of your original files. Just a preference to set!
Download and install Hugin
Download and install Hugin. Nothing particular to say since the language is automatically detected. You'll be able to create your panoramas in three extremely simple steps soon enough, but before that we'll take a look at software preferences.
Download Hugin
Hugin exists in WINDOWS, 32 or 64 bits and MAC OS versions.
Preferences open via the Hugin Menu / Preferences with Mac OS and File Menu / Preferences on a PC.
1 - "General" tab - Check the button "Based on the original folder": during the creation of the panorama, the software will save automatically and before a project file that will keep in memory everything that's been done in order to save time when opening it later. It is easier to put it where the images to stitch are because then, I don't have to choose another folder.
Piece of advice! I order the images per folder / project. This way, for instance, I create a folder named "Basilique d'Issoire" and a subfolder called "La Nef"; I only keep my RAWs here. After developing my RAWs, I put them in a JPEG or TIFF subfolder (meaning, my files ready to be stitched). The file "Project xxx.pto" by Hugin is kept here, which I find quite natural.
Nothing else special in this tab.
2 - "Assistant" / Load images tab - You can possibly ask the software to "Align images automatically after loading them"; I recommend it to beginners. Experienced users like to change two or three things before launching alignment.
3 - "Assistant" / Automatic alignment tab - That's where you need to change the default resizing value of the panorama of 70%. I personally choose 100% but here's why, by default, your panoramas won't have the height of your photos...
4 - "stitching" / Output format tab - That's where you get to choose the file format of your panoramas between TIFF (default), JPEG (with compression rate option) and PNG.
Important remark! This software can't handle PSD format, but TIFF format is also "naturally" limited to 2 Go. Gigapixel projects are thus impossible over a certain size. Secondly and that's the most important, Hugin can't generate multilayer files, so convenient to make certain edits. Big drawback!
Click the button "Accept" to confirm your preferences changes.
Automatically stitch a panorama with Hugin
It is now time to stitch our panorama with Hugin. Essential point, it is possible to get a panorama in three steps only, without "getting your hands dirty". An experienced user will be able to use multiple options however, if he didn't like the automatic result.
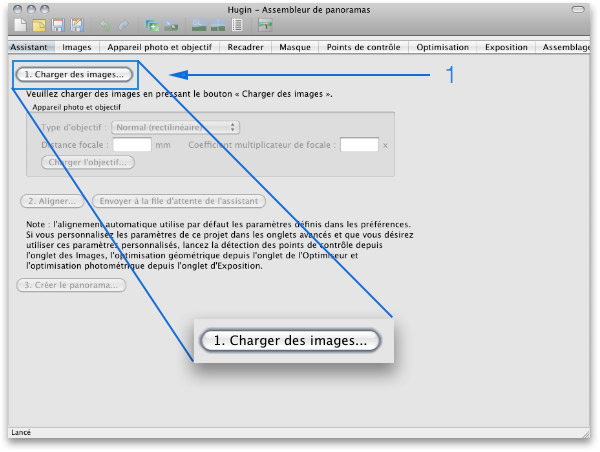
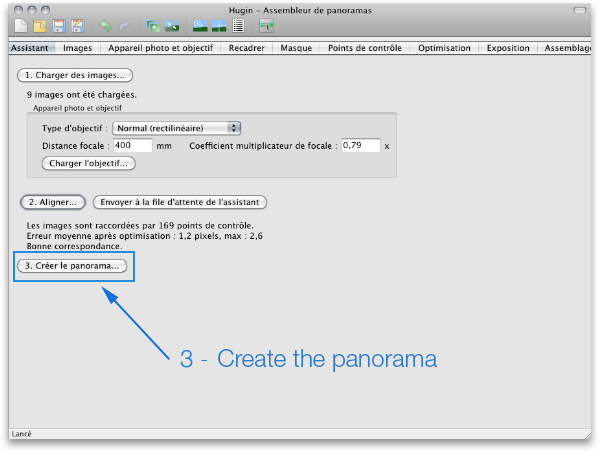
1 - First step: choose the images to assemble. As with many other pieces of panorama software, you need to select them in the folder where they're stored. Click the button "Load images" below, in the main interface of Hugin. It is also possible to select the second tab, "Images" and to drag&drop the images to stitch from your explorer.
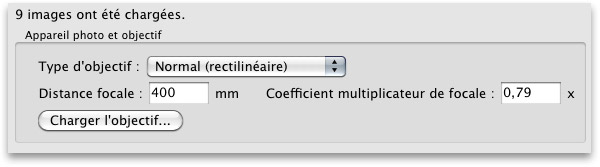
The software automatically detects the number of photos and the lens with which they were taken. Pefect!
Were it not the case, you can inform Hugin manually by telling it whether it's a classic lens, called "rectilinear" or Fisheye then its focal and of course the coefficient depending on the size of the sensor (1 for 24x36).
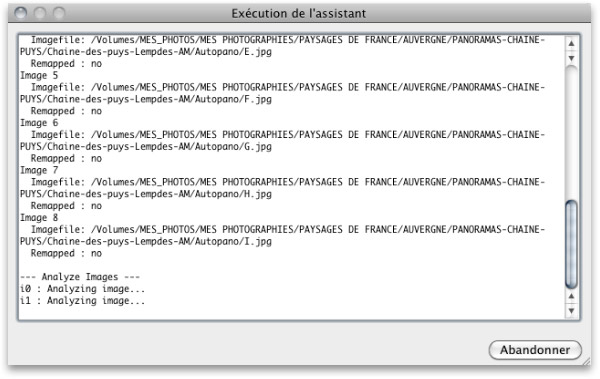
2 - Automatic images alignment - Then, click the button "Align..." below. It will launch the automatic alignment of the images.
Piece of advice! If you want, you can change the preferences of the software so that it automatically launches the alignment of the photos after loading them. Preferences Menu / Assistant / Check the button "Automatically align images after loading". We saw it in the first part of this Hugin tutorial.
It launches pre-stitching and opens a new window with many weird things written but it doesn't matter at all: the software is working...
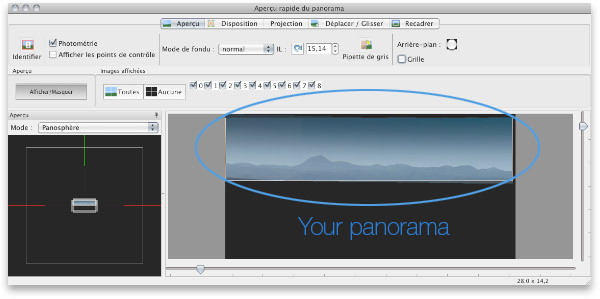
When the calculation is over, it opens a new window "Quick preview of the panorama" below.
There's nothing particular to do. It's all automatic and it works very well. The buttons are here for experienced users and connoisseurs...
Shut this window.
3 - Click the button "Create the panorama..."
The software then asks you to save to things in this order and in two separate windows:
1 - The project - it will keep in memory where the images to stitch are on your hard drive and how they should be stitched. If you were to redo the stitching, you'd save precious time...
Piece of advice! Like I do, leave the name chosen by the software if your images are in a separate folder. The project is automatically saved where the images to stitch are. If your images are in a folder "Vacation in India", then you'll also have to choose a name to recognize THIS stitching project among all the projects in this folder.
2 - Your panorama and its file - Automatically and by default, panoramas are saved in TIFF format except if you've changed this preference as I recommended before in this paragraph. I recommend to choose JPEG if you're a beginner. If you're a beginner, it is most likely that this format won't suit you and that you'll prefer the JPEG format.
Here again, you don't have anything to do apart from naming your panorama and placing it wherever you want!
You just stitched your first panorama !
Now you only have to open it in your editing software to modify it, magnify it, correct it then... share it.
Learn panoramic photography on a DVD
"Learn panoramic photography with Kolor Autopano " - 2011 version -
In this reedition of my DVD which first version was from 2008, I video-guide you to master all aspects of panorama shooting with the last version of Autopano Giga. "Learn panoramic photography with Kolor Autopano" is available at Elephorm.com. En savoir plus
(Contribute to the development of this site by buying this DVD from the link above.)
Pratical Guide N°1 : The Nodal Point
$12.90 USD
My practical guides in e-books - N° 1!
"Find the nodal point or no parallax point accurately in less than an hour"... whether you are photographing a simple panorama or a 360° photo - PDF of 100 pages -More information...
This website is almost entirely free and yet almost free of ads. Why? Because they look so bad! It is lucrative though, and enables many websites to keep on living. So I asked myself: what can I do? To keep on developing this website, I'm going to need a regular income just like everyone else. How can I keep on giving access to free information like I've been doing since April 2002?
And I finally found the answer: affiliation. Every time you click on a link from this site to one of my partners' shops, they know you've been referred by me and give me a small percentage on your purchase, be it something I recommend on my website or anything else. Remember to use my links when you shop on these sites! It doesn't cost you anything and it's a win-win deal – for me, them, and you!


 One of the main strengths of Panorama Tools, Open Source tools used for the realization of Hugin which presents them in a nice, pleasant to use interface, is its ability to correct
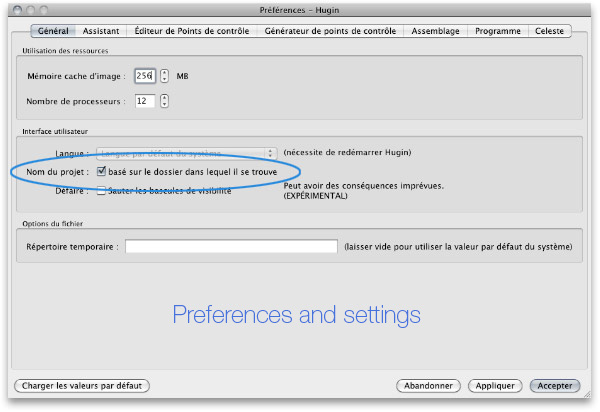
 Piece of advice!
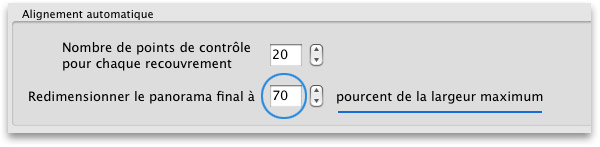
 Important remark!