Nodal Ninja has just replaced the panoramic head that I advised most often to those who want to make virtual tours with rather light equipment (Sony A6300, compact SLR APS-C sensors, etc.). In this new revision Mk3, progress seems such that more cumbersome SLR owners like the awesome Nikon D7200 should consider it from now on and thus lighten their camera bag in the process. I can not wait to let you discover ...
The panoramic head Nodal Ninja 3 Mk3 is a so-called spherical head. It allows to shoot 180 x 360 ° and thus to realize complete virtual visits. It replaces the Nodal Ninja 3 Mk2 that I loved and that I advised my trainees for APS or smaller boxes. It is removable in two parts making it a material of choice for transport and storage in his camera bag. This is not a detail!
If the old model was in the middle high stability compact heads, the Mk3 crosses a course and it is even now perfectly able to support my Nikon D7200 + Nikkor Fisheye 8-15 mm. Thus, provided that your housing is not too far back, the stability will be preserved. It has of course an integrated bubble level (accurate this time!) And allows to return rather easily his vertical rail to photograph the nadir.
Finally, it is possible to easily change the rotator with:
The new Mini V2 rotator (from 3 to 36 stops to choose for purchase);
The RD-10 (10 possibilities from 3 to 36 stops).
It is therefore possible to configure a head almost tailor-made! With the RD-10 rotator, it is possible to change the number of stops between two consecutive photos very easily depending on the lens used. On the other hand, those who, like me, use their panoramic head with only one hardware configuration will have an interest in choosing the new Mini V2 rotator with the number of stops they need (12 detent rings).
As with all spherical panoramic heads, it is possible to place the nodal point of the used lens absolutely in all directions. It is therefore a universal head.
Thanks to the company Panosociety (In Europe) and Jan Vrsinsky for the equipment loan that allowed me to carry out this test very soon after its release.
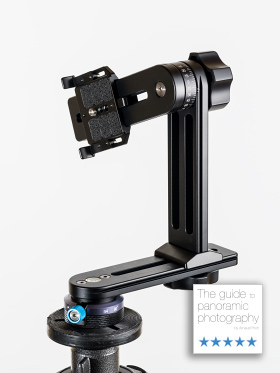
Nodal Ninja 3 Mk3 panoramic head presentation
The panoramic head Nodal Ninja 3 Mk3 is a spherical panoramic head. It allows to realize all types of panoramic photos and therefore of course 360 ° virtual tours. It has a depth adjustment rail, tilting on a vertical rail, itself attached to the lower rail. Each rail allows a displacement of 12 cm (4.72 in). With or without its nadir adapter sold as an option ($65 / €70), it is perfect to take the nadir picture even with long exposure times. Finally, this new Mk3 version can be mounted either on the new Mini V2 rotator (number of fixed stops but 10 detent rings available) or the new RD-10, lighter and less bulky than the known RD-16.
Technical specifications
Nodal Ninja 3 Mk3
Average price of the basic model: from $220.00
Quick fastening
Yes
Supported weight
1.5 Kg (3.3lb) with Mini V2 and 3.5 Kg (7 lb) with RD-10
Height of use
23 cm (9 in)
Rails movements
On 12 cm (4.7 in) upper and 12 cm lower
Bubble level
Yes (Acurate this time!)
Dismountable
Yes - in two parts - base and vertical rail + upper rail.
It is composed of two separate and removable parts as shown in a photo above. Once mounted, it is "normally" imposing but is particularly compact space folded as it is well designed. As it is rather light with its rotator Mini V2 (615 grs / 1.35lb measured in running order), it is particularly easy to transport.
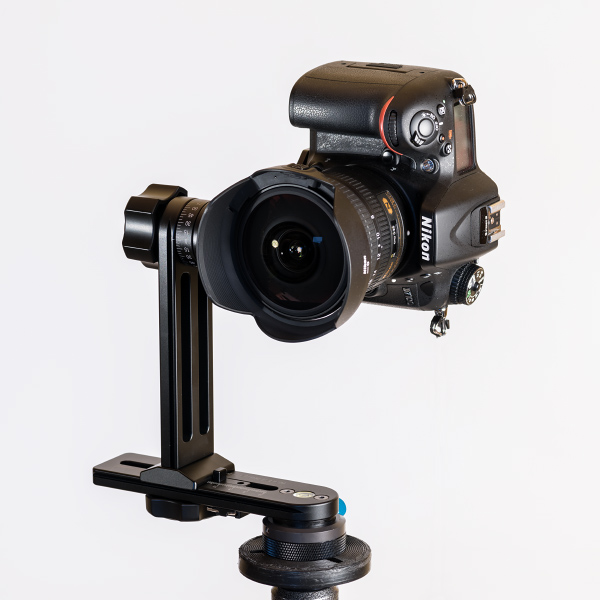
Camera installed, it is about 17.5 cm (6,7 in) higher than the tripod. The overall height is indeed 18 cm from the base of the tripod. As you can see in the picture above, its width dimensions are classic, I mean not too short for this model 3 and it is rather an advantage to photograph the nadir as we will see. The model 3 Mk3 remains a bit short for those who photograph all the time nadir long exposure time. The new Nodal Ninja 6 (soon to be tested) may be preferable on this criterion.
It is also very clear that the vertical rail can be unscrewed very easily for turning and for transport. Finally, note the presence of a tilt head clamping knob quite compact and easy to handle, again.
Lastly, let's hope that it remains accurate even after several years of intensive use and that the surface coating will be better preserved over time!
Once folded, the Nodal Ninja 3 Mk3 spherical head + Mini V2 is especially compact.
The new Nodal Ninja 3 Mk3, without setting a new record still held by Bushman Panoramic remains rather light for stability above average. I believe that Nodal Ninja has found a good compromise.
Two distinct and dismountable parts
The Nodal Ninja 3 Mk3 head is disassembled into two separate parts. This is a valuable benefit to store the material in his camera bag. The Nodal Ninja is particularly exemplary on this point even if Bushman Panoramic does even better on this criterion! To disengage the vertical rail of the lower rail, simply unscrew it. The knob is very pleasant to handle because it is very wide and its coating is soft to the touch (image below). Once disassembled, I put everything in a location of small telephoto lens 135 mm.
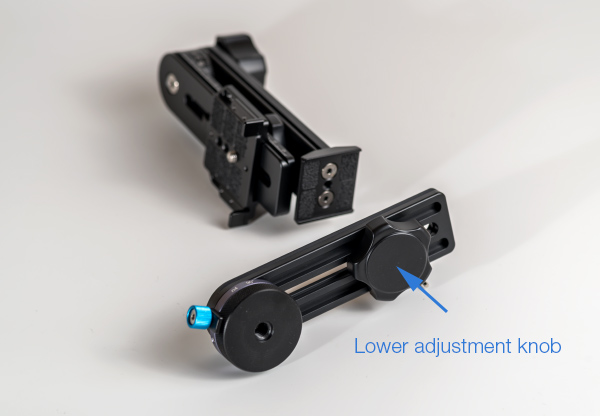
Once disassembled, the head Nodal Ninja 3 Mk3 is broken down as follows: a vertical rail and its 12 cm high fixed and tilting upper rail (1), the Anti-Twisting Camera Mounting Plate of the ingenious camera as we will see below (2), the 12 cm lower rail also (3) on its rotator, here the Mini V2 (4).
1- Upper rail tilt and vertical arm - The slider is secured to the vertical arm and receives the fast camera mounting plate. This slider allows a depth adjustment of the camera on 12 cm. Also note that tilt is continuous. There is no click or stop every 15 ° as on the Nodal Ninja 6 - The upper rotator uses a "compression friction lock".
Note about 24-70mm zooms - This 12cm rail length is too short to fit a 24-70mm f2.8 zoom set at the nodal point, especially at 24mm.
2 - Anti-twisting camera mounting plate - New! - The Nodal Ninja 3 Mk3's fast camera mounting plate is totally new and original. The Camera Mounting Plate uses two adjustable bumpers that once positioned will prevent the camera from twisting on the upper rail. This is same for NN3 MKII and NN4, NN6. It comes naturally slide on the upper rail thanks to a kind of dovetail which, remarkable thing, has no a slight amount of play between some parts. The Nodal Ninja 3 Mk2 or NN4 had a really important amount of play. She slides on 12 cm.
No a slight amount of play between the lower rail and the vertical arm ! It's new!
3- Lower rail - The lower rail has 12 cm of adjustment right / left.
4 - A Nodal Ninja 3 Mk3 = 2 rotators! My tips for choosing ...
There are two models of rotators that will have to be selected when ordering, both recent ones:
Either the rotator Mini V2 (only one stop to choose from 12 detent rings)
Either the RD-10 rotator (10 stops).
1 - The rotator Mini V2 - New! - It is therefore possible to choose from 12 detent rings, from 120 ° to 10 ° (3 stops to 36 clicks stop). The system that allows to change the number of stops - a simple detent ring below in photo on the right - is much simpler than on the previous model. Very clever and practical!
2 - Rotator RD-10 - New ! - Copied on the principle of the well-known RD-16, it is more compact and proportionate to this new Nodal Ninja 3 Mk3 or even its big sister, the Nodal Ninja 6. It has, as the name suggests, 10 clicks stop (From 4 stops / 90 ° to 72 stops / 5 °) so a wide range of possibilities.
My opinion on these two rotators and my buying advice...
If you buy this head just to take virtual tours with the same hardware - the same fisheye lens or the same focal length - all the time, then take the Mini V2 rotator with the number of clicks you need. On the other hand, if you take panoramas with at least two different focal lengths, then take, without hesitation, the RD-10 rotator, so much more convenient.
Use of the Nodal Ninja 3 Mk3 panoramic head
Like all panoramic heads, the Nodal Ninja 3 Mk3 head is used to place the nodal point of its lens above the axis of rotation of the ball and in the axis of inclination of the vertical arm to obtain overlapping areas perfect, even in spherical photo (360 °). This manual panoramic head is one of the simplest heads to handle. Personally I love!
Nikon D7100 + Nikkor 8-15 mm Fisheye lense on Nodal Ninja 3 Mk3
Adjusting the head to the nodal point
Let's start with an essential point, fixing the case on the upper rail and therefore the new camera support:
1 - Attach the camera to the dedicated mounting plate - New: simply attach the camera directly to the dedicated support (photos below) sold with the Nodal Ninja head and stall against the housing the two adjustable bumppers that slide on two centimeters. Not only does this allow the case to be replaced in the same way, but also to prevent it from tilting under its own weight and that of your lens. The still clever! But the most clever is that this board is no longer attached to your camera but is screwed between your camera and the upper rail with the same knob below:
From now on, the knob that serves the camera and the rail that supports it is the same.
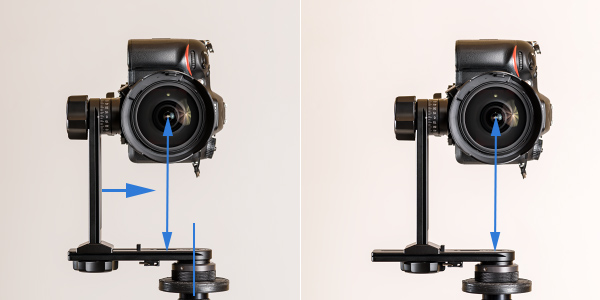
2 - Move the optical center of your lens towards the center of rotation of your rotator - Once the camera is fixed vertically on the upper plate, itself on the tilting arm, it is sufficient at first to center the lens just above the axis of rotation of the toothed base thanks to the movement of the vertical arm (possible stroke of 12 cm). To do this simply move this vertical arm a little to the right in this example after loosening the clamping screw below it ...
3 - Set the housing deep down to the nodal point - Once this is done, you have to find the depth setting according to the nodal point of its lens and, if it is a zoom, you have to find the settings according to the focal lengths commonly used. This is done with the upper rail, very simply!
The nodal point is perfectly set in all axes so in 3D on this panoramic head for this purpose. It remains only to note the settings, below ... unless using the new rail stop, ingenious on this new head.
Remember the settings for the Nodal Ninja 3 Mk3 head
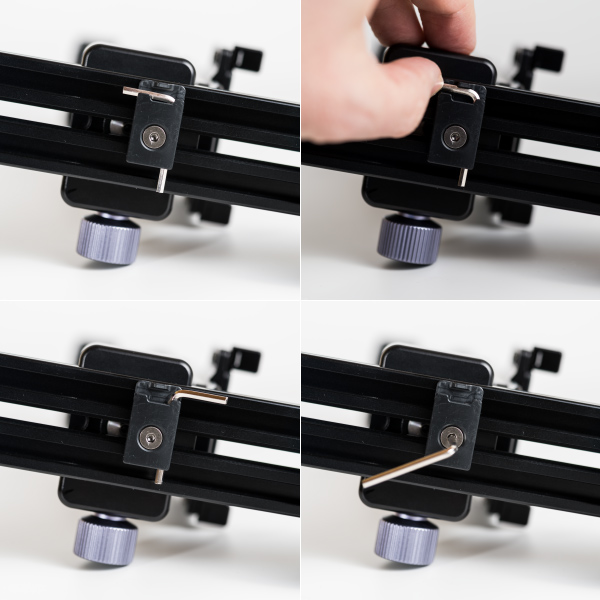
Once the settings made for your lens and unlike the heads Manfrotto303 especially, there's no need to take notes to mark the settings (at least when you only work with one lens) because the Nodal Ninja 3 Mk3 head is sold (like models 6) with two metal rail stop that screw under the graduated rails, in abutment against the vertical arm AND against the camera mounting plate once set. To replace the vertical arm and the camera in the right position, it is only to press the arm and the camera mounting plate against these small rail stop (Photos below)... Unbeatable even in the dark!
The small stop which we see a small end protruding from the rail serves as a stop on the vertical arm and will come to bear on it. It is very reliable and practical!
The Allen key used to lock the rail stop is now directly under it. It is very practical too!
Rotate the vertical rail 180° to shoot the nadir
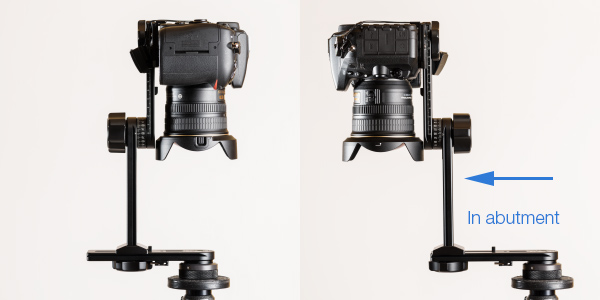
In the tutorial dedicated to the creation of virtual tours on this site, I wrote an article about shooting the nadir with a tripod. To do so, you need to rotate the vertical arm from 180° in order to tie the camera above empty space by putting it as far away as possible from the arms of the tripod. On the Nodal Ninja 3 Mk3 head (as well as on models 6), simply unscrew the knob under the lower rail (picture below left) which holds the vertical arm in order to rotate it over 180 ° (image below right). And for that, you do not need a screwdriver because the knob is very wide and pleasant to the touch. It's very useful. And yet Nodal Ninja is doing even better ... Here's how.
1 - First solution: ... rotate the vertical rail 180°, simply!
When you're trying to shoot a complete sphere in order to realize a virtual tour and if you want to get the best possible quality, it is better to shoot the nadir leaving the camera on the panoramic head in order to keep the camera close to the nodal point relatively to the ground but also, of course, to be able to shoot photos with long exposure times.
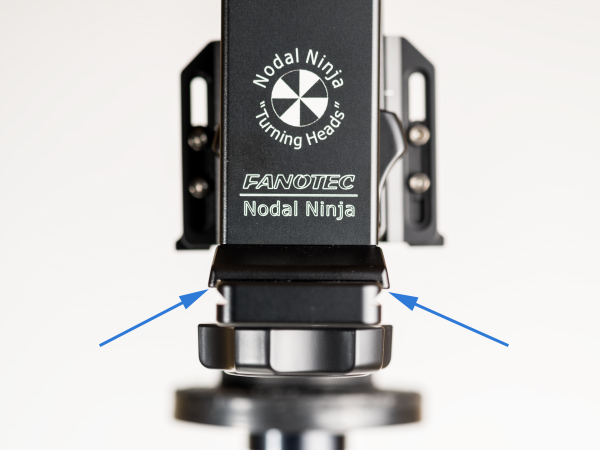
Note that this new Nodal Ninja 3 Mk3 sinks significantly less under its own weight than the old NN3 Mk2 it replaces when we turn the vertical arm. The fixing system of the lower rail on the rotator and the play in the rotator have been further improved. When I tell you that it breathes solidity!
2 - Second solution: new nadir adapter in option
Nodal Ninja produces a small accessory that comes between the vertical arm and the lower rail and that enables to rotate it over even more easily without dismounting it. Simply unscrew the small knob on the side, the same used to lock the arm to the right position elsewhere and rotate the vertical arm. It could not be easier!
Once the adapter is inserted between the lower rail and the vertical arm, simply unscrew the knob on the side from now on and rotate the arm 180 °. Very beautiful material with gentle but frank movements. The impression of quality is real!
Stability and spherical heads: what is this Nodal Ninja 3 Mk3 worth?
To photograph the nadir without a tripod or panoramic head, two things are needed:
Flip the arm up and hang the camera over the gap;
move it as far as possible from the center of rotation to photograph as little as possible the branches of the tripod.
But it is to the detriment of the stability of the whole if one wants to use long exposure times which is often the case at F11.0 indoors! It is therefore necessary to find an acceptable compromise and very clearly, this Nodal Ninja 3 mk3 very significantly improves things compared to the NN 3 Mk2 it replaces...
Conclusion and rating!
Today, the Nodal Ninja 3 Mk3 head is certainly one of the best designed spherical heads on the market, most enjoyable to use. It remains rather light even if it is not the lightest but in any case it does not sacrifice stability to the yardstick of the sacrosanct lightness! And I'm one of those users! The vertical arm turns easily and it is possible for those who still use it with the same optics to use only the detent ring so without the RD rotator, heavier and more expensive.
In conclusion, I love this head to take my more conventional virtual tours (eight photos) with my Nikon D7100 and Nikkor 8-15 mm Fisheye. I do not use RD rotator because I always use the same number of stops and the detent ring 6 stops is enough, especially in this new version significantly improved. As a result, the head remains compact enough in this configuration and therefore stable.
Excellent product that we find on the European market at Panosociety and where I give you a discount of 5%!
Ratings
Nodal Ninja 3 Mk3
Manufacturing quality
Robustness/stability
Bulkiness mounted
Bulkiness dismounted
Setting of the base
Value for money
PROS...
Especially well designed and well made,
Many original and practical improvements,
Very stable with light housings or even heavier housings but with a compact and rather lightweight lens,
Content weight,
Dimensions mounted and folded,
The vertical arm rotates easily,
With or without optional RD rotator,
Optional nadir adapter further improved,
Precise bubble level!
Product "Heart Stroke"!
CONS...
Maybe the absence of upper rotator stops like the NN4 and NN6 ... but it offers great freedom of choice and is lighter and more compact,
Heavier than the competition ... but great stability preserved. It's up to you to choose what you prefer!
For the rest I'm still looking!
OVERALL RATING
9.75 / 10
My opinion: I dreamed about it, Nodal Ninja did it! This new Nodal Ninja 3 Mk3 remains light enough for improved stability and an undeniable convenience. And what about the quality of manufacture ... It's a real favorite product!
This new head is sold on the European market by Panosociety with which I negotiated a discount for you. Enjoy!
Buy the new Nodal Ninja 3 Mk3
Retailers
Price without VAT
$219.95
Black Friday
180.14 € *
Pratical Guide N°1 : The Nodal Point
$12.90 USD
My practical guides in e-books - N° 1!
"Find the nodal point or no parallax point accurately in less than an hour"... whether you are photographing a simple panorama or a 360° photo - PDF of 100 pages -More information...
This website is almost entirely free and yet almost free of ads. Why? Because they look so bad! It is lucrative though, and enables many websites to keep on living. So I asked myself: what can I do? To keep on developing this website, I'm going to need a regular income just like everyone else. How can I keep on giving access to free information like I've been doing since April 2002?
And I finally found the answer: affiliation. Every time you click on a link from this site to one of my partners' shops, they know you've been referred by me and give me a small percentage on your purchase, be it something I recommend on my website or anything else. Remember to use my links when you shop on these sites! It doesn't cost you anything and it's a win-win deal – for me, them, and you!


 Note about 24-70mm zooms
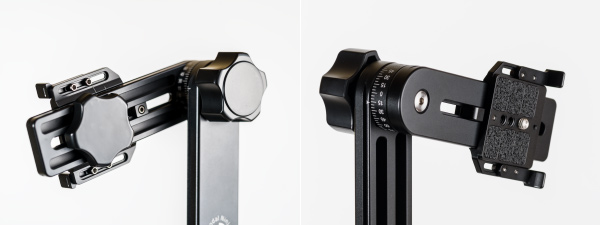
 4 - A Nodal Ninja 3 Mk3 = 2 rotators! My tips for choosing ...


 Today, the Nodal Ninja 3 Mk3 head is certainly one of the best designed spherical heads on the market, most enjoyable to use. It remains rather light even if it is not the lightest but in any case it does not sacrifice stability to the yardstick of the sacrosanct lightness! And I'm one of those users! The vertical arm turns easily and it is possible for those who still use it with the same optics to use only the detent ring so without the RD rotator, heavier and more expensive.


