During the shooting of the different photos of the sphere, you'll have to stay focused. Indeed, you'll need to think about double exposure in case of compensation of high lights (HDR exposure), rotate or tilt the panoramic head, move the tripod to shoot the nadir without the tripod... You sure won't get bored!
Key points if you're a beginner...
Here are the key points to remember about the shooting of a virtual tour. The rest of this page is aimed at those who want to learn more.
Realize a virtual tour without a tripod and with the camera hand-held is almost impossible. You need at least a monopod, and even better, a tripod.
If you set your camera on a panoramic head, itself on a tripod, you'll be able to work fast and well.
I'll explain you below how to shoot the photos if you want to remove all traces of the tripod.
You need to decide one last thing before engaging into the realization of the shooting: whether you want to use a tripod or not. Except for dilettante photographers, even photographers who choose to make virtual tours into the heart of action - literally and figuratively - work with a circular fisheye but also on a monopod. It enables to keep the camera more or less at the nodal point and especially in height. Finally you can shoot the photos and make exposure corrections in front of openings...
Hand-held or on a tripod?
The realization of virtual tours with the camera hand-held can only be seriously considered if you only need two or three photos to shoot the complete sphere. And even then, it is better to set your head on a monopod. It is easier to remain at the entrance pupil (Nodal point) and to keep a very mobile solution, light and not bulky. As soon as you need more photos, the tripod is mandatory.
My recommendation! It is interesting to note that the more impressive the tripod, the more space it will take at nadir level. That's not what you're looking for in general, so careful about your choice!
The shooting During the preparatives, you decided on the number of shots you'll need to make a complete rotation as well as the number of ranges. You only need to turn / tilt the camera between two shots depending on the angle covered by the focal used, while thinking of the overlap necessary for stitching. As I showed you in the category equipment and if you own a head with a notched base, you only have to rotate the camera to the next notch. If you don't, you'll have to do it according to what you're seeing on the control screen or in the viewfinder. I even think sometimes that looking through the viewfinder has its assets if the camera doesn't have a built-in cloaking device. Indeed, some old digital cameras like the old E10 Olympus have a reflex view through the intermediate of a semi-transparent mirror. If the sunlight or a spotlight enters through the viewfinder, it can easily veil the photo as I regrettably experienced! Hopefully, it only seldom happens and anyway, there are better things to do than look through the viewfinder: look around you to see whether a subject could enter the field of the photo...
Shoot the nadir and... make the tripod disappear!
Shooting a complete sphere raises a real issue because of the tripod. How to eliminate it? There are several approaches depending on the nature and the level of interest of the floor, your panoramic head and the time you can spend on it.
In a first approach, you choose not to shoot the floor under the tripod and you thus have to eliminate it in one way or another. In a second approach, more accomplished and impressive, you'll try to actually shoot what's under the tripod and make the tripod disappear in the virtual tour. The user seems to float into empty space then. In certain cases like the floor of the reception of the hotel Chè;vre d'Or in Eze-village it is even compulsory...
The nadir with a tripod...
In our first case, you don't shoot the floor under the tripod. The nadir photo hence includes the tripod. It can be erased in two ways:
By placing a circular shape in its place in order to hide it;
Or by stopping the mouse movement downwards at the limit of the tripod arms in Panotour Pro.
When you choose the first solution, it is then common to write your copyright and the name of the place shot in this circle. Anyway, when you don't show the floor, it either because the floor is completely uninteresting and shooting it wouldn't bring anything to the virtual tour, either because you can't rotate 180° the vertical arm to direct the camera towards empty space or either because you don't know how to proceed!
A circle was simply added in Photoshop on the floor photo to write annotations. I'm not a big fan of this technique. I only used it to show you how it works!
My recommendation! I really prefer, when I'm not shooting the floor because it doesn't have any interest, to stop the virtual tour downwards at the level of the arms of the tripod. I never found this circle very elegant. I'll explain you how to proceed in my tutorial dedicated to Panotour Pro.
If you're not of the same opinion, for the photo to show as few of the tripod as possible, and for the circle to be as small as possible too, there are three possibilities:
either shoot with a full-format fisheye (15 mm fisheye in 24 x 36) and then the vertical field of view is such that the circle is really small;
either shoot with a circular fisheye (8 mm fisheye in 24 x 36);
Either add one more line at the bottom, at the limit of the tripod arms.
Nadir without tripod...
It is my very favorite solution, even if it takes more time during the shooting and after, in front of your computer. It brings a lot of added value to the virtual tour, if the floor is of any interest obviously. I'll say it again: I'd rather stop the visit downwards than show a floor of no interest.
Shooting a nadir with no trace of the tripod is done in two steps:
first, you'll need to shoot the raw material you'll need afterwards;
then in Photoshop, you'll have to make the two or three pictures match and using the layers masks, remove all traces of the tripod. It can take quite a while but with a bit of experience, you won't spend more than five minutes on a nadir...
Here are the steps to shoot the raw material:
1 - Shoot all the photos aiming at 0°;
My recommendation! I always start with these photos because if the weather changes, if a subject passes and stop into the field of vision, at least I'll have saved the most important part of my sphere.
2 - Then shoot the zenith photo (+90°);
3 - Then shoot a photo towards the floor (-90°) by directing the camera towards the floor, just above the rotary axis. Make sure to set the vertical arm above one of the arms of the tripod.
Note! It takes me less than 30 seconds to get 95% of my sphere in full daylight.
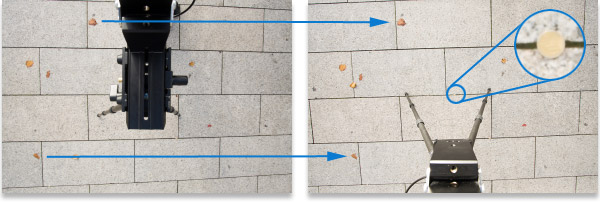
This way, you'll get a photo towards the floor with the print of your panoramic head and part of the arms of your tripod BUT this photo will perfectly match the other ones because the tripod won't have moved in a first time.
In this photo, you can clearly see that 85% of the photo is tripod and panoramic head-free so only a small part of the floor is missing to get a complete sphere.
You'll thus have to shoot another photo of the same place but without the tripod. And at that point, I'd like to make two important remarks:
Even if you often see tutorials where the photographer shoots the last photo with the camera hand-held, raising his arm approximately at the height of the first photo, how to proceed with a long exposure time like in a church or a quite dark atmosphere, etc.?
Only one solution, use the same tripod on this same panoramic head but shift the tripod a little relatively to the floor.
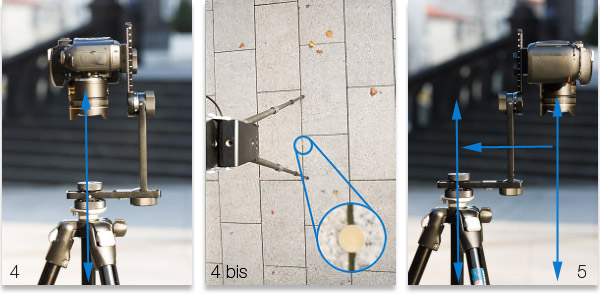
The arrow towards the left in photo 5 indicates the shifting direction of my tripod once my vertical arm turned over empty space and a coin placed just under the central column of my tripod as a marker at step 4.
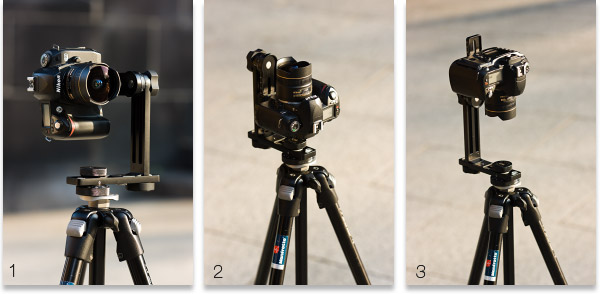
4 - In profile, the camera aims at the floor and is set just above the rotary axis. The camera is still set at the nodal point of its lens. I thus take a photo.
4 bis - Place a coin as marker on the floor, just under the central column of the tripod, hence BEFORE moving the tripod. It represents the rotary axis of the head but also the rotary axis of the nodal point of the lens.
5 - The, rotate the vertical arm of the panoramic head at 180° - here is why it is so important and I'm already talking about it in the page spherical panoramic heads!
The camera is now hung over the floor BUT IT'S STILL AT THE SAME HEIGHT and STILL ON THE TRIPOD HENCE STABLE AT ALL EXPOSURE TIMES. By rotating the vertical arm over at 180°, I moved the nodal point of my lens of XX cm (xx in). Well I am now going to move my whole tripod of the same XX cm but in the opposite direction in order to set my lens again where it was, at the nodal point of the 3D sphere, aiming at the coin. I take another photo (4 bis).
My recommendation! To reposition your lens accurately, I only have to look through the viewfinder of my reflex or use the liveview and position the coin perfectly at the center of my viewfinder.
Where my tripod and my panoramic head were standing, I now shot the floor and leaves are here to prove it. The insert shows the coin I used as a marker.
I take my last photo (above on the right)... In the next step of preparation and edits on my photos, I'll just have to take the raw material of the floor to paste it on my previous photo of the nadir (step 3) with Photoshop - remove the panoramic head from the nadir. It's quite easy with layer masks if the work has been done correctly during the shooting.
Double exposure: HDR exposure
This part requires a minimum focus. During the phase of measurement of the light you might have decided to make an exposure correction to compensate high lights which might have been really "burnt". You thus need to think about making a photo with the basic exposure time, then a second one with a correction of 1.5/2 diaphragms. Be careful not to move the tripod during this phase, nor the panoramic head. The stitching of the two photos will only be easier. The exposure is always set in manual mode and exposure corrections must be made by changing the speed and not the diaphragm to avoid stitching problems.
All the raw material is now on the memory card and you need to develop the RAW files, bring possible corrections, stitch the two photos of the nadir and paste possible photos shot at the level of windows and openings - edits before stitching
"Find the nodal point or no parallax point accurately in less than an hour"... whether you are photographing a simple panorama or a 360° photo - PDF of 100 pages -More information...
This website is almost entirely free and yet almost free of ads. Why? Because they look so bad! It is lucrative though, and enables many websites to keep on living. So I asked myself: what can I do? To keep on developing this website, I'm going to need a regular income just like everyone else. How can I keep on giving access to free information like I've been doing since April 2002?
And I finally found the answer: affiliation. Every time you click on a link from this site to one of my partners' shops, they know you've been referred by me and give me a small percentage on your purchase, be it something I recommend on my website or anything else. Remember to use my links when you shop on these sites! It doesn't cost you anything and it's a win-win deal – for me, them, and you!


 The realization of virtual tours with the camera hand-held can only be seriously considered if you only need two or three photos to shoot the complete sphere. And even then, it is better to set your head on a monopod. It is easier to remain at the
  My recommendation!
 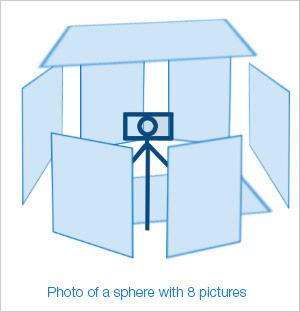 During the preparatives, you decided on the number of shots you'll need to make a complete rotation as well as the number of ranges. You only need to turn / tilt the camera between two shots depending on the angle covered by the focal used, while thinking of the overlap necessary for stitching. As I showed you in the category
  Shooting a complete sphere raises a real issue because of the tripod.
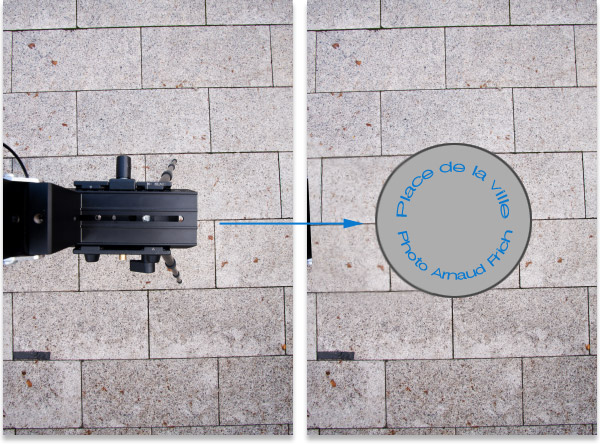
 Note!
Note!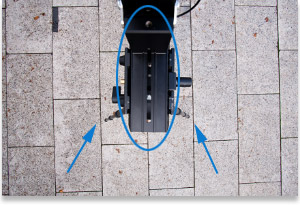 This way, you'll get a photo towards the floor with the print of your panoramic head and part of the arms of your tripod