|
|||||||||||||||||||||||||||||||||||||||||||||||||||||||||||||||||||||||||||||||||||||||||||||||||||||||||||||||||||||||||||||||||||||||||||||||||||||||||||||||||||||||||||||||||||||||||||||||||||||||||||||||||||||||||||||||||||||||||||||||||||||||||||||
|---|---|---|---|---|---|---|---|---|---|---|---|---|---|---|---|---|---|---|---|---|---|---|---|---|---|---|---|---|---|---|---|---|---|---|---|---|---|---|---|---|---|---|---|---|---|---|---|---|---|---|---|---|---|---|---|---|---|---|---|---|---|---|---|---|---|---|---|---|---|---|---|---|---|---|---|---|---|---|---|---|---|---|---|---|---|---|---|---|---|---|---|---|---|---|---|---|---|---|---|---|---|---|---|---|---|---|---|---|---|---|---|---|---|---|---|---|---|---|---|---|---|---|---|---|---|---|---|---|---|---|---|---|---|---|---|---|---|---|---|---|---|---|---|---|---|---|---|---|---|---|---|---|---|---|---|---|---|---|---|---|---|---|---|---|---|---|---|---|---|---|---|---|---|---|---|---|---|---|---|---|---|---|---|---|---|---|---|---|---|---|---|---|---|---|---|---|---|---|---|---|---|---|---|---|---|---|---|---|---|---|---|---|---|---|---|---|---|---|---|---|---|---|---|---|---|---|---|---|---|---|---|---|---|---|---|---|---|---|---|---|---|---|---|---|---|---|---|---|---|---|---|---|---|


 The
The  The
The  The
The  The
The  The
The  The
The  The
The  The
The  The
The 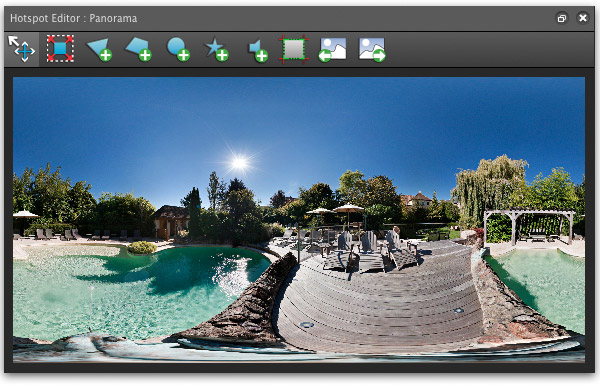
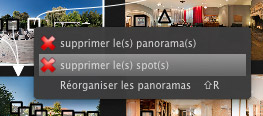
Delete a HotspotYou might need to delete a hotspot. To do so, you just have to click the small icon representing it - little white square in the example below, ON the panorama and IN the main window. Then, you need to right-click it to open a contextual menu. In this same menu, click "Delete the spot(s) ".
|
|---|
Hotspots properties
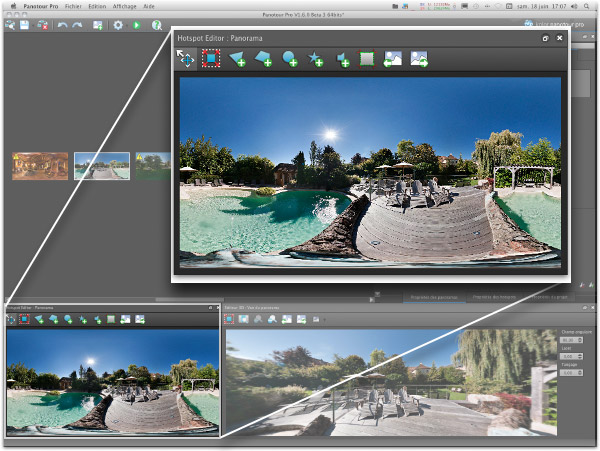
It is now time to create links between hotspots zones and the different panoramas, to edit interest spots, sounds, etc. We'll detail the tab "Hotspots properties" in the Properties zone, at the top right.
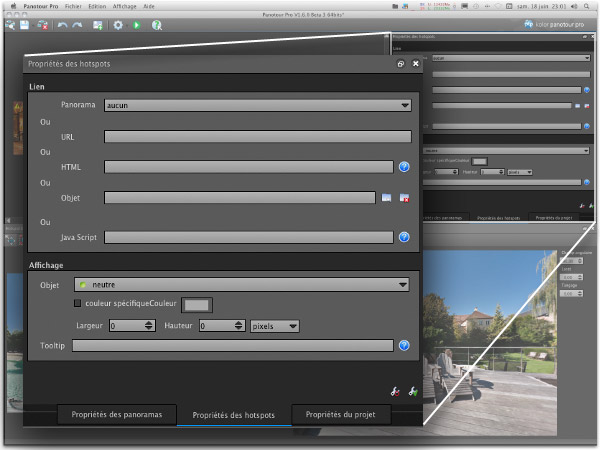
This window changes aspect depending on the type of hotspot selected. Here, it's an image or photo link.
Polygonal or rectangular hotspot
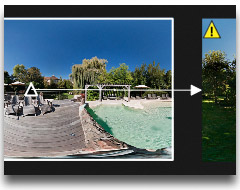 When you've drawn a polygonal or rectangular hotspot before in this page, the zone was drawn on the original panorama, in the hotspot editor, at the bottom left, and a small white triangle or square appeared at the center of their location in this panorama, but this time, it's in the column above, the main window. You still had to create the link to another panorama. That's what we'll do now. To create a link you just have to:
-
Draw a link from the first spot - a white triangle or rectangle - to the panorama to link - here on its right -,
-
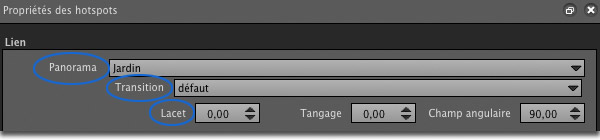
Either choose the name of this same panorama in the unfolding list "Panorama" of the "Link" zone, here of three panoramas, of our project and of the tab "Hotspots properties". An arrow then appears between the two panoramas linked. We could have chosen to open an URL, an HTML page, an item (video, photo...) but it's less common, except for the video we'll see later. When the link is created, new menus appear below.
-
Panorama - The name of the panorama linked appears now.
-
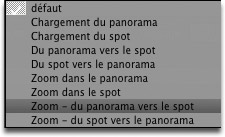 Transition - Choose from the unfolding list the type of animated transition effect you want. This gives movement, like a camera movement, between the two panoramas. No such thing like trying even if I like the transition "Zoom-in - from the spot to the panorama or the next". Nowadays, there are nine effects of animated transitions.
 -
Lace, tilting and field of view - When you've created a link to a panorama, it appears in the 3D editor, at the bottom right. You only have to rotate the panorama as you
 want, zoom in or out when you like the final angle of view in this panorama, to make a right click of the mouse to open the contextual menu "Use as view for the hotspot" or click the icon in the menu bar of the 3D editor "Use as view for the hotspot".
Piece of advice! Make sure that the final view is different from the default view for this panorama. Coupled to the transition evoked before, the virtual tour becomes more lively!
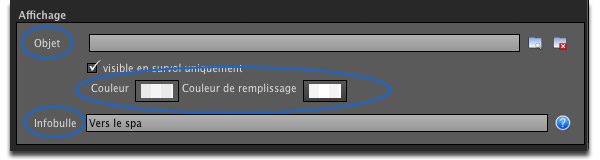
Then, you need to edit the display of this hotspot in the virtual tour. This is done via the menu below. It allows to set the colors of the hotspot, the information balloon and if the hotspot zone should be displayed permanently or only when hovered.
-
Item - You can choose to display an item above the hotspot zone, an image for instance, but I don't find it really aesthetic.
Caution! this option is invisible when you drew a polygonal hotspot. -
Button only visible when hovered - If you check this option, the user only knows that there's a hotspot here if, during his tour, he hovers it with his mouse.
Piece of advice! I'd rather not check this button, moreover, it is now possible to edit the colors of this hotspot zone and make them very discreet as we'll see now. -
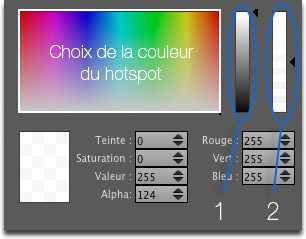 Color - As in outline color - that can thus be different from the filling color (1) . You have the possibility to choose among all the colors of the rainbow thus to adapt it to all the projects but, more interesting, it is possible to modify the luminosity (1) of each color and above all the opacity (2) with the right cursor. I generally choose the same color for the outline and the filling of my tour but I choose an opacity of about 50 % for the outline.
 -
Filling color (1) - This is the background color of the hotspot. I often choose a good ol' white with a 20 % opacity to see through it anyway.
-
Information balloon - The link can be described in this information balloon. Note that it will be possible to choose the font, the size and the color later.
Interest hotspot
 When you placed an interest hotspot earlier in this page, it was placed on the start panorama, in the hotspots editor, at the bottom left and a white circle appeared in its place on the panorama but this time in the column above, the main window. You still needed to create the link to another panorama, an item, a website, etc. That's what we'll create now. To create a link you just have to select this interest hotspot by clicking on it, having chosen the tool "Choose"
 previously in the menu bar of the hotspots editor. Then, in the tab "Hotspots properties", at the top right, you can choose to link this point to a panorama but it's not very "logical", to open a URL (writing the address in absolute value: http://... ), an HTML page, an item (often a photo...) selected from the hard drive. It will be displayed in a lightbox hence above the virtual tour and thus mustn't be too big. It mustn't exceed the size of the user's screen! Then, you need to edit this hotspot label thanks to the following menus:
-
Item - Panotour offers quite a number of items icons, that will superimpose to the virtual tour to draw the user's attention. It also allows to differentiate a hotspot allowing to change panorama - a zone - and a hotspot allowing to enrich THIS panorama - a button.
Caution! The buttons offered depend on the choice of models of navigation buttons in the tab "properties of the project". -
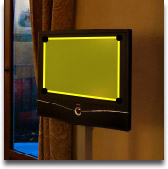
Specific color button - If you check this button, you'll be able to change the color and opacity of the button which is neon green by default.
-
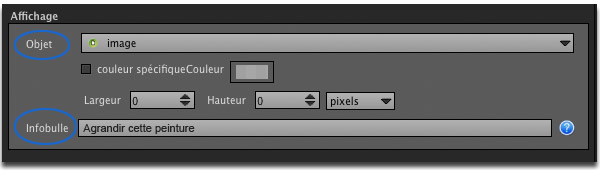
Width, height - It is possible to change the size of the button.
Tip! If you leave it on 0, the button is displayed with its default values. If you choose pixel values, your button will have this size. So be careful about proportions and pixelation if the original button isn't big enough. -
Information balloon - It is possible to describe the interest hotspot by a short text. The text's size, color and font can be modified in the properties of the project.
Video or photo hotspot
 It's always surprising when you can play a video on a TV screen into the virtual tour, when there's a TV of course! It's very easy with Panotour Pro.
Caution! You have to place a rectangular hotspot. The order of the points matters. Start by pulling the four sides at the top left of the screen then go clockwise. Then, click with the tool "Choose" on the little white rectangle symbolizing this hotspot in this panorama in the main window. Then, go to the tab "Properties of the hotspots". Then, you just have to search your hard drive for the video (or other items...), or the photo that must be integrated here, in the "Item" line of the category "Display". That's it!
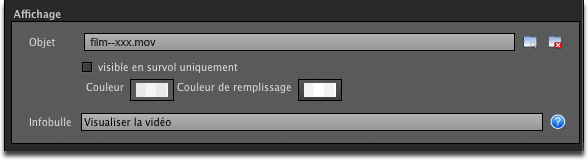
About color setting for the hotspots zone in the virtual tour, I'll let you read the paragraph about it, before in this page.
Sound Hotspot
 It is now possible to set an ambient sound not only to one panorama but localized in one part of the panorama. The sound will be heard only when the user goes past the sound hotspot. The volume will be turned up when he gets closer and down when he goes away. In the opposite direction of where the sound hotspot is placed, the sound is turned off. So once placed, the sound hotspot is selected as always with the tool "Choose" on the panorama in the main window. Then, you classically go to the tab "Hotspots properties". Here, in the only possible field, you select your sound file from your hard drive. It is not possible yet to choose the before/after angle of the central point of the hotspot son where the sound will be turned off in the hotspots editor. The sound surrounds the hotspot at 90°. For those who know, it can be edited with XML files.
Reminder! This sound is always superimposed to the sound of the panorama and to the sound of the project.
Here is how this long part dedicated to hotspots settings in Panotour Pro ends. In the next step, we'll finish and export the virtual tour ![]()
Next page 4/4 : export the virtual tour |
|---|
New! Panotour and Panotour Pro 2.5
|
|---|
| €99.00 |
| €399.00 |
| (Contribute to the being free of this site by downloading Autopano from the link above.) |
Learn more with Kolor's documentation
|
|---|
![]()
![]()
|
||||||||||||||||||||||||||||||||||||||||||||||||||||||||||||||||||||
|---|---|---|---|---|---|---|---|---|---|---|---|---|---|---|---|---|---|---|---|---|---|---|---|---|---|---|---|---|---|---|---|---|---|---|---|---|---|---|---|---|---|---|---|---|---|---|---|---|---|---|---|---|---|---|---|---|---|---|---|---|---|---|---|---|---|---|---|---|
|
||||||||||||||||||||||||||||||||||||||||||||||||||||||||||||||||||||

