To make it easier when you want to make gigapixel panoramas, it is so much better to do it with a motorized panoramic head. The brand Gigapan has a three-models range, among which the famous Epic Pro. It's the more robust if you want to place quite heavy equipment on it.
The Gigapan Epic Pro panoramic head is a spherical motorized head. It is, in two ways: it can rotate and tilt automatically but also release the shutter as automatically. It thus enables to make panorama shooting automatic. You might wonder what's the point of it if you're shooting ten photos?! In fact, this type of head has been invented to make shooting hundreds of photos automatic in order to make high or ultra-high definition photos or even gigapixel panoramas. As for now, you only see them on the Internet where they have an incredible enlargement capacity!
The Gigapan Epic Pro head was one of the first motorized heads on the market. Not only did it automatize this type of photo, but it also made the process very simple. It thus became easy to launch into gigapixel panorama shooting. Even if the model Epic Pro is the most accomplished one, there are also two other models in the Gigapan range: the models Epic 100 and Epic. They're more for users owning lighter cameras. Indeed, the model Epic Pro is the only one that can support a pair camera/teleobjective lens thanks to two vertical arms to reinforce the overall stability. Indeed, to achieve gigapixel sizes or even beat world records of the biggest photo ever, you have to use powerful teleobjective lenses (focal over 300 mm), necessarily heavy and bulky.
Gigapan Epic Pro motorized head presentation
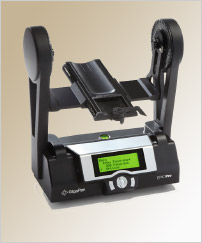
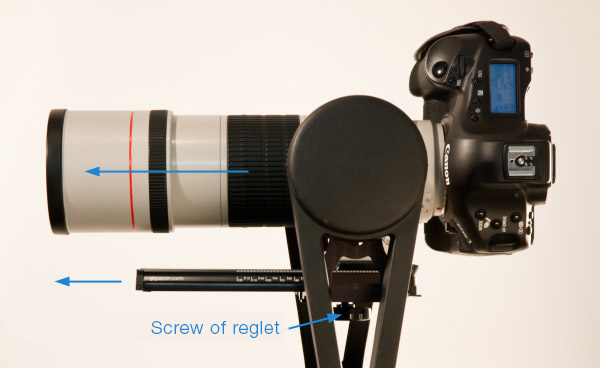
The Gigapan Epic Pro panoramic head (there are two lighter models: Epic 100 and Epic) is thus a spherical motorized head (photo over there). Its two vertical arms are what make it characteristic because it's the only model on the market to have some. It enables to support heavier pairs camera/teleobjective lens like here with a body Canon 1 DS Mark III and another teleobjective lens Canon 300mm + multiplier 1.4X. Overhangs are thus limited even though the whole thing still lacks stability at the level of the base. Another big asset of this head remains its embedded computer built in its base. New! The program is now translated in several languages and the many options enable to set the head very accurately. It is an essential point to realize the shooting as fast as possible.
It is made of one block that can't be disassembled. It is thus quite bulky but it's difficult to do any less if you want a minimum of stability. Since it's still quite light, it remains easy to carry. Come what may, I think it's the best compromise size/stability/weight to make gigapixel photos with 24x36 digital cameras and a teleobjective lens with at least 300 mm of focal. There are in the Gigapan range heads that are less heavy and bulky to make gigapixel panoramas with point-and-shoot cameras more or less light.
The Gigapan Epic Pro head is a good compromise between bulkiness/weight/stability. It remains perfectly transportable.
The head can rotate on 360° and tilt on -65° and +90°. It is thus impossible to shoot a complete sphere.
Fastening of the camera and stability
The camera or its lens is fastened using a classic dovetail system but proprietary. It's all fastened on a sliding stage to place the whole thing either at the nodal point either at the balance point.
Gigapixel photo requires the use of powerful teleobjective lenses, over 300 mm of focal (in 24x36). But for these focals, any vibration can become annoying because the risk of camera shake increases. Two crucial points must thus be checked:
That the motorized head is stable enough,
and that the camera/teleobjective lens pair is placed at its center of gravity.
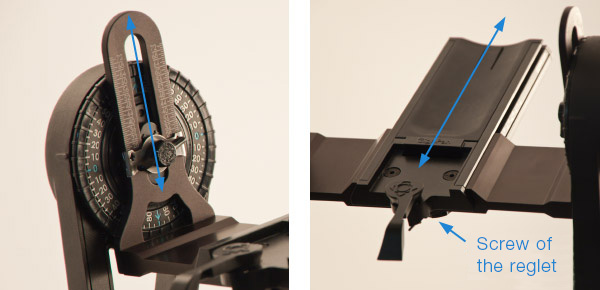
But we know that a third point is important when it comes to panoramic photography by stitching: the good positioning of the nodal point of the teleobjective lens above the rotary axis and in the tilting axis. As I explain in the note below, this point is not so important in the particular case of gigapixel photography. It is more important for the overall stability and to keep the engines' forces for the whole thing to be well-balanced and to rotate easily. For that, the Gigapan Epic Pro head offers two sliding elements: the camera base in height between the two vertical arms and a sliding stage in depth, under the lens.
The base for the camera and its lens is adjustable in height so that the center of the lens is aligned on the tilting axis. Then, the perpendicular stage to this base slides on 10.5 cm in depth in order to balance the whole thing.
Nodal point and gigapixel: important or not?
As detailed in the page dedicated to the nodal point and its setting, it only really matters when shooting a foreground AND a background in one same photo. In order to avoid a progressive shift, it is important to rotate the camera on a panoramic head around this ideal rotation point.
But in gigapixel photography and since you're using a teleobjective lens hence with few depth of field, there's almost no risk to see a neat foreground and background in the same photo. The nodal point doesn't matter much in this particular case.
Moreover, the nodal point in a teleobjective lens happens to be often close to the fastening collar and its balance point is way more important. Place the camera/ teleobjective lens at the balance point on the panoramic head will place almost "naturally" the nodal point of the lens above the rotary axis.
In our specific case, it turns out that even if the Gigapan Epic Pro head slightly lacks stability at the base, it enables to balance the position of the camera and its lens. That's a good point. And not only does it reduce vibrations but it also facilitates the work of the engines that don't have to struggle against too strong an unsteadiness. I still want to stress here that the different menus of the embedded computer enable to adjust the settings of the head so that it waits until vibrations stop before releasing. It is completely possible to find a good compromise between this waiting time and a quick shooting. We'll see this later...
The battery
Of a great capacity to offer a real autonomy in the field, it's placed into the base of the head. The battery can be reloaded separately or directly into the base as show in the photo below.
The great capacity of the battery once reloaded enables to consider serenely a gigapixel shooting...
The embedded computer
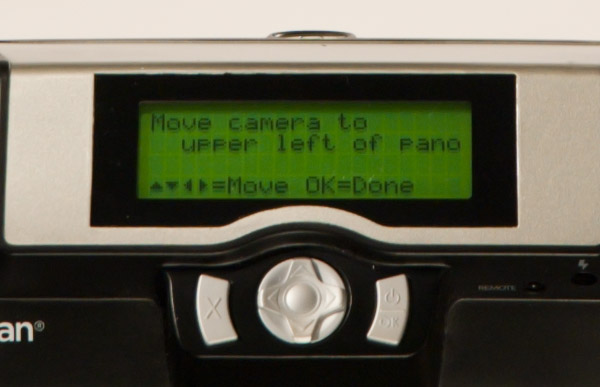
The Gigapan Epic Pro head has an embedded control computer with LCD screen on four lines. It turns out to be very convenient because you don't need a laptop to use it. It is interesting to note that it's not possible to make it do something it wasn't made for though... except if you want to wait for an update of the firmware. For some users, it's crippling! For others, it has all the functionalities that make it appealing, convenient and very powerful.
Thanks to a few keys, a directional PAD and an LCD screen on four lines, it is possible to navigate easily in the different menus, now in different languages, of the Epic Pro and to set accurate parameters for the shooting of a new panorama. It's very efficient...
Cable connecting the camera to the motorized head
The head is sold with a whole bunch of cables enabling to connect the motorized head and its computer to the remote control plug on the camera. You just need to choose yours! The cable is fastened on the left side of the LCD screen of the computer.
Now that we've gone around it, it is time to set its parameters and use it...
Use of the Gigapan Epic Pro head
Like all panoramic heads, the Gigapan Epic Pro head is usually used to place the nodal point of your lens above the rotary axis of the head and in the tilting axis of the vertical arm to get perfect overlap zones. But we just saw above that in the particular case of panoramic photography, this setting wasn't that important. However, to success in making such a photo, it is widely recommendable to automatize the shooting. Indeed, it is not uncommon to shoot more than 200 photos for a large-scale gigapixel and when I realized the project paris-26-gigapixels.com, I shot 2436 photos in a little bit more than 4h30! Unrealistic in manual mode. The Gigapan Epic Pro head enables an accurate setting of the shooting sequence.
Setting of the head at the nodal point... and at the balance point
I wouldn't want to repeat myself, but we saw that the search for the nodal point of your teleobjective lens wasn't as crucial as with a noticeably shorter focal. The reason is very simple: with a long focal, the focusing is so tight that only one area is sharp. So we'll give as much importance to this nodal point as to the overall balance of the equipment of the head not to wear the engines out.
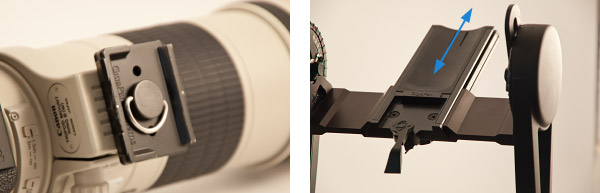
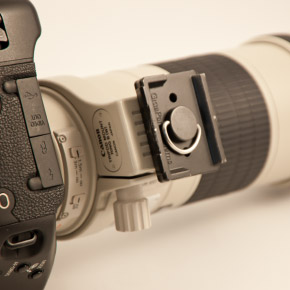
1 - Fasten the dovetail under the body or on the collar of your teleobjective lens (most common case with long teleobjective lenses): the longer the focal and the heavier and longer the lens. It will then be sold with a fastening collar for tripods. It enables to rebalance the pair camera/teleobjective lens (image here). It turns out that the nodal point of teleobjective lenses is often located in this area of the lens so we get a double win: the fastening on the panoramic head is close to the nodal point and to the center of gravity of the camera.
2 - Set the height of the stage supporting the camera : once the camera set on the stage sliding in depth and in height, we'll align, whenever possible when it's possible which doesn't matter much as we now know, the optical center with the tilting axis of the motorized head. To do so, you just have to unscrew the inside nuts of the vertical arms, in the tilting axis.
The camera base can slide vertically on 50 mm. That's enough, even if you fastened the camera with the collar of the teleobjective lens.
3 - Set the stage supporting the camera in depth: once the camera fastened on the stage sliding in depth and in height, possibly by the collar of the teleobjective lens, we'll align the nodal point of the lenses of short focals above the rotary axis of the motorized head but when the focal is really long (over 200 mm of focal length), we'll above all try to achieve an overall balance. The engines of the motorized head will thank you for that!
Move the camera as forward as possible enables to rebalance the whole thing and not to wear the engines driving the motorized head out.
Set the embedded computer for shooting
The Gigapan Epic Pro head is autonomous. It has its own embedded computer. Once set up, it will control the whole shooting sequence, from the first to the last photo by rotating and tilting the head automatically but also by taking control of the camera. All menus are now in different languages (update of the firmware), however, it was not always the case and the menus are not always very transparent. It is not about being exhaustive here but to make good ol' basic choices. About the basic functioning of the head or all the available options, I'll let you read the instruction booklet.
Let's now see the functionalities I consider most useful or essential...
1 -Set the Gigapan head - (Main Menu - Options) - In a first time, you'll have to choose your language:
Main menu/options/language: and to choose among English, French, Spanish, German.
2 -Set the camera and its lens (Main menu - Set camera) - Firstly, the head needs to know with what camera and what focal the photos will be taken. It allows it to know:
The focal used (Camera settings): the embedded computer needs to know the viewing angle for each photo which thus depends on your lens. For that, it won't ask you to indicate the size of your sensor nor the focal length of your lens but it will measure it. How? So the next menu is: Set the viewing angle? Click OK. Set the zoom level: Click OK. Align the skyline with the top of your viewfinder: thanks to directional arrows on the PAD of the Gigapan head, you'll place the skyline just at the top of your viewfinder. Then click OK. Then, Align the skyline with the bottom of the image: still using the PAD, you place this same skyline at the bottom of your viewfinder. The head now knows exactly your viewing angle! It still needs to know...
The sensor ratio (Image format): for that, go to the Options menu > Expert options > Image format: 1, 3:2, 4:3, 16:9, etc. The sensors 24x36 or APS, APS-C have a 3:2 ratio.
The overlap zone (Superimposition of image): go to the Options menu > Expert options > Superimpos. image: from 25% to 75%. Piece of advice!
25 or 30% is perfect for a gigapixel panorama.
3 -Set the head (Main menu > Options) - In a third time, the head needs to know after how long it should rotate, of how many degrees, until where. It enables it to know:
Very important - Time/Exposure (Main menu > Options > Expert options): how long should the head stay in a position before rotating. Piece of advice! When I shoot during the day my exposure time is very short so I choose an exposure time of 2.5 sec. with a self-timer set on 2 sec. The head rotates to its new position, releases the shutter, and as I activate the self-timer set on 2 sec. after two seconds the shooting really happens and 0.5 seconds later the head rotates to its next position...
Very important - Release delay (Main menu > Options > Expert options): time left to the head between its new position and the release of the photo (or of the self-timer). This delay can be very short. Piece of advice! As I activate the self-timer on my body, I set it on 0 sec.
Very important - Support delay (Main menu > Options > Expert options): delay between the end of a shot (the mirror goes down) and the moment when the head turns to the next position. Piece of advice! I choose this delay depending on my exposure time: if the exposure time is very short (for instance 1/125e), I'll choose 0.5 sec. But if my exposure time is 2 sec. then I have to choose at least 2 + 0.5 = 2.5 sec.
Release mode (Main menu > Options > Expert options): choose At a distance if you want to release the shutter automatically. In the opposite case, to release whenever you want, choose Manual.
Order of the photos (Main menu > Options > Photo order) : in what order should the photos be taken - Piece of advice! I like Bottom line: the shooting starts at the top left and ends at the bottom right.
Release delay (Main menu > Options): It's the delay before launching the shooting of the panorama. You can decide to launch the shooting right away or after a certain amount of time from 15 seconds (up to 5 minutes or launch a timer). Since the head can be released remotely, you can choose to launch the shooting after one or two minutes, the time necessary to mount your tripod at a height where you couldn't access the touchPAD of your head for instance.
4 -Then set the starting and ending points of the panorama - If you set the other criteria, the head calculate automatically the number of photos, ranges and columns it requires. You only have to confirm to launch the shooting and go get a coffee if your memory card is important enough... and accessorily you don't need to revise your focusing between each range (a word to the wise is enough...!).
New panorama (Main menu): shoot a new panorama... It asks you where you want to start (at the top left)...
Move your camera at the top left (with directional arrows of the PAD): Aim at the point at the top left of your panorama... then click OK. Do the same at the bottom right.
The embedded computer tells you how many photos it's going to shoot and how long it will take.
Then the computer asks you if you want to display the panorama: it enables to check in the viewfinder that you weren't wrong about the field of view because it will position in the four corners of your panorama!
Launch the shooting by clicking OK! (if you didn't activate the checkup functionality because it will ask you through five questions if you thought about setting the exposure, the focusing, etc. )
To finish with, I invite you to read the pages dedicated to the shooting and stitching of a panorama in order to find advice about exposure, focusing, etc in gigapixel photo.
Conclusion and rating!
The Gigapan Epic Pro head is one of the best motorized heads on the market, even more now that it has an embedded computer available in several languages! Well configured - and this tutorial is here to help! - it enables to realize gigapixel panoramas quickly. It is all optimized to work quickly but qualitatively. I think the only things I could reproach it are a slight lack of stability at the level of the base (it's the impression given because in fact, when it's working, it seems very stable) and a lack of possibilities offered to experienced users or programmers to customize the menus (quite complete already). It is thus a really good product!
Ratings
Gigapan Epic Pro
Manufacturing quality
Robustness/stability
In comparison to its competitors; 3 stars on its own
Bulkiness mounted
Bulkiness dismounted
Computer setting
Value for money
PROS...
Very convenient and easy to use when it's well set up
The most stable on the market thanks to its two vertical arms (even if it's still not perfect)
Minimized weight hence transportable
Full setting of the embedded computer
Multilingual
No need for a laptop or accessory to work
Value for money
and last but not least, its shooting speed: 15 minutes to shoot 228 photos with an optimized setting of the different delays.
CONS...
Might be even more stable
The weakness is especially at the level of the base
Can't be controlled remotely
Can only evolve with the update of the firmware but it evolves well and the firmware is easy to update
A developer can't create his own program or functionality...
OVERALL RATING
8.5 / 10
My opinion: I love this motorized head. The best in this price range. And it works well! Of course, its competitors also made an evolved head but it's more designed for an experienced audience or a programmer. For a better product, and it all depends on your criteria, you'd have to spend a lot more money. I highly recommend it!
Buy the panoramic Gigapan Epic Pro head
Retailers
Price
$949.99
Pratical Guide N°1 : The Nodal Point
$12.90 USD
My practical guides in e-books - N° 1!
"Find the nodal point or no parallax point accurately in less than an hour"... whether you are photographing a simple panorama or a 360° photo - PDF of 100 pages -More information...
This website is almost entirely free and yet almost free of ads. Why? Because they look so bad! It is lucrative though, and enables many websites to keep on living. So I asked myself: what can I do? To keep on developing this website, I'm going to need a regular income just like everyone else. How can I keep on giving access to free information like I've been doing since April 2002?
And I finally found the answer: affiliation. Every time you click on a link from this site to one of my partners' shops, they know you've been referred by me and give me a small percentage on your purchase, be it something I recommend on my website or anything else. Remember to use my links when you shop on these sites! It doesn't cost you anything and it's a win-win deal – for me, them, and you!


 The Gigapan Epic Pro panoramic head is a spherical motorized head. It is, in two ways: it can rotate and tilt automatically but also release the shutter as automatically. It thus enables to make panorama shooting automatic. You might wonder what's the point of it if you're shooting ten photos?! In fact, this type of head has been invented to make shooting hundreds of photos automatic in order to make high or ultra-high definition photos or even gigapixel panoramas. As for now, you only see them on the Internet where they have an incredible enlargement capacity!
 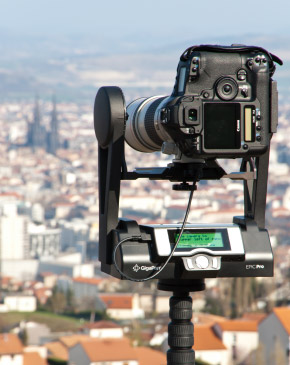 The
The 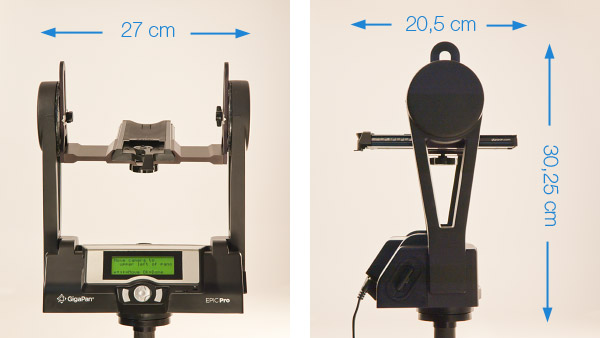
 Nodal point and gigapixel: important or not?
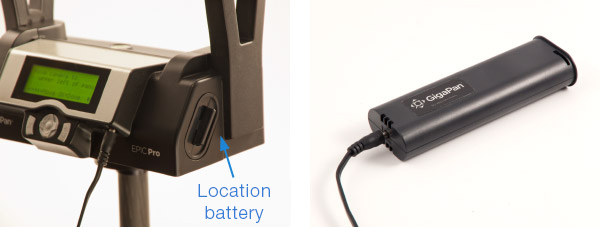

 1
1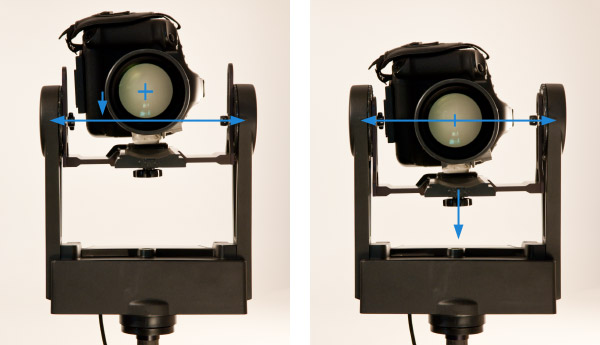
 The Gigapan Epic Pro head is autonomous. It has its own embedded computer. Once set up, it will control the whole shooting sequence, from the first to the last photo by rotating and tilting the head automatically but also by taking control of the camera. All menus are now in different languages (update of the firmware), however, it was not always the case and the menus are not always very transparent. It is not about being exhaustive here but to make good ol' basic choices. About the basic functioning of the head or all the available options, I'll let you read the instruction booklet.


