Now that we know how important it is to set our camera at the entrance pupil (often wrongly called nodal point or no-parallax point), we'll now see how to do it and with the help of what equipment.
The key points if you're a beginner...
Here are the key points to remember about the entrance pupil. The rest of this page is for those who want to learn more.
First of all, the entrance pupil is the correct name to denote the famous nodal point or no-paralax point, ideal rotation point to rotate the camera without getting ugly stitching artefacts. We should now only talk about entrance pupil but that's not such a big deal!
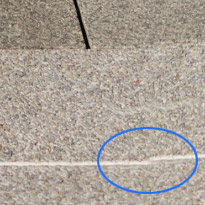
The entrance pupil represents THE point in your lens around which you have to rotate the camera or the panoramic head in order to get perfect panoramas and not like in this picture.
It's always in the lens, often close to the front lens in short focals (where its setting is more important). There are several, a different one for each focal, if you're using a zoom lens.
To set the camera correctly, it is necessary - but not compulsory - to use a special photo head: a panoramic head.
The entrance pupil of each lens (or each focal if you have a zoom lens) is found once and for all, quietly at home, with the method described below or during the review of each panoramic head on this site. We set the panoramic head correctly thanks to graduated rails and rails stop.
In the previous page, we saw that it's better to rotate the camera around an ideal rotation point, the entrance pupil (wrongly called nodal point), in order to guarantee perfect stitchings (if the lens doesn't have complex distortions however or if we use the best panorama software on the market). In this second part dedicated to the entrance pupil, we'll see how to proceed depending on the type of camera, reflex or not, to find it and ideally place the camera. There are two different ways to do so, very concrete and successive, that allow to guarantee an excellent setting. The first one is done, in first approximation, through the front lens and the second through the viewfinder of the camera or on the LCD screen. It's quite simple, anyway more than it appears!
Buy and download my 100-pages PDF
"Find the nodal point or no parallax point accurately in less than an hour"
Fifteen years of experience shared through my unpublished detailed step-by-step advice for beginners or advanced photographers, in a 100-pages PDF in its latest version v2.2 of January 16, 2019 - More information...
Finding the entrance pupil through the front lens - to rough out...
We just saw that the entrance pupil was in the plan of the diaphragm-iris seen from the front lens as shown in the picture here (we can clearly see the plan of the diaphragm on the enlargement of the photo when we hover the mouse over it, just behind the front lens. As often with short focals, the iris plan is very close to the front lens of your lens). It's thus quite easy to spot approximatively the place where it is for a given focal since you only have to turn the ring of the zoom lens to see if it moves in the lens.
Piece of advice! Make sure to shut the diaphragm a bit to spot it better (F11,0). Then, by placing your finger approximatively at the level of this plan of the iris, you can already have an idea of the position of this entrance pupil behind the front lens. It's approximatively this point we'll have to superimpose to the rotary axis of your panoramic head.
Finding the entrance pupil by observing
There are two cases conditioned by whether the camera possesses or not a reflex view. It's just a bit longer if it doesn't have one but that's it! You'll see, it's not so complicated.
With reflex cameras
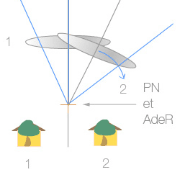
Reminder! When the entrance pupil of the lens and the rotary axis superimpose, the perspective doesn't change. So when you rotate your body from the left to the right to include a nice panorama, we mustn't see the subjects in the foreground move, nor the subjects in the background in the LCD screen or the viewfinder or even the photos seen at 100% in Photoshop. Even if it's easy to note in the viewfinder of a reflex camera, it's of course impossible with a point-and-shoot or telemetric camera, except if it comes with a liveview functionality. With this kind of camera, the positioning must irremediably and simply be done by taking photos as we'll see a bit later.
To save time and not grope our way around, it's then very useful to have spotted the entrance pupil (or the nodal point, whatever) with the previous method, described over here. To describe the steps, I chose the cylindric panoramic head Manfrotto 303. As I explain it in the equipment page, Manfrotto made a panoramic head perfectly adapted to the needs of panoramic photography by stitching with quite heavy equipment. Everything is made to make the task of the photographer easier in the implementation of the camera before and after the shooting. Fundamentally, it's the same with all settings since they allow to move the camera held vertically in the two perpendicular directions.
The steps of research of the entrance pupil...
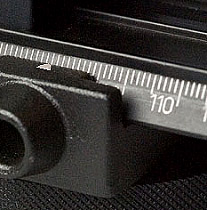
1 - Level the panoramic head - Level the tripod but above all the rotary base - also called rotator - at the chosen point of view. The horizontal rotary axis must be absolutely plane in all directions. A bubble on the base makes this operation easier.
2 - Fasten the camera vertically on your panoramic head, if you want and if it's possible.
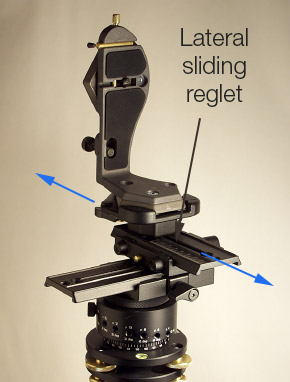
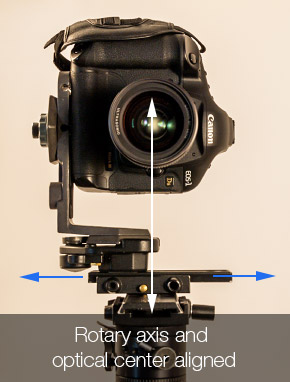
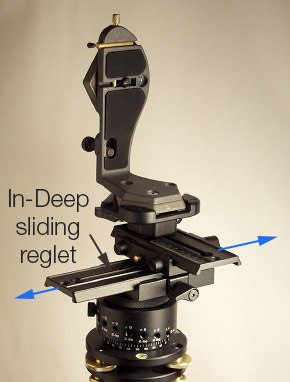
3 - First of all, align the center of your lens with the rotary axis - Move the lateral sliding stage so that the center of the lens seen frontally is placed just above the rotary axis of the head. The setting must be made as accurately as possible - Illustration below -:
The center of the lens is placed just above the rotary axis of the panoramic head.
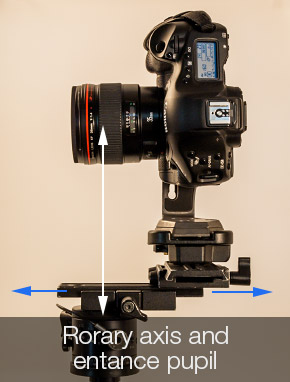
4 - Then, in-depth setting depending on the lens or the focal if it's a zoom lens - Choose the focal with which you want to make your panorama if the camera has a zoom lens and watch through the front lens seen frontally where is approximately located the entrance pupil as explained in the first paragraph. Move the camera back or forward so that the entrance pupil of your lens - for a given focal if necessary - is approximately set above the rotary axis of your head. For that, use the sliding rails on this panoramic head.
The camera is moved back or forward for the entrance pupil of its lens if it's a fixed focal or a focal if it's a zoom lens be placed just above the rotary axis of the panoramic head. You'll have to spot different positions in the case of a zoom lens.
4 bis - Here's what happens in the viewfinder - To make an accurate setting of the in-depth setting, it will all be done by looking through the viewfinder:
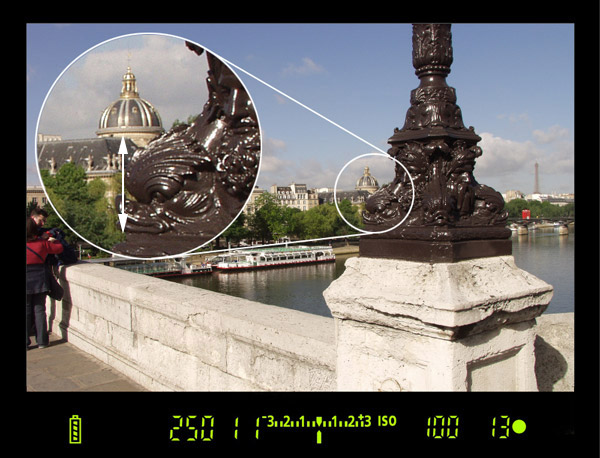
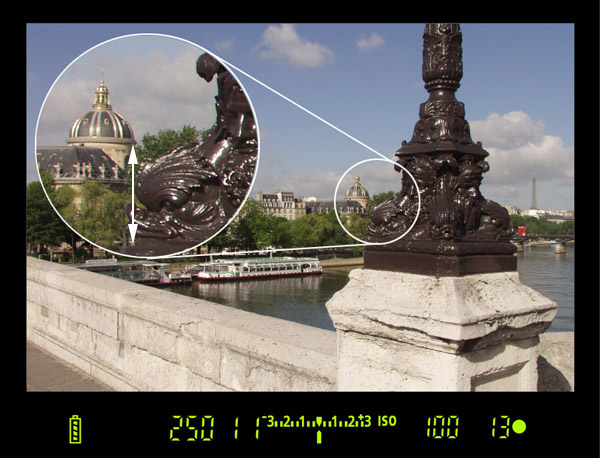
a) Find an alignment of subjects between a very close foreground and a background as distant as possible as it is the case in our example between the street lamp of the Pont Neuf and the Institut de France in Paris. Turn your panoramic head so as to place this alignment of subjects to the right of the viewfinder as in the illustration below. Observe the alignment between the streetlamp and the dome.
b) - Then, by turning the camera to your right while keeping an overlap zone (about 30%) that will be used as stitching zone by the panorama software, observe this time at the left of your viewfinder this same alignment of subjects. Since in theory your panoramic head hasn't been set ideally yet, except stroke of luck, you'll see that the dome in our example will move relatively to the streetlamp as explained in the first paragraph. Here, the dome moved to the right.
It's easy to note that the alignment is not perfect. The background shifts to the right of the streetlamp. The panoramic head is thus set too far back. You have to move it forward slightly, mm by mm - making sure to mark down the setting on the sliding stage (from the bottom of this Manfrotto 303 panoramic head) on the side where the millimetered graduation is.
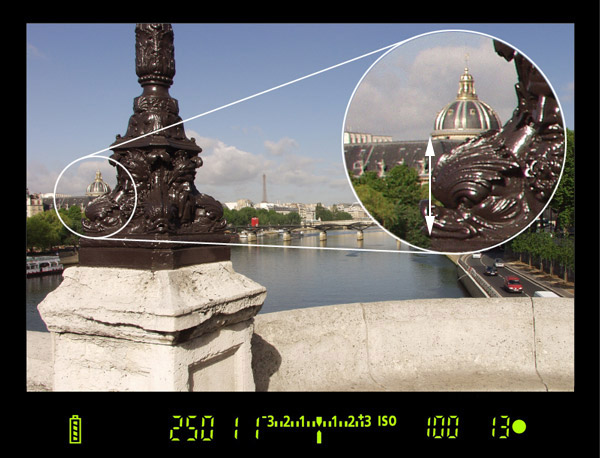
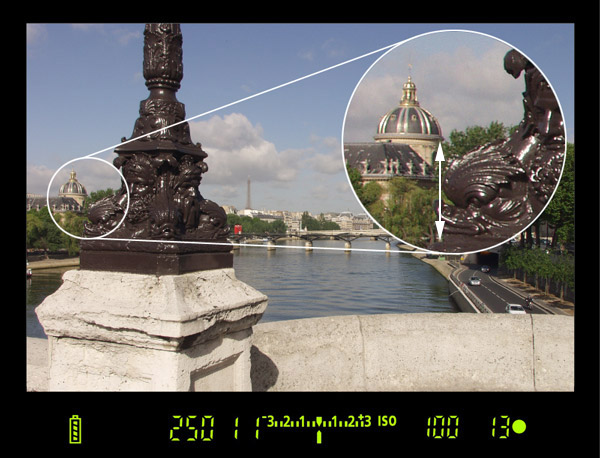
c) - Finalization of the setting of the entrance pupil - As long as you notice a gap of the background in relation to the foreground, the entrance pupil of your lens isn't perfectly set above the rotary axis of your panoramic head. Try and you'll see! You'll have to keep on moving the camera back or forward on its sliding stage until the moment when you won't notice any gap between the fore and the background. In the end, you need to move the camera, mm by mm, which is quite convenient with Manfrotto or Nodal Ninja heads since they are graduated. After several tries/fails, you'll get to a moment when the entrance pupil of your lens will be perfectly above the rotation center of your panoramic head. You won't have any gap between your foreground and your background, even when watching your photos at 100% in Photoshop. Your head will be perfectly set as you can see below:
There is an ideal rotation point where, when you aim to the left then to the right, while keeping in the viewfinder an alignment of subjects in an overlap zone of about 20/30%, this alignment between the fore and the background doesn't move at all. The lens and its entrance pupil are placed just above the rotary axis of your panoramic head.
With non-reflex cameras without Liveview
1 - You really need to spot the position of the entrance pupil thanks to the first method and place the camera on the head approximatively over the assumed ideal position.
2 - Then you have to make a serial of two photos (right/left) by setting:
- the camera slightly before the assumed position.
- the camera 5mm behind hence close to the ideal position
- the camera 5 more millimeters behind, hence behind it.
Then open the images and enlarge them to 100% on your screen to observe the result. On the photographs taken close to the entrance pupil, you now know that you won't see much of a difference with the alignment of the fore and background. If needed, make another serial of photos around the ideal point to polish the result.
3 - Once the entrance pupil of your lens found, mark the position of the graduated reglets of your panoramic head. The reglets will need to be placed exactly in the same way for each shooting for this given focal. The gain of time will be valuable in the field!
Conclusion
Using this method it's possible to know exactly where the ideal rotation point is for a given focal and thanks to graduated panoramic heads it's very quick and easy to be sure to find again its ideal setting. And finally, this wouldn't be complete if I didn't make a link to the tutorial of Alain Hamblennewho uses a grid, very handy to set a spherical panoramic head like the 303 SPH Manfrotto or the Nodal Ninja heads, especially when you want to create a virtual tour or the tutorial of SmugMug.
Find the setting of the entrance pupil in my
equipment reviews
You need to be careful to set the entrance pupil of your lens above the rotary axis of your panoramic head in all directions: so when moving the camera back and forward BUT also when moving it laterally. If the camera has a zoom lens you need to make different tests to take the different focals into account - fixed or zoom -.
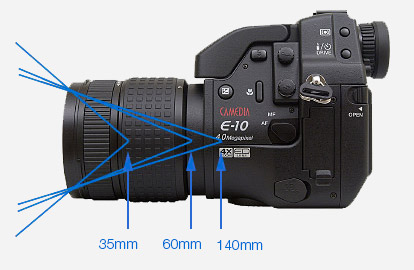
As I explained earlier, this famous point will have a different position in the camera depending on the focal. On the zoom lens of the E10 OLYMPUS - my first digital camera! - I'd spotted three positions: 35 mm, 60 mm and finally 140 mm. Here is in this precise case what I'd gotten:
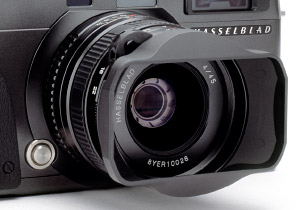
Now, Hasselblad, on the PDF descriptives of its Zeiss lenses, determines the position of the entrance pupil and not of the nodal point anymore.
Watch out, with modern optical formulas and especially with Canon or Nikkor wide-angle zoom lenses, the entrance pupil is often very close to the front lens with a short focal but also with a teleobjective! It's not unusual indeed to set a to-and-fro movement of the entrance pupil in these optical formulas called retrofocus.
I invite you to go back to the contents of this site to keep reading one of the tutorials in this guide. Contents of the guide
Buy and download my 100-pages PDF
"Find the nodal point or no parallax point accurately in less than an hour"
Fifteen years of experience shared through my unpublished detailed step-by-step advice for beginners or advanced photographers, in a 100-pages PDF in its latest version v2.2 of February 12, 2019 - More information...
"Find the nodal point or no parallax point accurately in less than an hour"... whether you are photographing a simple panorama or a 360° photo - PDF of 100 pages -More information...
This website is almost entirely free and yet almost free of ads. Why? Because they look so bad! It is lucrative though, and enables many websites to keep on living. So I asked myself: what can I do? To keep on developing this website, I'm going to need a regular income just like everyone else. How can I keep on giving access to free information like I've been doing since April 2002?
And I finally found the answer: affiliation. Every time you click on a link from this site to one of my partners' shops, they know you've been referred by me and give me a small percentage on your purchase, be it something I recommend on my website or anything else. Remember to use my links when you shop on these sites! It doesn't cost you anything and it's a win-win deal – for me, them, and you!


 Piece of advice!
  Reminder!
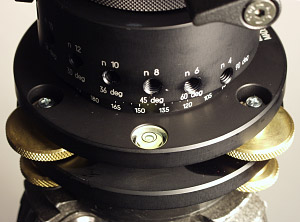
 3
3 Find the setting of the entrance pupil in my
equipment reviews
Find the setting of the entrance pupil in my
equipment reviews Last important remarks...