Some photo edits or corrections must be performed before stitching the photos when you're trying to achieve the best final quality. It is the case, above all, to stitch both photos of the nadir or for openings and windows. Indeed, certain defects that could appear on the final image are almost impossible to correct after stitching. It is especially the case for optical distortions we'll see in the next page, completely dedicated to them. It is also the case for vignetting as you'll see below. But to save time, it will be better to perform the others -levels, etc. - on the Stitchd panorama.
The key points if you're a beginner...
Here are the key points to remember about photo edits on the panorama. The rest of this page is aimed at those who want to learn more.
Try to remove as many defects as possible like vignetting, chromaticism in your photos before stitching. It is very easy with RAW files.
You can usually remove the marks of the tripod directly in panorama software but I highly prefer doing it myself using Photoshop BEFORE stitching.
HDR merging can be performed directly in panorama software like PTGui or old Autopano (Exposure fusion), without using specialized software: convenient!
Even if the first correction can be done directly on the final panorama hence only once, the second one, vignetting, must absolutely be fixed BEFORE stitching because panorama software can't do it for one good reason: they don't think!
Luminosity
Because they've all been taken in manual exposure mode, all photos can have been globally over or under-exposed. Either we'll edit them one by one at that point, by lighting them up or darkening them with a Photoshop level for instance, either we'll do it on the final panorama hence with only one image.
Several elements of answer have to be considered:
The photos have been shot in RAW format and they thus have to be developed before stitching even if some pieces of software like AutoPano Giga can stitch RAW files. I still don't see the point to it!
The photos have been shot in 16 bits (TIFF or RAW) and the panorama software can handle it; luminosity corrections must be done preferably on the final Stitchd image. (Caution, the stitching will last longer and the final image will be a lot heavier.)
The photos have been shot in 16 bits (TIFF or RAW) but the panorama software can't handle them; the main corrections - important compensations of luminosity - will preferably be done on the 16 bits files and the stitching will be made from images converted in 8 bits.
The photos have been shot in 8 bits and in JPEG and this time, whatever the panorama software, we'll make the corrections on the final Stitchd image to go faster.
Vignetting
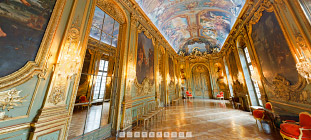
Because it is very visible in digital photography - maybe even more than in film-based photography - and because any panorama software has trouble handling for good reasons - they don't have any reason to manage it since each photo edge has the same luminosity - you need to make sure to correct vignetting BEFORE stitching. Indeed, a panorama which source images show vignetting can be spotted right away thanks to the darker vertical zones marking the junction between two consecutive photos as you can see in the images below. So even if you're using the best panorama software, it is almost mandatory to remove vignetting BEFORE stitching.
1 - The photos have been Stitchd without correcting the vignetting. Each overlap zone is marked. 2 - once corrected, very easily by the way if you work with RAW files, especially in Photoshop's Camera Raw because since version 6.2, the final panorama is automatically free from marks at the level of overlap zones in the sky.
Color balance
One of the main assets of digital cameras is their setting of color balance before shooting. It works really very well. But as for luminosity, corrections can be necessary once at home, in front of the computer. Here again, you'd better make them on a 16 bits image, and better yet, if you want to work as well as possible, work in RAW. Moreover, it is then very easy to harmonize a panoramic serial because all the photos can synchronize on the reference photo. With that said and mainly if you stitch your photos using PTGui, it will be easy to ask the software to make a small correction, even if it hadn't been made before stitching. But really, you'd better work in RAW!
Properties of the photos
By image properties, I mean the size of the file in pixels and the extension format: JPEG, TIFF or PSD/PSB, etc.
Image size
Only one thing seems really important to me: all the images must have the same size in pixels or the panorama software won't want them. Once you decided what size your final image will have, at least in height and thus depending on what you want to do with it (fullscreen virtual tour or in a window), you'll have to redefine their size. In Photoshop, it can be done via the Image menu/Image size. In the window opening, you can define the resolution (96 ppi for the web - even if it doesn't have any importance since it's not going to be printed), you tick "keep proportions" and bilinear interpolation if you reduce the photos and define the image size in cm or pixels. The software works for us then. The lighter the images, the faster the panorama software will work. There's no use to import full resolution images if the final goal is to realize a virtual tour that will only be seen in 480x600 pixels on a retail website. Don't forget that we're going to stitch many images and that the final wieght, once Stitchd, can be very important and even go over a gigabyte. For instance: eight photos shot in RAW, developed in 8 bits TIFF and Stitchd in PSD, 8 bits, multilayers with Autopano Giga weighs almost 2 Gb!
Popular belief about resolutions: 72 dpi
and others...
For a reason I don't know, I always hear about 72dpi for web images. But for an image displayed on a screen, its resolution (its dpi unlike its definition, its pixels) doesn't have the least bit of importance. Only its definition, its size in pixels matters. A pixel on an image will always be displayed as a pixel on screen. A photo which definition is 800x600 will take 800x600 pixels on your screen, in 72dpi (ppi) or anything else. The famous DPI are only used for print. So, from this 800x600 pixels file, you can print this image more or less big depending on its resolution (72, 96, 240, 300 ppi). At 254 dpi for instance, this image will be printed in 8x6 cm (since there are 100 pixels per centimeter in this resolution so 800 / 100 = 8 cm).
To finish convincing you about it, measure the size of your screen in centimeters - my old Quato is 43 cm wide - and calculate your screen resolution - my screen displays 1600 pixels in width -. So my Quato has a resolution of: 1600/ (43/2,54) = 95 ppi! Try it at home...
As a conclusion, it is fortunate that the resolution of an image doesn't matter to display on the web, because then all our images in 72dpi would seriously lack sharpness! They would all be under-digitized, but of course, it is not the case. Phew!
Images format
I draw your attention to the format of your images because even if each panorama software accepts JPG images, it's not the case of the format TIFF, 8 or 16 bits, PSD and even less of the RAW format - raw format, often proprietary -. The images should indeed maybe be converted before stitching. In certain cases, if we want to work on uncompressed images, we'll have to save them in BMP format because certain pieces of software don't even accept TIFF format. It doesn't happen with top-range panorama software anymore though.
The healing brush/stamp tool
Numerous artefacts like grains of dust or flares won't necessarily end up at the same place in two consecutive pictures so the panorama software will automatically erase them without intervention. However, in certain cases, it's better to remove certain defects BEFORE stitching.
Dust grains
Whoever says stamp or healing brush tools means dust grains but here, point-and-shoot digital cameras with non-interchangeable lenses or even reflex cameras and their antidust system, since about 2008 and obviously very efficient, have a huge advantage: almost no dust! I'll let you imagine the amount of work it could suppose on 24×36 diapos scanned at 2,900 dpi to make posters. Antidust systems of scanners should better work well! I sometimes happened to spend two hours on my scans of 120×50 mm diapos of the Noblex... I tried to remove the bigger at that point even if there are less and less since the Canon system works so well, without reaching the level of my old Olympus E1, perfect! You should also note that we're less and less able to correct dust grains as in the image here.
Annoying subjects
And of course, these tools can be used to remove annoying details mistakenly shot and this time, it will be something personal. As for myself, when I'm moved by a landscape, it's that there are no or few details annoying me and the edits of this kind are finally very marginal. However, in the city, the work can be necessary, particularly due to traffic signs, really ugly sometimes. And finally, when the tripod can be seen in the photo taken with fisheye lenses, I prefer to remove it at that point because the photo is not too distorted by the spherical projection.
Sun halos
The flare effect - halos generated by the sun or any other very intense luminous source - strongly reduces the contrast in the photos and is, of course, very ungracious. As shown at the page 156-159 of Gérard Perron's book " Interactive photography " - sold out -, those are often very annoying to eliminate because they're very numerous and on important surfaces. Even if the new stamp tool of Photoshop ( J - Corrector ) is sometimes impressively efficient, it's not certain, without spending hours on it, that we'll manage to properly remove them. Well then, the given trick is to hide the sun with your hand or with a little black cap (as in a photo lab to realize a make-up) that we'll erase more easily with the stamp tool. Indeed, this cap will be in a zone of the sky that is widely overexposed hence without luminosity gradient. It will then be very easy to eliminate this cap by successive edits. The second method listed in the book consists in taking two images, one with the cap and one without and to stitch both together in an editing software while taking care of stitching only the top parts together.
Remark on lenses' flare
After making numerous reviews with all kinds of lenses of good quality and of different makes, it clearly appears that they were not created equal before flare. So apart from the number of pixels, the intrinsic quality of the lens, in panoramic photography, protection against this defect is a major asset and manufacturers took consciousness of it and are now vigilant about it.
Recent lenses thus really have a better correction against this defect and the Canon 16/35 mm F 2,8 first generation, which was totally useless by night while the second version was perfectly corrected, proves it...
So, whether be it in terms of quality, flare correction or even separative power of the lenses, I always try to buy the last version of the lenses I like.
Finally, certain edits can still be performed on the final Stitchd image. So it's not compulsory to correct each photo at that point.
The nadir: remove the tripod
During the shooting, we saw in the page Shooting that it was impossible to shoot the nadir without the tripod other than with the camera in hand, but in many cases, because you're shooting at F11.0 or even F16.0 in order to have a maximum depth of field, the exposure time is too long to get sharp photos hand-held. So I gave you my method to shoot the nadir in two steps and two shots, with the camera still fastened on the panoramic head. We'll now try to remove any trace of the panoramic head and the tripod from these two photos in Photoshop.
Superimpose both photos of the nadir
1 - Open both photos of the nadir in Photoshop;
2 - Click the second photo (with the coin -2), select it and copy it (CMD + A and CMD + C with a MAC/ CRTL + A and CRTL + C with a PC) ;
3 - Then click photo 1 and display layers palette (Window Menu/Layers). Paste the photo in the clipboard (2) - CMD + V with Mac OS or CRTL + V with Windows-;
4 - Click layer 1 (photo N°2 with the coin!) and reduce its opacity to about 50%;
5 - Transform this photo - CMD + T / CRTL + T; the selection zone transforms with handles in its corners and on the sides (as in the photo here).
6 - Since both photos can be seen by transparency (50% opacity of the second layer), rotate the second photo over the first until they perfectly coincide towards the tripod on one detail at least - photo here -. For that, take the mouse pointer out of the photo hence of the selection zone and rotate your photo on layer 2 of more or less 180°. Both photos are now more or less superimposed and coincident at a common point. Tip! at that point, you'll almost always notice that both photos superimpose quite poorly, globally. It is partly due to the shifting of the tripod for the second photo, BUT also to the fact that sensors are far from being perfect hence symmetric, flat and well-positioned in the camera. Yup!
7 - Take the marker at the center of the photo - a small circle with a cross, marking the rotation center of the photo when you enlarge it of at least 50% - and move it on that common point using the mouse. You just have to take it with a left click held and drag'n'drop it at the wanted place.
8 - Keep on rotating layer 2 to see if you manage to get a better coincidence between the two photos, but around that new rotation point centered on two common details now thanks to step 6.
9 - Right-click on the photo to open the contextual menu proper of the "Transformation" tool and choose "Deformation". The corners of the selection zone become points and not squares.
10 - Pull on the image, directly inside the transformation frame and not only on the edges as with other transformation modes, in order to make the part where the panoramic head is coincide, as shown in the image here. The rest doens't interest us at all because we have on other vertical photos and this zone mustn't be distorted in order to be perfectly jointed with those same photos. The rest doesn't interest us at all because we have it in other vertical photos and this zone mustn't be distorted to joint these same photos perfectly.
11 - When everything is OK in this zone AND only in this zone, confirm your transformation by pressing "Enter";
12 - Set the opacity of layer 2 at 100%;
13 - Create a black layer mask on layer 1 (photo n°2). For that, click layer 1 first. Then click the third icon at the bottom of the palette "Layers" in Photoshop and press the ALT key at the same time. If you don't press ALT at the same time, the layer will be white. To make it black, you'll have to fill it with black.
14 - Then, to show the floor under the panoramic head, you only have to paint the black layer mask with the "Brush" tool and use white as a foreground color. Almost magically, the panoramic head vanishes and the floor shows up, perfectly positioned if you realized step 10 rightly. Remove as much of the panoramic head as you can by playing with the brush size and by enlarging the picture more or less.
15 - There are often at least two places where the arms of the tripod superimpose in both photos as you can see in the photo over there on the right. Here, the "brush (B)" tool won't do anything to it and you'll have to use the "Stamp(S)" or " Healing brush(J)" tool AFTER flattening (Layers Menu/Flatten the image) both photos. There are generally few edits of this type to make. But there can be other edits because of shadows due to the sunlight, halogen spotlights, of a difference of luminosity because of a cloud, etc.
Once your work finished, you get an (almost) perfect floor, but above all, without a trace of the panoramic head or the tripod. Your nadir is finished! It can be necessary to perform final edits to remove shadows on the floor due to the sun, edit the tripod zone because a cloud appeared and the luminosity of this small part of the photo is different from the first nadir photo, the one that will stitch perfectly with other photos of the sphere.
Compensate windows high lights
This time, it's about trying to place raw material through a window, a door or even a plate glass window because the strong contrasts between the inside of a room and outdoors, the openings are often over-exposed.
Photo 1 was shot for indoors: the window is completely over-exposed. Photo 2 was under-exposed of more or less two diaphragms in order to see through it more. You'll have to keep only the inside of the window in this second photo in order to place it on the first photo...
1 - Open both windows photos in Photoshop: the normally exposed photo (1) and the photo under-exposed for the room but exposed better for the window (2).
2 - Choose the darkest photo (2) - the one where the exposure is better for the window - by clicking it, select it and copy it - CMD + A then CMD + C on Mac OS / CRTL + A then CRTL + C on Windows;
3 - Re-select photo 1 by clicking it then paste photo (2) over it. CMD + V / CRTL + V -;
4 - They must superimpose perfectly if you took both photos in a row, without moving the panoramic head nor the tripod (caution, a kick happens so fast!). To know it, open the layers palette (Window Menu/Layers). Click the eye on the left of layer 1 several times to see if the darkest image perfectly superimposes or if it seems to be slightly shifted. If it's OK, create a layer mask by clicking the third icon at the bottom of the "Layers" palette(fig. here).
5 - Display the white layer mask on the screen by clicking it and pressing the ALT key at the same time.
6 - You should then see a white picture on screen. Paste the image that is still in your clipboard on it - CMD + V / CRTL + V -; the layer mask turns into your photo but in a grey shelf which, at pixel level, has exactly the shape of your window.
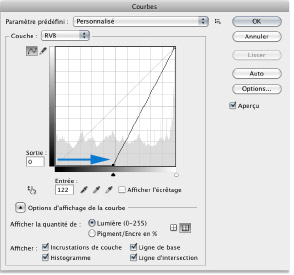
7 - To keep only raw material through the window from layer 1 (photo 2), you need the layer mask of layer 1 to be white at the level of the window and black everywhere else, if I caricature. To get closer to this result, you need to reinforce contrast thanks to a curve - CMD + M / CRTL + M - and tighten the black point threshold meaning pulling to the right - about half but it can vary - the curve at the bottom as shown in the image here. The grey parts of the image become very dark grey or black. The white parts remain white, of course, and they're the ones interesting us. The mask is still not perfect, but in two clicks, you can prepare it up to the pixel!
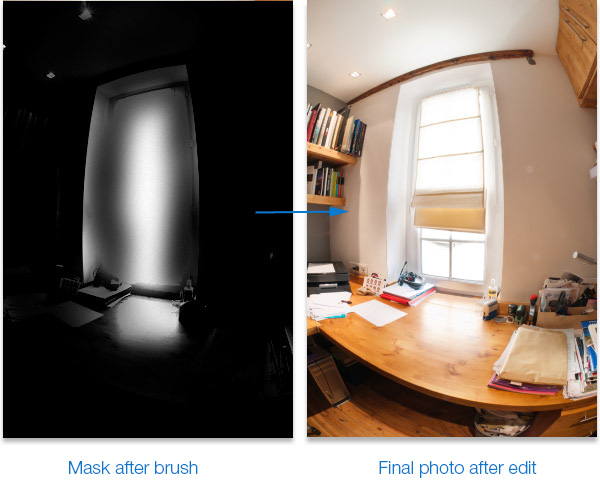
8 - To finish the mask, you need to paint the window in white a little and paint black around it. When the work is done, that's what you should get:
Still painting on the layer mask of layer 1 with your brush BUT this time showing photo 2, you can see concretely what you're doing. To finish the job, it is more convenient. You only have to flatten your image through the menu Layers/Flatten the image. You can now save this photo - CMD S/ CRTL S -.
The two big edits before stitching the panorama used to create a virtual tour are now over. You only need to see a few elements of color management now before switching to correction of optical distortions.
Color management
Color management can be summed up in a few lines but I'd like to detail a few notions here. I invite you to read my tutorial on color management on my personal website though.
The correct display of color depends directly of a controlled color management. If the camera enables it, the photographer will thus work preferably in RAW in order to choose between four neutral color spaces while in JPEG, only two would have been possible. Even if it is possible to choose though, I'd like to draw your attention on the fact that very few pieces of panorama software except for PTGui handle color and ICC profiles. Their only work color space by default is sRGB. If your images have been saved in this space - with or without ICC profile incorporated - they'll display correctly. If your images are saved in another space, bigger, they' look faded and dull when you open them in the panorama software. It doesn't have any consequence on the intrinsic image quality of your photos, but only on their display. When the software will save the panorama, it won't handle the colors more than at the opening. So when you'll open this image in Photoshop with the right settings, it will tell you that it doesn't feature an ICC profile. You'll only have to assign it the ICC profile with which you developed your photos in Camera Raw, for instance, or the one chosen in the menus of your camera if you shot your photos in JPEG. Unfortunately, most panorama software don't know how to read an ICC profile, but moreover, they erase it!
Tip! to create a virtual tour, I only work in sRGB from the development of my RAW files to the final panorama since my tour will be seen online where sRGB rules!
"Find the nodal point or no parallax point accurately in less than an hour"... whether you are photographing a simple panorama or a 360° photo - PDF of 100 pages -More information...
This website is almost entirely free and yet almost free of ads. Why? Because they look so bad! It is lucrative though, and enables many websites to keep on living. So I asked myself: what can I do? To keep on developing this website, I'm going to need a regular income just like everyone else. How can I keep on giving access to free information like I've been doing since April 2002?
And I finally found the answer: affiliation. Every time you click on a link from this site to one of my partners' shops, they know you've been referred by me and give me a small percentage on your purchase, be it something I recommend on my website or anything else. Remember to use my links when you shop on these sites! It doesn't cost you anything and it's a win-win deal – for me, them, and you!


 Because they've all been taken in manual exposure mode, all photos can have been globally over or under-exposed. Either we'll edit them one by one at that point, by lighting them up or darkening them with a Photoshop level for instance, either we'll do it on the final panorama hence with only one image.
Several elements of answer have to be considered:
Because they've all been taken in manual exposure mode, all photos can have been globally over or under-exposed. Either we'll edit them one by one at that point, by lighting them up or darkening them with a Photoshop level for instance, either we'll do it on the final panorama hence with only one image.
Several elements of answer have to be considered:

 One of the main assets of digital cameras is their setting of color balance before shooting. It works really very well. But as for luminosity, corrections can be necessary once at home, in front of the computer. Here again, you'd better make them on a 16 bits image, and better yet, if you want to work as well as possible, work in RAW. Moreover, it is then very easy to harmonize a panoramic serial because all the photos can synchronize on the reference photo. With that said and mainly if you stitch your photos using PTGui, it will be easy to ask the software to make a small correction, even if it hadn't been made before stitching. But really, you'd better work in RAW!
  Popular belief about resolutions: 72 dpi
and others...
Popular belief about resolutions: 72 dpi
and others... 
 The flare effect - halos generated by the sun or any other very intense luminous source - strongly reduces the contrast in the photos and is, of course, very ungracious. As shown at the page 156-159 of Gérard Perron's book " Interactive photography " - sold out -, those are often very annoying to eliminate because they're very numerous and on important surfaces. Even if the new stamp tool of Photoshop ( J - Corrector ) is sometimes impressively efficient, it's not certain, without spending hours on it, that we'll manage to properly remove them. Well then, the given trick is to hide the sun with your hand or with a little black cap (as in a photo lab to realize a make-up) that we'll erase more easily with the stamp tool. Indeed, this cap will be in a zone of the sky that is widely overexposed hence without luminosity gradient. It will then be very easy to eliminate this cap by successive edits. The second method listed in the book consists in taking two images, one with the cap and one without and to stitch both together in an editing software while taking care of stitching only the top parts together.
 Remark on lenses' flare
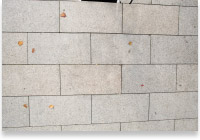 During the shooting, we saw in the page
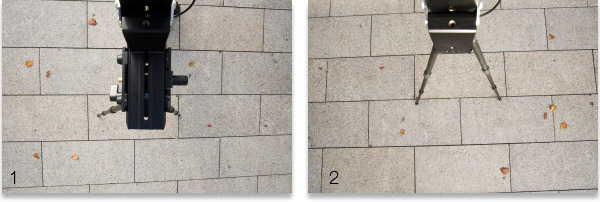
 3
3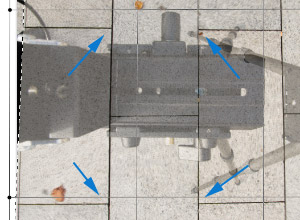 10
10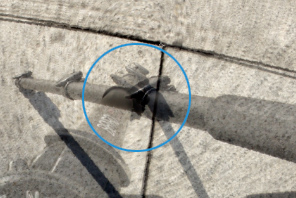
 Once your work finished, you get an (almost) perfect floor, but above all, without a trace of the panoramic head or the tripod. Your nadir is finished! It can be necessary to perform final edits to remove shadows on the floor due to the sun, edit the tripod zone because a cloud appeared and the luminosity of this small part of the photo is different from the first nadir photo, the one that will stitch perfectly with other photos of the sphere.
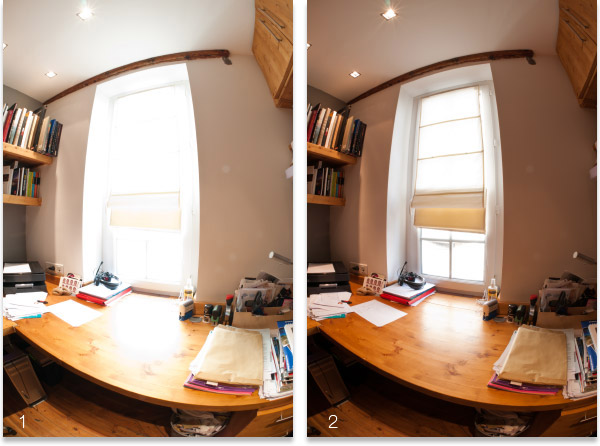
 7
7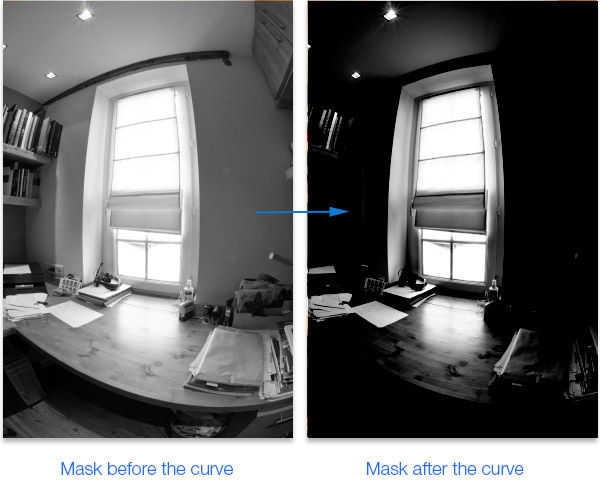
 Color management can be summed up in a few lines but I'd like to detail a few notions here. I invite you to read my tutorial on
  To read


