A new brand of panoramic heads just arrived on the market now quite well supplied of panoramic heads called spherical. It's the brand Bushman Panoramic.
This brand just released its first head of a serial that should grow bigger: the Kalahari panoramic head. It's positioned at once in the category of compact and light panoramic heads hence very well transportable with, and that's another striking quality, a very good manufacturing quality... It is thus not especially cheap!
Does it keep all its promises then? Is it convenient and well-designed? Stable enough given its featherweight? That's what I offer you to discover in this page dedicated to it.
Bushman Panoramic Kalahari head presentation
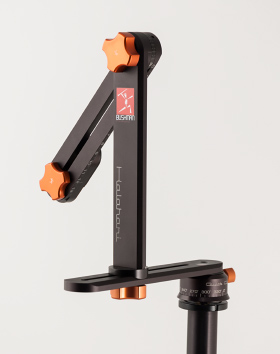
The Kalahari panoramic head is thus a very compact spherical head. It is sold in a case, in two very classic separate parts: the horizontal arm with its possibly notched base and its vertical arm, dismountable, supporting the tiltable arm on which we'll fasten the digital body. It is obviously the panoramic head case the less bulky on the market.
The bulkiness of the travel case of the Kalahari head is really incredible: the head is twice less bulky than a head Nodal Ninja 4!
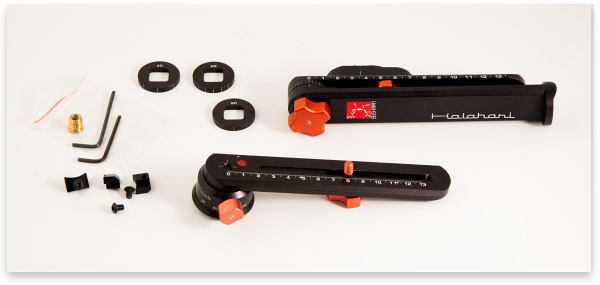
In the case, you'll find:
The Kalahari head and its Quick Click head, unnotched, with lock screw
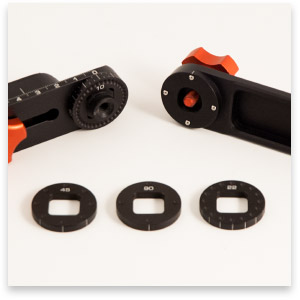
4 clips, 10°,22°,45°,90° to place in the tilting axis
a quick fastening stage of the camera
3 rail stops
an Allen wrench
its dedicated travel case (photo above).
It has all the functionalities we could expect from a panoramic head in order to realize all sorts of panoramas, possibly multi-range and of course virtual tours: a depth setting stage (on 10 cm) and tiltable on its vertical arm, notched at the level of its tilting axis thanks to the clips listed above, a horizontal stage with base possibly notched and its built-in bubble level. This head is even delivered with mark wedges we'll talk about again later.
The whole thing smells of manufacturing and finishing quality, above the average. The head is made from an alloy of anodized aluminium in black, red for the clamping screws and the marks are laser-traced for a high accuracy, very convenient in the real world moreover. It stands out! The bubble level is also very accurate, maybe even too much as it can be tedious to set it but it's really small. There's not much space and it's present. We're at the level of Novoflex equipment, imagine! Obviously, the designers made panoramas and virtual tours during its conception because it seems very well-thought... Anyway, this head doesn't lack anything, I repeat it, very transportable.
It is made of two distinct and dismountable parts. Once mounted, it is usually impressive except at the base level, far below the average and the confrontation with the reference head Nodal Ninja 4 is striking: the settings ranges are identical and yet it is far less bulky and less heavy! It is particularly easy to carry and you don't need to debate whether to take it or not!
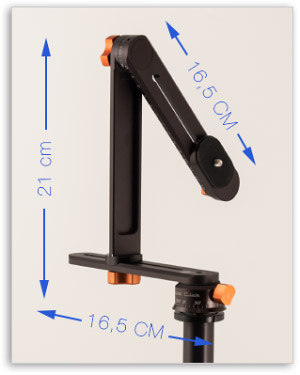
With the camera set, it is about 19 cm higher than the head. Its height alone being 21 cm from the base of the tripod.
We can also see clearly that the vertical arm can be unscrewed very easily (big screw under the vertical arm) to turn over in order to photograph the nadir during the realization of a virtual or to carry it. Then, note the presence of a clamping screw of the quite compact tilting head. This axis is notched and the number of notches can vary by simply changing the inside clip.
Then, time will tell us if it remains accurate but its designers did their best to make it more reliable and avoid wear points. Come what may, nowadays, it inspires trust. One last remark about the paint that seems to vanish a little, as for all painted or anodized heads at friction points, between vertical and horizontal arms. No miracles on this side but how to do without painting in the block?
Comparison between the reference panoramic head for this niche Nodal Ninja 4 and the new and compact Bushman Panoramic Kalahari.
Two distinct and dismountable parts
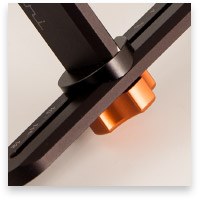
The Kalahari head can be separated into two distinct parts. It's a great asset to place your equipment in your photo bag or even directly in your pocket here. This is the only one that can do that! To separate the vertical arm from the base and from the bottom rail, you just have to unscrew it. The screw is quite pleasant to manipulate because large enough but could be improved by smoother edges (image over there).
Once dismounted, the Kalahari head can be disassembled into: a base (1) which rotation is free and not notched as we could expect by default (but there's an explanation as we'll see later...) and its lower stage, a vertical arm (2) and a stage sliding in depth on 10 cm and the quick fastening stage for the camera (3) that can be optionally replaced by a more impressive stage called Xtension.
1- Rotary base smooth or notched (optional) and bottom reglet (1) - There are several solutions by Bushman Panoramic: the Quick Click base sold with the basic model is smooth (unnotched) but it can be replaced by an optional notched model (unless you choose to replace the smooth model by a given number of notches at the purchase; only another QuickClick with a different number of clicks would then be invoiced to you optionally) which particularity is to be chosen depending on the number of notches you need. It has a huge drawback but also a huge asset, consistent with the philosophy of the product: you have to change the Quick Click base each time you change focal or lens, however, the reliability, the simplicity and the lightness of the product are conserved. Finally, it matches perfectly the logic of design of this head that is meant to be easy to transport and reliable, even in difficult environments (sans, water, dust).
It's on the marked reglet that we're going to fasten the vertical arm thanks to the big orange clamping screw. The vertical arm can slide on 10 cm which is remarkable for that level of bulkiness. Note the quality of milling and anodization, remarkable. The dovetail design makes the blocking of the vertical arm very reliable.
2 - Upper stage and vertical arm (2) - The whole thing enables to maintain the camera vertical in order to get the highest possible panorama in pixels. The framing in height, let's not forget it, is done by the focal in panoramic photography by stitching.
The reglet can be tilted on the vertical arm and receives the quick fastening stage of the camera. This reglet has a depth setting of 10 cm. Also very good. The tilting of the arm is notched thanks to the four clips sold with the head. Its change is particularly easy since you only have to unscrew the big arm tilting screw as show in the photo over there.
3 - Camera quick fastening stage (3) - The quick fastening stage of the Bushman Panoramic Kalahari is very well designed because it naturally sticks to the reglet thanks to a dovetail.It avoids to this stage to tilt on the reglet. Only the camera, if it's not fastened correctly on that stage, will possibly rotate. It slides on 10 cm. (There is also another optional stage called Xtension detailed below).
The Quick Click base (optional)
The Quick Click base sold with the Kalahari head isn't notched (it rotates freely as long as you haven't clamped the screw on the side) as we just saw above. There are optional Quick Click notched bases which number of notches is specific to each Quick Click model. There are five models at the moment: 4, 6, 8, 10 and 12 clicks, in order to make it more reliable (more robust and less sensitive to exterior aggressions.)
Note! When you place the order for your Kalahari head, you can choose a notched Quick Click with the number of notches you need instead of the smooth Quick Click.
Camera stage Xtension (optional)
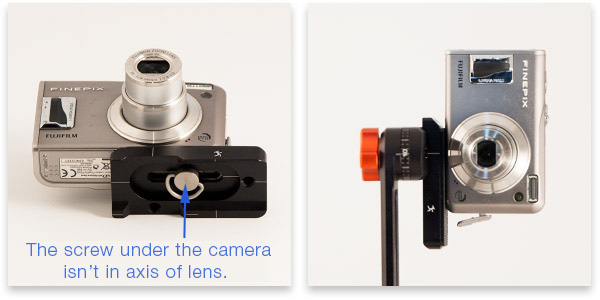
This camera stage can be placed on the sliding arm in two directions. It allows, above all, to place any camera that wouldn't have a clamping screw in its shoe just behind its optical axis, especially with digital cameras that have a shifted clamping screw relatively to the optical axis hence the famous entrance pupil. It is also more robust in other cases and can thus support heavier camera/lens pairs.
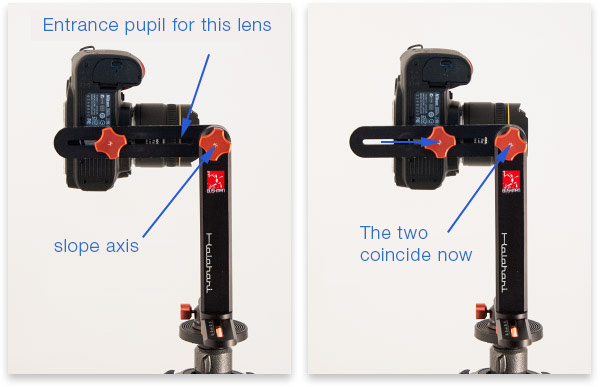
As for all panoramic heads, the Bushman Panoramic Kalahari head is used to place the entrance pupil of your lens above the rotary axis of the head and in the tilting axis of the vertical arm to get perfect overlap zones, even in spherical photography. This manual panoramic head is one of the most simple heads to manipulate.Let's see this in details now...
Setting of the Kalahari head at the entrance pupil
Let's start with an essential point, the fastening of the body on the upper stage. Indeed, depending on whether the screw thread of the camera sole is in the axis of the lens or not, its fastening on the panoramic head won't be the same:
1 - The fastening of the camera is in the axis of the lens (most frequent case with reflex cameras): you just have to fasten the camera directly on the dedicated stage sold with the Kalahari head and it will all go into the tilting axis. The entrance pupil will thus end up above the rotary axis BUT also in the tilting axis. (image below).
With both stages, when you fasten a camera that has a clamping screw in the axis of the lens, it is possible to place the camera in the tilting axis. The optional accessory Xtension isn't essential for this functionality.
2 - The binding nut of the camera isn't in the axis of the lens (most common case with point-and-shoot cameras and when you put a grip on a reflex camera): you definitely need to use the Xtension stage then because its binding screw can slide on about three centimeters. It is then easy to set the stage so that, once the body mounted, it ends up in the tilting axis. (image below).
Note that the clamping system of the stage under the body doesn't require a screwdriver or a coin. Very convenient!
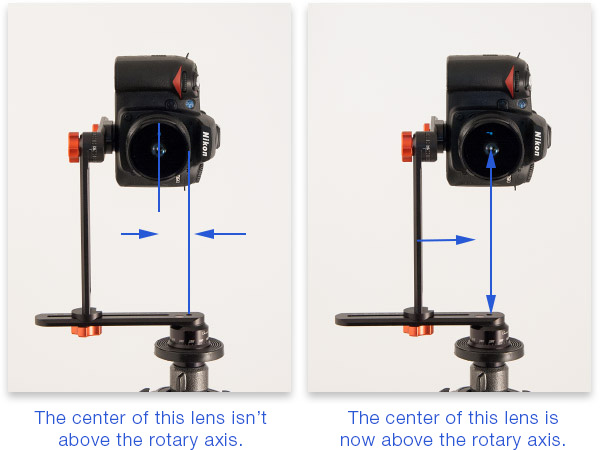
3 - Move the optical center above the rotary axis of your head - Once the camera fastened on the upper stage (possibly Xtension), itself on the tiltable arm, you just have to center the lens just above the rotary axis of the notched base thanks to the movement of the vertical arm on which the camera is fastened at first. For that, you just have to move the arm a little on the right in this example after unscrewing the clamping screw under the arm...
4 - Depth setting of the camera - Once this is done, you need to find the setting in depth depending on the lens and if it's a zoom-lens, you need to find the settingS in accordance with the focals commonly used. This is done using the upper reglet, very easily!
The entrance pupil is perfectly set for all the axis hence in 3D for that panoramic lens and that lens. You just have to write down the settings below to find them easily next time.
Marking the settings for the Bushman Panoramic Kalahari head
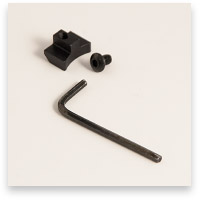
Once the settings found for your pair camera/lens and unlike the Manfrotto303SPH heads especially, there's no need to take notes to mark the settings (at least when you only work with one lens, reading the marks on the marked stage, not very accurate by the way) because the Kalahari head is sold with three small metal plates. They're screwed on the marked reglets with an Allen wrench, stopped against the vertical arm AND the stage supporting the camera once set. To replace the vertical arm and the camera in the right position when you take your equipment out... of your pocket (!), you just have to replace the vertical arm and the camera against these little plates. Unbeatable even in the dark!
However, you'll have noted that you need an Allen wrench to fasten the whole thing with a tiny screw... so avoid setting your head in the field! However and here again, this fits the philosophy of the product because there's not much space on and under the stages and you need to have an operational head in the field while keeping its first quality: compactness. Was it possible to do otherwise?
The small stage is stopped against the vertical arm at the bottom and against the camera at the top, once the camera is set at the entrance pupil. It is very convenient to find your settings easily in the field!
Turn the vertical arm over to photograph the nadir
In the tutorial dedicated to the creation of virtual tours on this site, I wrote an article about shooting the nadir with a tripod. For that, you need to turn the vertical arm of 180° in order to tie the camera above empty space by putting as far as possible of the arms of the tripod. On the Bushman Panoramic Kalahari head , you just have to unscrew the screw under the lower stage almost completely (image above on the right) holding the vertical arm to be able to rotate it on 180° (image below on the left). To do so, no need for a screw driver because the screw is big enough. It is very convenient.
Note that it's no illusion that spherical heads are seldom massive enough for the arm not to bend a little under the weight of the camera (here just a Nikon D90 with its lens Nikkor 10.5 mm Fisheye) as you can see in the left photo when you turn the vertical arm over to photograph the nadir - AND ONLY IN THIS CASE. It's the main weakness of the Kalahari head. You can't have it all! In all other cases, the robustness can't be questioned.
In order to photograph the nadir without tripod nor panoramic head visible in the photos, you need two things: turn the vertical arm over to tie the camera above empty space hence in overhang; put it as far as possible from the rotation center not to include the arms of the tripod in the photo.
But it's detrimental to the overall stability if you need long exposure times wich is often the case at F11.0 inside! You need a massive enough head. That's the weakness of the Kalahari head. It is extremely light - one of the lighter on the market - so it's necessarily a bit detrimental to the stability. You'll absolutely have to use the self-time/mirror raising...
If you only use this head to shoot panoramas, then stability will be satisfying, especially if you use the Xtension stage (and don't think I'm trying to force you into buying it, really) that improves things even more because, then, the robustness can't be questioned. You'll remain in a very acceptable zone when you absolutely need to limit the weight of your photo bag. You just have to avoid very windy days! And don't forget that other heads, on this criteria, are much better... yes, but they're noticeably heavier, bulkier. You can't have it all!
In a way, this head doesn't square the circle but take heart, you chose it knowingly!
Conclusion et and rating!
So does this Kalahari keep all its promises? It does, or almost does, because I was expecting a miracle! Let me explain: if you accept necessary defects of its real qualities - but the miracle doesn't happen!. It is very clearly well designed and the choices inherent in specifications - very transportable and light - are perfectly taken on and coherent but unfortunately, not unimportant. Technical solutions found are well thought. Yes, the base enables to change notch easily how else to do with such few space while keeping a great reliability (strong against dust and sand grains). Frankly, the choice of a one-notch base seems relevant. No, you don't want to lose the tiny screw that enables to fasten the marking wedge on the stages but honestly, if you go shooting in the mountain and want to be as light as possible, you're obviously not going to take all your lenses. You'll favor one focal, your favorite one. Then, the choice of the ultra-light system is once again relevant.
So this is a good alternative when you're looking for a light head that is moreover very well manufactured. Although this head also clearly lacks stability. You'll make do if you have a light body but it seems crippling in other situations.
As a conclusion, nature, mountain, hiking photographers that favor the weight will like it. Quality equipment lovers too. But owners of big bodies or those needing a minimum of stability can keep on looking.
Very good product though, really, and good news!
Ratings
Bushman Panoramic
Kalahari
Manufacturing quality
Robustness/stability
|(1)
Bulkiness mounted
dismounted
Base setting
Value for money
PROS...
Very well designed and manufactured
very compact and transportable (striking quality)
Weight
Mounted and folded bulkiness
The vertical arm can be turned over easily
adjustable but the the price can rise...
CONS...
(1) Too light for big bodies and just stable enough for the others...
Not so many things after all...
if you don't forget its use: hiking or long walks.
GLOBAL RATING
8.5/10 for a light use... in other situations, 6.0/10.
My opinion: Especially well-designed and wonderfully manufactured for a special use, meaning for light hiking, then it's an excellent new product. We can't consider it a universal head because it really lacks stability.
Buy the Kalahari V1 panoramic head from
Retailer
Price (€)
€149.50 *
* Your coupon code -5% : BPAF5
Buy the Xtension-U or M
Retailer
Price (€)
€33.06 *
* Your coupon code -5% : BPAF5
Pratical Guide N°1 : The Nodal Point
$12.90 USD
My practical guides in e-books - N° 1!
"Find the nodal point or no parallax point accurately in less than an hour"... whether you are photographing a simple panorama or a 360° photo - PDF of 100 pages -More information...
This website is almost entirely free and yet almost free of ads. Why? Because they look so bad! It is lucrative though, and enables many websites to keep on living. So I asked myself: what can I do? To keep on developing this website, I'm going to need a regular income just like everyone else. How can I keep on giving access to free information like I've been doing since April 2002?
And I finally found the answer: affiliation. Every time you click on a link from this site to one of my partners' shops, they know you've been referred by me and give me a small percentage on your purchase, be it something I recommend on my website or anything else. Remember to use my links when you shop on these sites! It doesn't cost you anything and it's a win-win deal – for me, them, and you!


 It is made of two distinct and dismountable parts. Once mounted, it is usually impressive except at the base level, far below the average and the confrontation with the reference head Nodal Ninja 4 is striking: the settings ranges are identical and yet it is far less bulky and less heavy! It is particularly easy to carry and you don't need to debate whether to take it or not!
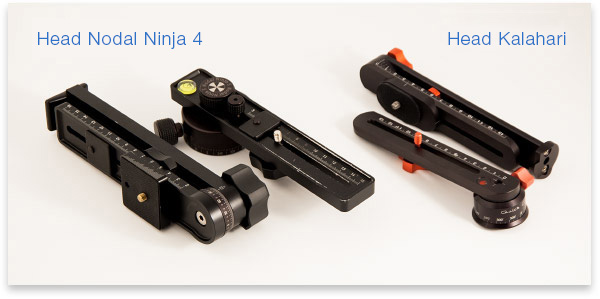
 The Kalahari head can be separated into two distinct parts. It's a great asset to place your equipment in your photo bag or even directly in your pocket here. This is the only one that can do that! To separate the vertical arm from the base and from the bottom rail, you just have to unscrew it. The screw is quite pleasant to manipulate because large enough but could be improved by smoother edges (image over there).
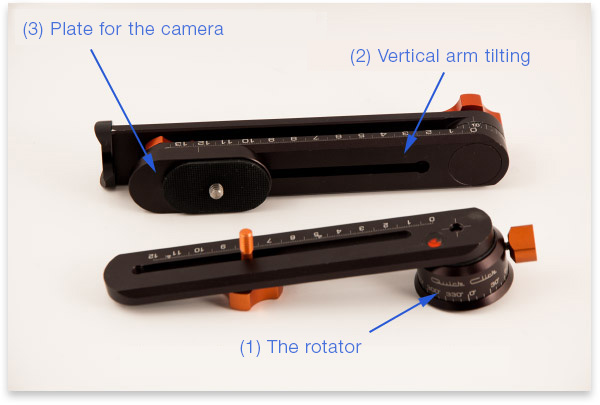
 2
2 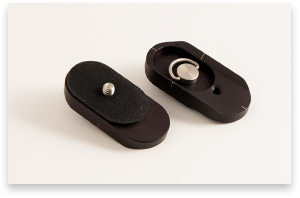 3
3 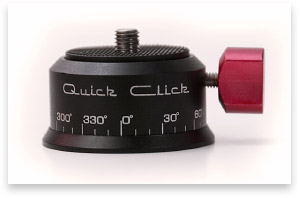 The
The  Note!
Note!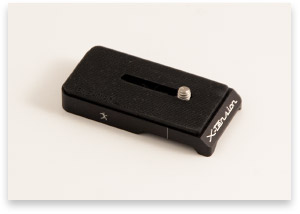 This camera stage can be placed on the sliding arm in two directions. It allows, above all, to place any camera that wouldn't have a clamping screw in its shoe just behind its optical axis, especially with digital cameras that have a shifted clamping screw relatively to the optical axis hence the famous
 Once the settings found for your pair camera/lens and unlike the


