Interface, preferences and new features in Autopano 4.4
GoPro announced on September 14, 2018 that it was closing the doors of Kolor, so no more Autopano or Panotour!!!!!! We're going to have to fight about PTGui or whatever.
I discovered Autopano at the end of 2005 and was immediately impressed. It's remarkable how its designers keep listening to the complaints of users and thus how the software sanely evolves. One thing is sure, it's my favorite panorama software, before its main competitor PTGui, imagine! I thus want to congratulate and thank here Alexandre Jenny and Lionel Laissus, the designers, as well as the whole team at Kolor.
Through this tutorial in several pages, I'll first present you the software, then in a second page, we'll learn how to edit a panorama, before keeping on...
Important! This tutorial as the rest of the site is free because you're a lot to play the game of affiliation which means buying your software and equipment from my partners. They're the ones remunerating me and it doesn't cost you anything!
What's new about Autopano Pro/Giga 4.0 (March 2015) and 4.4 (February 2017)
Here are Autopano Pro/Giga 4.0's new features:
The stitching algorithms have been improved even more, even if the difference might not be visible to anyone because they bettered the stitching of particular cases: this program has been doing a very fine job with "classic" case for a good while already!
At Autopano's level, the improvements can only lie in the margins. It is fundamental though for photographers like myself... Edit a panorama with Autopano
New color correction engine - My favorite new feature! - the program is now able to correct, almost perfectly most of the time, a big recurring problem in panoramas, especially in landscapes ones or in panoramas shot at dusk: vignetting and even more vicious, gradients differences.
The editor works even faster (for very big projects) - because it is already particularly fast!
Realtime panorama editor - Edit your panorama in real time hence with the final result under your eyes. No need to launch a rendering to know the final corrections to apply. Edit a panorama with Autopano
Mask mode easy to use and more efficient - Autopano Giga only - It is now possible to visualize the limits of the masks cutting zones. It is thus even easier to use this great mask mode to eliminate what you want. Edit a panorama with Autopano
Increased stability of the mask mode - The final rendering is now similar to the rendering in the panorama editor.
Stitching of an even better quality for aerial photography - Autopano Giga only - The stitching of aerial views hence which haven't been shot from the same point of view is even better. It will of course also improve the quality of shots taken free-hand. Edit a panorama with Autopano
Improvement of the HDR fusion mode - Autopano Giga only - There was an HDR fusion mode but its manipulation has been improved. Edit a panorama with Autopano
Compatibility 4K/high definition/Retina monitors - The display is now perfect even on this new generation of high definition monitors.
Zones selection tool - During the edition of the panorama, you can now use the CMD or CTRL key of your keyboard to select a zone in an image. All the images which center is present in this zone will then be selected and you'll be able to move simultaneously a group of images to correct a sky in a gigapixel panorama, for instance.
Suppression of artefacts at zenith and nadir (360° photography) - Especially at the zenith, a clear spot could remain because of a bad stitching, often due to a lack of raw material. Problem solved!
Improvement of groups management - Sorting out images in a group was never so easy.
Optimization of Autopano's memory use - Gigapixels are now more accessible to "modest" computers. There's still the problem of opening this final panorama on the same computer though!
New feature in Autopano Pro/Giga 4.2:
New color correction engine - the version 4.0 already brought noticeable changes; well version 4.2 goes even further and brings an even better harmonization in the case of photos shot with wide exposure gaps. I made trials with a gap of 1.5 diaphragms, and you don't see any difference in the final panorama.
New exposure cursor - very convenient, and a new button to display under or over-exposures has appeared.
Optimization of white balance - in its quest of perfection under all circumstances, the white balance has been improved even further.
The new color engine in Autopano Pro/Giga 4.2 (In french) - 10'10
Free HD video (in french)!
I'm detailing at the bottom of this page why and how it is possible. Thank you!
Start well with Autopano Giga/Pro 4.4
Installation and registration are very easy and don't call for any particular remarks. Possibly more information on the site of Kolor.
Note about the installation of Lightroom and Bridge plugins! If you opted for the Giga version, you have the possibility to install Lightroom et Bridge plugins. I explain all about it in a new dedicated page - Open Autopano from Lightroom or Bridge -. It is then possible to launch Autopano Giga from these two programs but for Autopano's installer to offer you to install them, these two programs have to be installed on your computer BEFORE launching the installation of Autopano.
Interface
Since version 2.5, the default interface of Autopano is dark grey but it's possible to choose a lighter theme. It comes within the scope of standards for professional photo editing software since it comes with a dark grey background. The icons have also been redesigned with brighter colors. The interface looks like the image below, meaning, a menu bar, classic at the top, an icon bar below - shortcuts - and a wide work area split in two parts: a left part for the content of the files and a right part for pre-stitched panoramas, ready to be finally rendered or edited.
The interface of Autopano Giga or Pro 3.5 is, according to me, more refined than in the previous versions but it's possible to go back to the last version in the preferences of the software.
It's thus really simple once understood how the software gathers photos of a same panorama, which we'll see again later. But first of all, let's see together the basic parameters and preferences of the software.
Preferences of the software
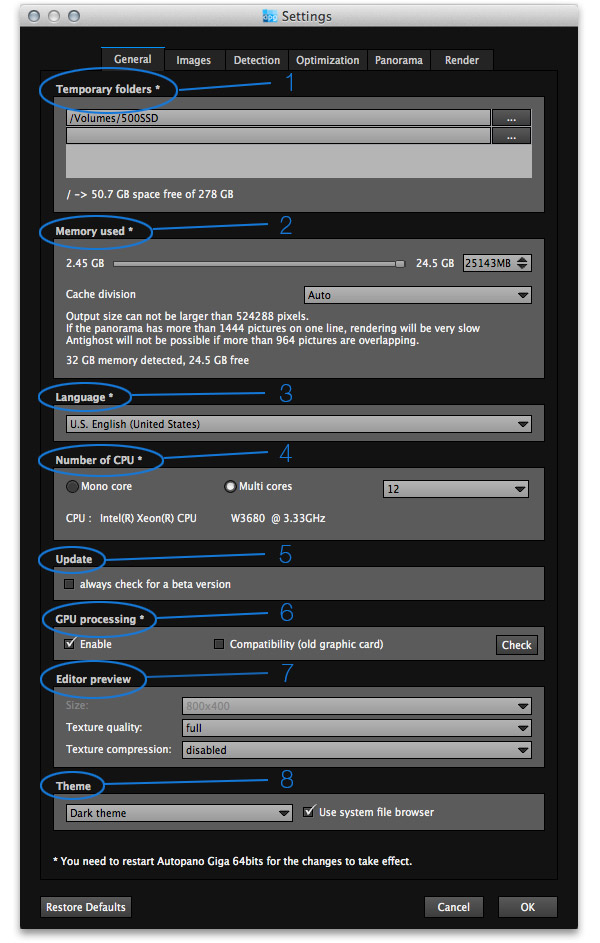
As each piece of software, Autopano Pro/Giga 3.7 allows to customize certain basic options for a personally adapted functioning. A certain number of these basic options can be set via the Menu / Edition / Editor options on Windows or Autopano / Preferences on Mac OS. It is obvious that it's possible to change almost all these options one by one. This six-tabs menu now looks like this:
As you can see, the number of preferences that can be set in Autopano Giga is impressive!
First tab: Preferences
Temporary directory (1): Temporary files can be placed in one or several partitions, possibly dedicated, which is better with large-size stitchings. Indeed, Autopano Giga and image stitching are very demanding in terms of resources and it's preferable to place temporary files in separate partitions, themselves on hard drives that are not the installation one. The faster the hard drives (possibly in RAID 0-mounted SSD) the faster the software. It is thus a rule that works with other pieces of software like Photoshop.
Used memory (2) : it's also been optimized. It will be set automatically and it's perfect this way. Piece of advice! If you have few RAM and you're experiencing stitching problems, place the cursor on the minimum.
Language (3) : I just note that the choice of languages available is very wide. It's very pleasant when it's a software one likes to recommend when other pieces of software are in English only.
Number of CPUs (processors) (4) - The software is fully multithreaded and thus perfectly handles multicore processors as well as hyperthreading of Intel processors. If you have four cores at least, leave it at the maximum. I tried numerous processors with this software and I can testify that the more processors or simply cores your computer will have, the faster the software will stitch. It's even particularly fast with four cores or more! Remark! Note that the software will tell you the name of the processor installed.
Update - New! (5): the software automatically checks the updates but it's possible to ask the software if there are also new Beta versions.
Use of GPU (6) : If your GPU allows it - you only have to launch the test - you'll be able to activate its use to make certain calculations a lot faster, I especially think about the pre-stitching of images - spectacular! - or even the visualization of the pre-stitched photo at 100 % and not completely pixelated as in the previous versions, when editing. Essential! Since 2.6: the GPU calculation becomes accessible to old GPUs.
Editor preview - new! (7): If you lack RAM or you have an old GPU, you can also lower the displaying quality of your panorama in the panorama editor.
Theme - appearance (8) : It's possible to restore the old interface.
Second tab: Images
1 - The second tab of preferences in Autopano Pro/Giga 3.5 allows to set a default focal for the lens you use all the time, if it's the case, and of course if Exif data isn't detected automatically by the software. We can try to set a default focal other than the one actually used but this is of few interest as a default setting of the software. It will thus be done one by one.
2 - New! - It's possible to choose a few options of development for RAW files.
Piece of advice! Prefer to develop your RAW files directly in your demosaicing software; the result will only be better!
3 - Then, you can set the preferences of management of piles of several photos when you regularly braket. More information on this site: Kolor
Third tab: Detection
I just note here that Autopano Giga 4.2 or Autopano Pro 4.0 use the best stitching algorithms on the market, especially with very distorted lenses or very short focals with strong distortions. Even if we can set the sensitivity and the detection algorithms by default here, they can be changed at any time then. It is thus not very important.
As in each tab, it's possible to reset the default parameters with the button at the bottom left.
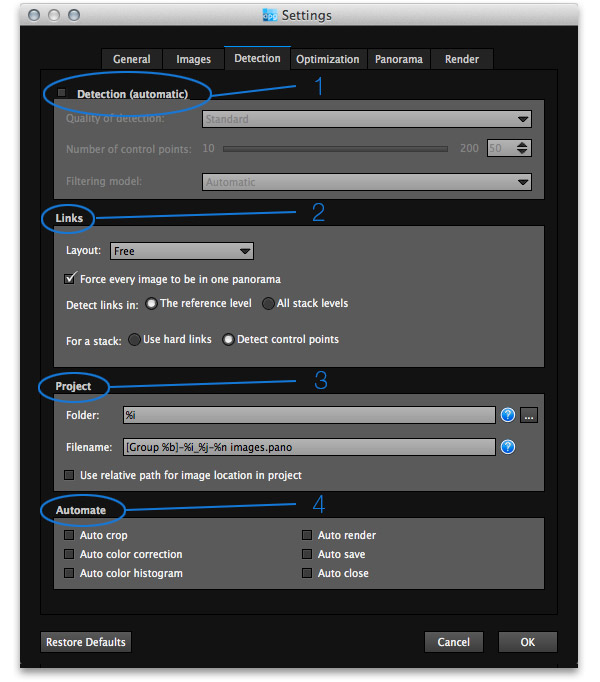
Detection quality (1) : Important news 4.0! The algorithms have been rewritten for a full automation. It will still be possible to take control individually.
Piece of advice! The automation really works very well indeed!
Links (2) : Choose free except if you always stitch images shot with a motorized panoramic head. Then you need to pick line. During the stitching of the project, the software will ask in what direction the photos have been taken to "naturally" place them in the right places. Check "Force all images in the same panorama": this option - that I check by default - allows to force the software to stitch all the images of a same directory even if it detects an anomaly (for instance if we want to stitch a photo that's been shot way before or after the rest of the panorama or even if a photo strikingly lacks details like a ceiling when you're making a virtual tour) or if doesn't find any links, for lack of raw material. Even if the software doesn't know how to stitch it, it will be part of the panorama and its edition, and it will still be possible to move it manually. It's easier than to go look for that photo later. Prefer "All bracket levels" so that the software can create checkpoints on all the photos, even when we've bracketed.
Project (3): the "cabalistic" signs mainly help Alexandre and his team to know more about the stitching conditions if you send them a panorama... but they also allow to precise the folder where the stitched photo should be placed:
- %i/...: the final photo is placed in the directory above the images directory.
- %i/.../Rendering: In the Rendering file, automatically created by Autopano Pro/Giga, as sub-folder of the images folder.
Piece of advice! By default, I like to save the .pano project in the concerned images folder. It's much more convenient to find it.
Automation (5) : To choose depending on your preferences and according to their names! I like to choose for each project because I'm still not a big fan of automatic corrections.
Piece of advice! As for myself, I uncheck all the options. For a beginner, I recommend to check them all.
Fourth tab: Optimization - (Update 3.5)
Here is a tab that's evolved a lot with the update 3.5: I keep it all unchecked hence completely automatic!
Fifth tab: Panorama - Updated 4.0
It's possible to choose a certain number of panorama displaying options during the pre-stitching phase:
The "Panorama" tab practically hasn't evolved since version 2.0.
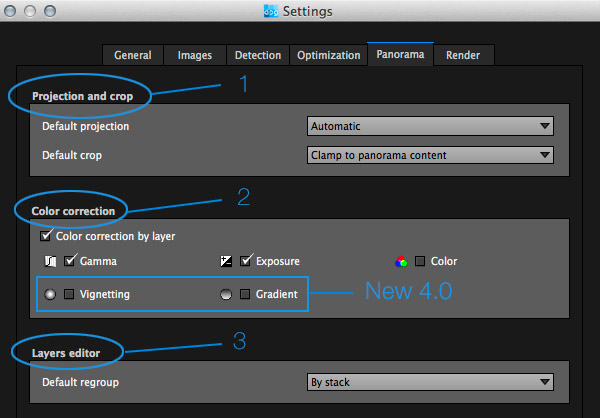
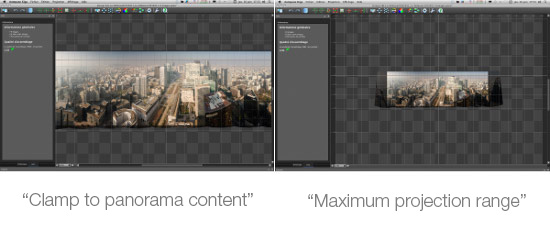
Width of the panorama (1) : Favorite projection - leave it in "Automatic" except if you always make rectilinear panoramas. Preferred width - If you leave it on "Reduced to the width of the content", the pre-stitched photo will also be displayed in the panorama editor in its whole width as shows the screenshot below on the left. If you choose "Maximum projection zone", you actually see the proportions of your panorama displayed in a work area of 360° x 180°. Your pre-stitching can really look small in some cases. Of course, if you're shooting a complete sphere, the option chosen doesn't matter much!
Color correction (2) - Update and important 4.0 new feature- When you choose the option Automation/Auto color correction in the tab "Detection", the automatic color corrections are chosen here."Gamma" is the equivalent of a curve in Photoshop and thus enables to play with the contrast in the image or to brighten / darken the photos in the panorama in order to make them coherent with their neighbors; "Exposure" is the equivalent in Photoshop of a black point / white point level setting in the "Level" window. It enables to tighten the thresholds, meaning to make it so as there are real blacks and real whites in the final panorama. Without it, the panorama could lack contrast. Finally and it is one of the main new features in this 4.0 version, it is now possible - finally, as will malicious tongues like myself say! - to apply an automatic vignetting or gradients correction. Yay!
Panorama layers (3) : Leave by default.
Sixth tab: Launch the rendering
It's possible to choose several options of final rendering in the preferences of the software. Here again, all the options can be modified individually. Even if this menu is detailed in the third part of this tutorial, certain options can be chosen once and for all here.
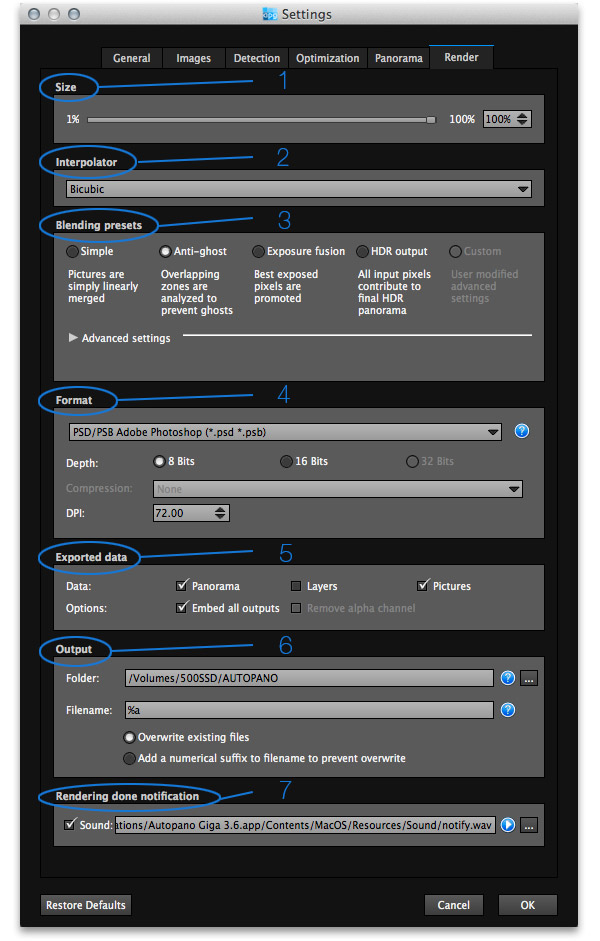
The tab "Launch rendering" has undergone numerous changes we'll see now and in the third part of this tutorial.
Size (1): individually
Interpolator (2): individually even if most of the time, I leave it by default.
Mix profile (3): individually.
Format (4): I like to set the extension of my final file from the preferences of the software ici because almost all my renderings are in PSD/PSB, multilayers, 16 bits. Please note that certain extensions don't allow, of course, to choose the 16 bits or multilayers modes.
Exported data (5):Data: "Panorama" is of course to be left by default! The "layers" option is only accessible in particular stitching cases with HDR bracketing, for instance. The "Images" option must absolutely be checked if you want to make multilayers in the Photoshop sense of the word in order to make corrections on the layer masks in this software. Indeed, thanks to this option, the panorama is rendered with the final panorama, as it would be rendered in flattened JPEG and the individual photos of the panorama are superimposed in Photoshop layers. It's essential to make particular edits very quickly. Options: "Incorporate everything" allows to incorporate all the photos on separate layers + the final panorama in the same file, for instance a PSD (Photoshop format).
Output (6) : You can choose, as I did, the folder and even better, the partition, if possible on a fast hard drive and different of the one of installation of the software, the finally stitched panoramas. For the 2010'record - Paris26gigapixels - : even if I needed 2'30 to make the final rendering of a quite heavy stitching when choosing as output drive a classic hard drive at 7200 tours, yet different from the installation one, I only needed 1'30 hence one minute less!!! when the final photo was saved on the very fast partition made of four SSD hard drives mounted in RAID 0 on a PCI card (writing speed 700 Mo/s against 80 Mo/s) .
Sound of end of file (7): as you want!
Restore the default parameters (8): To go back to the default values of the software.
So this is how this part dedicated to basic settings of the software Autopano Giga / Pro 4.4 ends. In the next page, we'll start a new project by selecting our photos by different ways : Select images
"Find the nodal point or no parallax point accurately in less than an hour"... whether you are photographing a simple panorama or a 360° photo - PDF of 100 pages -More information...
This website is almost entirely free and yet almost free of ads. Why? Because they look so bad! It is lucrative though, and enables many websites to keep on living. So I asked myself: what can I do? To keep on developing this website, I'm going to need a regular income just like everyone else. How can I keep on giving access to free information like I've been doing since April 2002?
And I finally found the answer: affiliation. Every time you click on a link from this site to one of my partners' shops, they know you've been referred by me and give me a small percentage on your purchase, be it something I recommend on my website or anything else. Remember to use my links when you shop on these sites! It doesn't cost you anything and it's a win-win deal – for me, them, and you!


 Important!
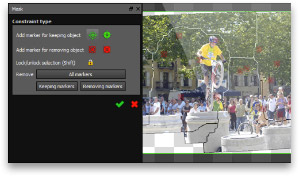 Mask mode easy to use and more efficient
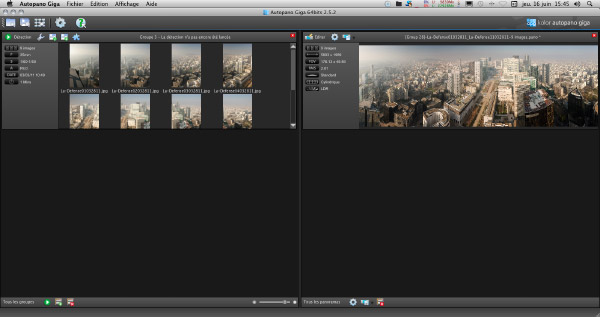
 Piece of advice!