When I want to discard a pedestrian I click on it with a red flag and when I want to keep a moving subject, I click on it with a green flag. Don't forget to place flags in the two layers of the overlap zone!
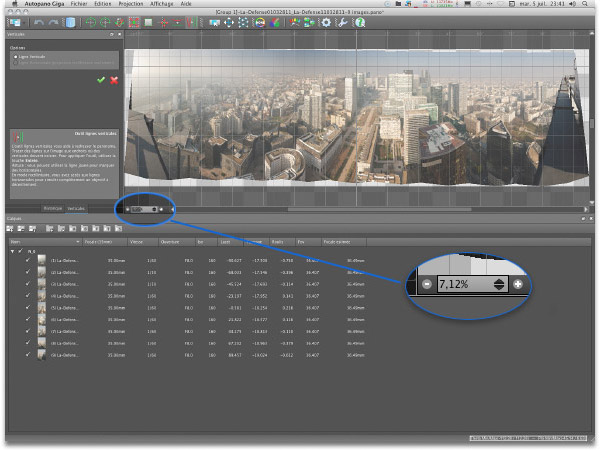
It is thus easy to know which zones of the images have been privileged by Autopano Giga. |
||||||||||||||||||||||||||||||||||||||||||||||||||||||||||||||||||||||||||||||||||||||||||||||||||||||||||||||||||||||||||||||||||||||||||||||||||||||||||||||||||||||||||||||||||||||||||||||||||||||||||||||||||||||||||||||||||||||||||||||||||||||||||||||||||
|---|---|---|---|---|---|---|---|---|---|---|---|---|---|---|---|---|---|---|---|---|---|---|---|---|---|---|---|---|---|---|---|---|---|---|---|---|---|---|---|---|---|---|---|---|---|---|---|---|---|---|---|---|---|---|---|---|---|---|---|---|---|---|---|---|---|---|---|---|---|---|---|---|---|---|---|---|---|---|---|---|---|---|---|---|---|---|---|---|---|---|---|---|---|---|---|---|---|---|---|---|---|---|---|---|---|---|---|---|---|---|---|---|---|---|---|---|---|---|---|---|---|---|---|---|---|---|---|---|---|---|---|---|---|---|---|---|---|---|---|---|---|---|---|---|---|---|---|---|---|---|---|---|---|---|---|---|---|---|---|---|---|---|---|---|---|---|---|---|---|---|---|---|---|---|---|---|---|---|---|---|---|---|---|---|---|---|---|---|---|---|---|---|---|---|---|---|---|---|---|---|---|---|---|---|---|---|---|---|---|---|---|---|---|---|---|---|---|---|---|---|---|---|---|---|---|---|---|---|---|---|---|---|---|---|---|---|---|---|---|---|---|---|---|---|---|---|---|---|---|---|---|---|---|---|---|---|---|---|


 Two important new features in this version 4.0!
  Caution!
 The
The 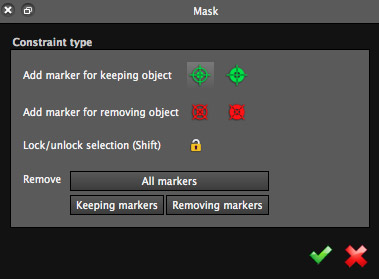 When you select the "
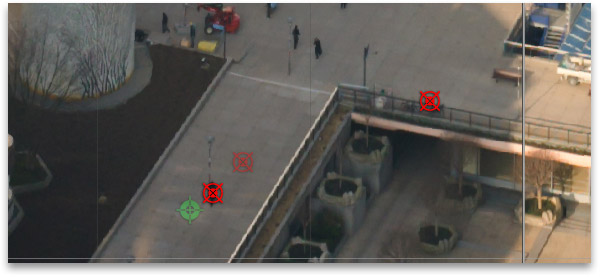
Watch this video tutorial Buy and watch this video tutorial from tuto.Elephorm.com
(Contribute to the development of this site by buying this DVD from the link above.) |
|---|
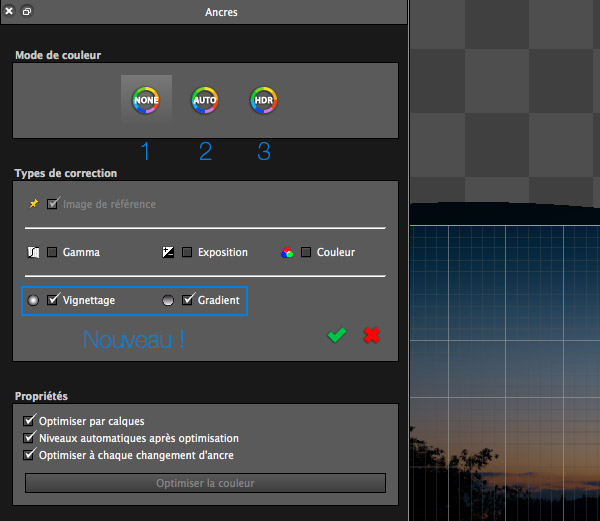
Open the color editor
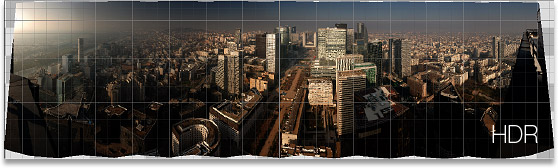
You need to go into the toolbar and click the icon "Edit color anchors". It opens a new menu in the left column: "None (1)" hence without correction, "Auto (2)" for Dynamic normal range hence a normal contrast and finally "HDR" (3) (High Dynamic Range hence high image dynamic) or strong contrast.

Then you open the toolbar below:
-
If you click Auto (1) : the look of the image is modified more or less locally. The colors and luminosities harmonization is activated (depending on the options). This modification can be edited though, and it's a huge asset. We'll see it later...
-
If you click HDR (2) : the look of the image changes completely and becomes dark because it's an HDR image. Of course, it can all be edited in Photoshop for instance.
Edit color anchors
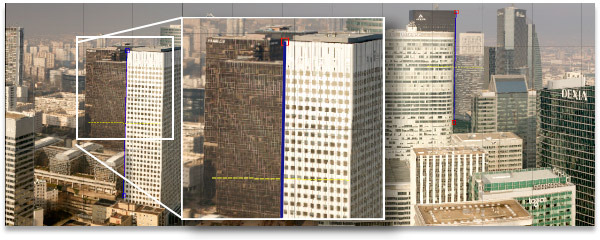
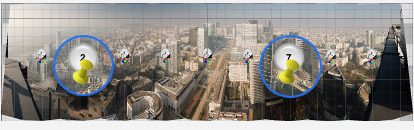
The main strength of Autopano Giga / Pro is the possibility to edit color anchors in luminosity, colors or even both at the same time. Let's see this now. When the harmonization automation is activated (Auto Mode), icons appear on each image of the panorama in the panorama editor.
Then, you'll see an icon appear in each individual image. Each icon has a correction value. Let's see this now...

Each anchor can take a different correction value. Here, the photo is harmonized in luminosity, contrast and color relatively, as always, to the yellow reference anchor, on the right.
Color anchors
|
|---|
 The
The  The
The  The
The  The
The  The
The  The
The  The
The Change color anchor
 Modifying a color anchor is very easy but there are two possibilities:
-
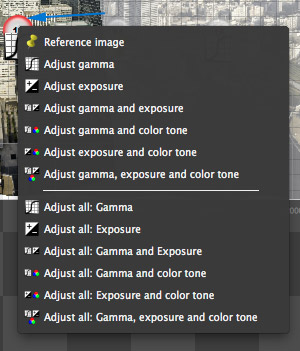
You click the number of the photo - illustration over there -: you can either:
- choose this photo as reference image;
- adjust the gamma for that photo only (the contrast of the photo);
- adjust the exposure (black and white points thresholds);
- with in addition the possible correction of tonality (color) ;
- or the three corrections at the same time.
- Then you can decide to make these corrections on all the other photos than the reference ones at the same time! This way, you won't forget any of them...
-
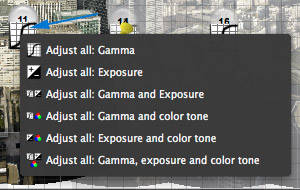 You click the icon symbolizing the anchor just below the number of the photo - illustration over there - and you open a shorter menu with two big differences:
- It's not possible to choose this photo as a reference image anymore;
- The chosen adjustment will always be applied to all the photos other than the reference ones at the same time.
Two last remarks! You need at least one reference image as you can imagine! However, you can as well choose several in order to keep a different chromaticism in two different places of the panorama, for instance, or even keep the original luminosity on two photos and make it so that the others relatively to these two photos.
Then, let's precise that all of this can almost be done in real time so it's easy to make trials or to step back... |
|---|
Correct vignetting and/or gradient - New great feature 4.0!
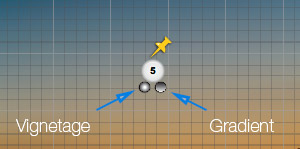 Hallelujah! Autopano 4.0 finally enables to correct vignetting and as two good news is always better than one, Kolor also added an equally great functionality: the automatic correction of gradient. Let's take a closer look at this right now...
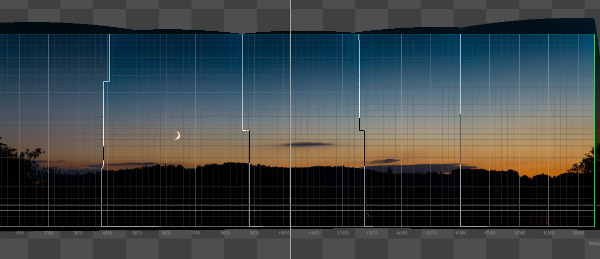
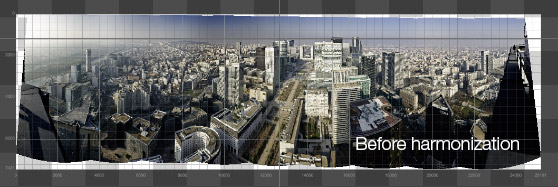
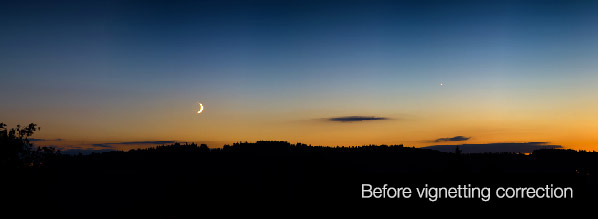
Who never faced a stitching as the one below?
Well here's the result with the new vignetting AND gradient correction functionality, which work hand in hand especially for a nice dusk shot:
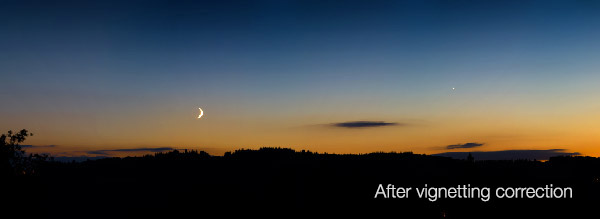
 My recommendation! The result is a lot more progressive and homogeneous even if it has its limits. Perfection addicts will also notice much cleaner files in the sky when they'll want to edit them. So posterizations are a lot more discreet or even disappeared. I'm telling you: this is genius... even if it's still not perfect all the time! Long story short, this new functionality doesn't mean you don't have to polish your photos at the shooting hence to work with a slightly closed diaphragm and in manual mode.
Open the exposure merging - HDR in Autopano Giga 4.4
When you've shot several photos from the same place but with different exposures in order to improve the dynamic of your photo - HDR technique - it's very easy to stitch them AND merge them together at the same time in Autopano. In version 3.6, it even becomes really easy because the new functionality Quick Preview allows to show the final result of this merging BEFORE making the final stitching. The amount of time saved is huge.
Exposure merging
When you display the pile of different exposures in the panorama editor for a given photo, be sure to launch the "Quick Preview" mode. Then click the "Activate" button then move the three target exposure cursors, the enhancement of clear and dark tones. You'll see, this is spectacular and efficient. We see almost everything we do in real time! |
|---|
 The button
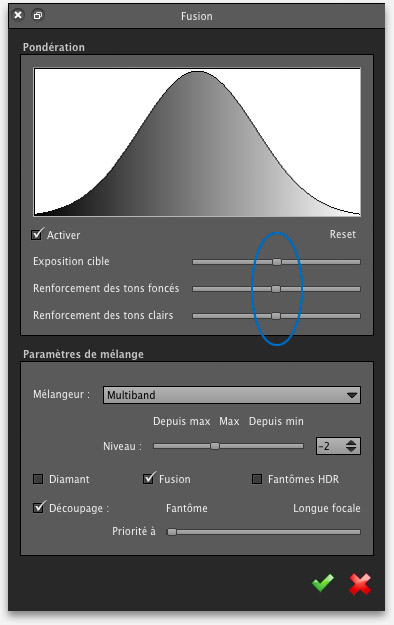
Here is how this part dedicated to panorama edition in Autopano Giga / Pro ends. We'll now make the final rendering in the next page. Render the panorama ![]()
Next page 5/5 : render the panorama |
|---|
![]()
 |
||||||||||||||||||
|
||||||||||||||||||


|
||||||||||||||||||||||||||||||||||||||||||||||||||||||||||||||||||||
|---|---|---|---|---|---|---|---|---|---|---|---|---|---|---|---|---|---|---|---|---|---|---|---|---|---|---|---|---|---|---|---|---|---|---|---|---|---|---|---|---|---|---|---|---|---|---|---|---|---|---|---|---|---|---|---|---|---|---|---|---|---|---|---|---|---|---|---|---|
|
||||||||||||||||||||||||||||||||||||||||||||||||||||||||||||||||||||

