It now remains to figure out how many photos we're going to take. Two main trends emerge: those in favor of a smaller number of photos to go as fast as possible, or even break records, and those looking for the "optimal" number. It's the one number enabling you not to waste too much time, but offering a very satisfying final quality.
If you're a beginner...
A new part of this guide is now dedicated to you. There you'll find simple pieces of advice to implement to stitch beautiful panoramas, choose your software, your hardware...
Through several important decisions about the focal, the photographed field of view, the photographer will leave his print on the framing of his panorama.
Choosing the field of view
In panoramic photography by stitching, the photographer decides on the final field of view his photo will have since he only has to stitch together more or less pictures. This way, you can realize a complete turn on 360°, or even the entire sphere. Having experience of the Noblex, panoramic rotary film-based camera, I tend to use my Canon 1 DS to get the same type of photographs. And my experience proves that if one can be moved by the scene before one's eyes, the same seldom happens on 360°. In Paris, for instance, I seldom felt like it. Most of the time, an angle of about 140° works for me. As if by chance, it's the angle of human vision! With this said, a current trend in panorama by stitching consists in realizing an image that will be viewed in an interactive window for an Internet use in virtual tours and in this case, there's an interest to do a whole turn. But visually, the user will only have before his eyes a picture with a 4/3 ratio, completely ordinary. All gigapixel projects are by the way rather displayed this way since it's very complicated to print them since they're sometimes so big! The project paris-26-gigapixels could be printed on two football stadiums and still in a very good resolution...
When you're stitching images to create a panorama, they all share the same "visual prints" as pictures made with a specialized panoramic camera like the Noblex or the Fuji 617: it will all depend on the panorama software and the chosen stitching mode. The stitching can be curved or rectilinear (orthoscopic). You need to take it into account for the framing and composition
Choosing the focal
If I had one thing to blame about the Noblex, thus about film-based panoramic cameras, it would be not to have the possibility to change lenses. At best you had to change cameras! With the stitching method, it's easy to change your lens or focal if you're using a zoom lens.
It is, I believe, a big asset of panoramic photography by stitching. It's true that spontaneously you think about holding your camera vertically with the shortest focal to gain height for your field of view if you're shooting on one single range, there are numerous situations when a longer focal would be welcome. With wide-angles, the picture is easily invaded by a big proportion of sky and ground, sometimes without a real interest. I recommend you read the page dedicated to geometric projections to have a better idea of the distortions that can alter the pictures, especially when you're using too short focals.
What lens for a gigapixel?
Gigapixel panoramas are high-definition projects. To realize them, you need focals long enough. A minimum would now be a 300mm-focal. It's not unusual to see projects taken with 420mm-focals or more on the web. For the project paris-26-gigapixels, I used a 300mm with a doubler, hence the equivalent of a 600mm. Binoculars multiplying by 12!
Choosing the axis of the body
Unfortunately, this depends on the panorama software we'll be using. With the most basic software, often free, it's impossible to choose. You have to make sure that your camera is completely straight in both axis. The skyline will thus be right in the middle of the finally stitched picture. If you want to place it elsewhere for obvious aesthetic reasons, you'll need to use reframing. Consequently, the picture will be notoriously shorter if you want to print it. Here's why a panoramic photographer often uses his shorter focal in vertical position: to gather as much data as possible in height and thus avoid the buildings to be decapitated! As you absolutely need the skyline to be in the middle of the picture, it's not even possible to use a shift lens, or the skyline will be wavy.
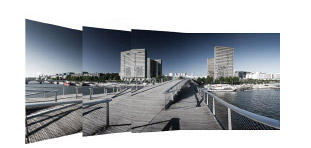
Luckily, with Autopano Giga, PTgui, or also ImageAssembler by Panavue, it is possible, without a shift lens, to get a flat skyline almost anywhere on the photo - it must remain visible in the viewfinder during the shooting! - AND vertical lines - buildings - completely straight, without convergence lines or any other flight point. This is completely startling!!! These tools give you almost complete freedom. For me, a big user of shifts, it was a great joy when I discovered this possibility with these three pieces of software.
The skyline was set very high in the panorama by a simple turn of the camera during the shooting. The software automatically set right all vertical lines of all the buildings, as if we'd used a shift lens.
How many pictures?
The number of pictures depends of course on the focal of the lens and the position of the camera, horizontal or vertical, as well as the overlap we'll choose. This last - see below - will need to represent about 25 - 30 % of the picture, meaning that every picture will in fact have an "effective" width of only about 70 % ( 100 % - 30 % ). It shouldn't be over 50 % for obvious reasons but doesn't matter too much in definitive. It simply adds useless pictures. Personally, when I mentally imagine my cut-out before shooting, I make sure the important parts of the picture end up in the middle of it rather than in an overlap zone. So when necessary, I make one or two more pictures or a more important overlap between two pictures.
Note: It's not essential that all overlap zones represent the same proportion of the image.
If under these conditions, the final image gets wider than expected, it will be very easy to then reframe it with Photoshop or any other software in the usually used ratio to ensure the homogeneity of a photographic work.
A very simple formula can give a pretty accurate idea of the number of pictures to be taken depending on the final panorama wanted with a manual head:
How many pictures?
N = A / ( 70 / 100 x ADCO *) N = number of photos to shoot; A = field of view of the panorama;
(70/100 = only 70% of the picture are effective since 30% are used as overlap zone).
* HFOV = field of view of the lens. This field of view is the real field of view of the lens. So whether in the direction of the smaller side if the camera is in vertical position (also called portrait position), either in the lens direction if the camera is in horizontal position (also called landscape position).
Caution: catalogues almost always indicate the lens field of view diagonally. The sought angle can be easily found via a rule of three: HFOV = AO × W or H / DC
(HFOV = effective field of view of the lens AO = field of view indicated by the manufacturer for a given lens and a given focal; W or H = width or height of the format of the sensor; DC = diagonal of the format of the sensor.)
Example in the case of a 35mm-lens in format 24x36 - data given by the manufacturer DC = 62° HFOV = 62°x 24 or 36 / 43.27.
(HFOV = 34° if the camera is in portrait position; ADCO = 52° if the camera is in landscape position).
In our example, this formula, if we want to obtain a 140° panorama with a 35mm-lens in portrait position, tells us that we'd have to take: N = 140° / ( (70 / 100) x 34° ) hence 5.88 pictures so 6 photos.
Please note: With motorized panoramic heads, the head automatically calculates how many shots it needs, once the different questions answered: from where to where? what focal? which overlap? dead simple!
Why at least 25% overlap?
You need, of course, the software to have enough raw material to recognize the common parts to two consecutive images to be stitched to identify points of control or recognition. But there's also a second reason we don't necessarily think about: harmonization of luminosities or colors balances between two shots. The success of the stitching will indeed depend on its discretion thus, among others, the absence of "zones" between two consecutive shots on the final panorama. Causes can vary since from simple exposure or white balance variations can be added vignetting, often present even with a tightly shut diaphragm. And to that end, at least 25% overlap is needed. Now I would even tend to recommend 30 to 35%. The wider will the overlap zone be and the more discreet will the gradation be.
On next page, we'll study the last preparatives in the particular case of panoramic photography by stitching: last settings before shooting
"Find the nodal point or no parallax point accurately in less than an hour"... whether you are photographing a simple panorama or a 360° photo - PDF of 100 pages -More information...
This website is almost entirely free and yet almost free of ads. Why? Because they look so bad! It is lucrative though, and enables many websites to keep on living. So I asked myself: what can I do? To keep on developing this website, I'm going to need a regular income just like everyone else. How can I keep on giving access to free information like I've been doing since April 2002?
And I finally found the answer: affiliation. Every time you click on a link from this site to one of my partners' shops, they know you've been referred by me and give me a small percentage on your purchase, be it something I recommend on my website or anything else. Remember to use my links when you shop on these sites! It doesn't cost you anything and it's a win-win deal – for me, them, and you!


 Having experience of the Noblex, panoramic rotary film-based camera, I tend to use my Canon 1 DS to get the same type of photographs. And my experience proves that if one can be moved by the scene before one's eyes, the same seldom happens on 360°. In Paris, for instance, I seldom felt like it. Most of the time, an angle of about 140° works for me. As if by chance, it's the angle of human vision! With this said, a current trend in panorama by stitching consists in realizing an image that will be viewed in an interactive window for an Internet use in
  Unfortunately, this depends on the panorama software we'll be using. With the most basic software, often free, it's impossible to choose. You have to make sure that your camera is completely straight in both axis. The skyline will thus be right in the middle of the finally stitched picture. If you want to place it elsewhere for obvious aesthetic reasons, you'll need to use reframing. Consequently, the picture will be notoriously shorter if you want to print it. Here's why a panoramic photographer often uses his shorter focal in vertical position: to gather as much data as possible in height and thus avoid the buildings to be decapitated! As you absolutely need the skyline to be in the middle of the picture, it's not even possible to use a shift lens, or the skyline will be wavy.
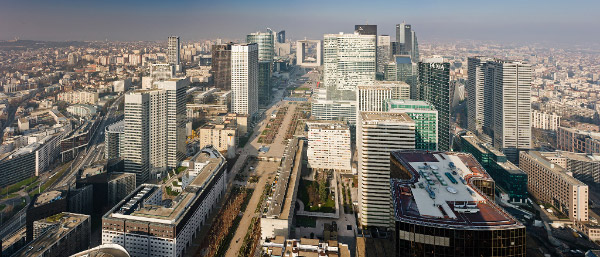
 Note
Note Caution
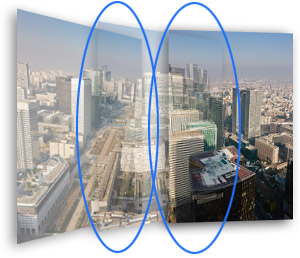 You need, of course, the software to have enough raw material to recognize the common parts to two consecutive images to be stitched to identify points of control or recognition. But there's also a second reason we don't necessarily think about: harmonization of luminosities or colors balances between two shots. The success of the stitching will indeed depend on its discretion thus, among others, the absence of "zones" between two consecutive shots on the final panorama. Causes can vary since from simple exposure or white balance variations can be added vignetting, often present even with a tightly shut diaphragm. And to that end, at least 25% overlap is needed. Now I would even tend to recommend 30 to 35%. The wider will the overlap zone be and the more discreet will the gradation be.


