|
|||||||||||||||||||||||||||||||||||||||||||||||||||||||||||||||||||||||||||||||||||||||||||||||||||||||||||||||||||||||||||||||||||||||||||||||||||||||||
|---|---|---|---|---|---|---|---|---|---|---|---|---|---|---|---|---|---|---|---|---|---|---|---|---|---|---|---|---|---|---|---|---|---|---|---|---|---|---|---|---|---|---|---|---|---|---|---|---|---|---|---|---|---|---|---|---|---|---|---|---|---|---|---|---|---|---|---|---|---|---|---|---|---|---|---|---|---|---|---|---|---|---|---|---|---|---|---|---|---|---|---|---|---|---|---|---|---|---|---|---|---|---|---|---|---|---|---|---|---|---|---|---|---|---|---|---|---|---|---|---|---|---|---|---|---|---|---|---|---|---|---|---|---|---|---|---|---|---|---|---|---|---|---|---|---|---|---|---|---|---|---|---|---|


Panorama by reframing In any case, it's the reframing of a part of a classic photo, thus in a rectangular format (18x24, 24x36, 36x45, etc.). By reframing the digital file, you bring it back to a panoramic format, so at least a 1/2 ratio.
A 24x36 digital file can be reframed very easily to a panoramic format. The edges of the picture show the same stretching as if the picture had been taken via stitching, and of course the same as the original picture. Once again, I'd like to emphasize this point, stitching or not, the visual signature, thus the geometric distortions of the picture, is given by the field of view and the type of geometric projection picked in the panorama software. |
|---|
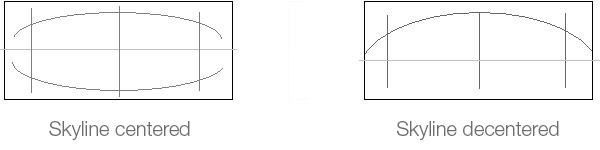
In this way, in both cases, rectilinear or curved projection, you get "typified" pictures. One graphic element at least signs the picture:
-
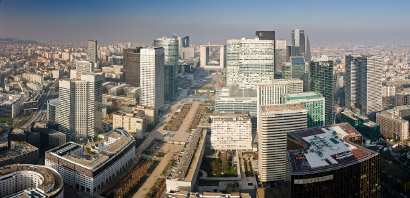
In rectilinear projection, straight lines stay straight but to the detriment of the stretching of the edges of the picture, visible in a city landscape. Low-angle shots can also be very typified.
-
In curved projection, the edges of the picture become harmonious again but horizontal lines get curved, sometimes in a very obvious way with short focals or strong tilt of the body during the shot.
Composition
It's through balance and harmony that a photograph will succeed in creating an emotion, by offering a reading direction of the picture, lines of rhythm and by choosing the intensity of the colors or greyscales.
Because you can't easily eliminate an undesirable part through framing - by zooming in for instance -, I believe that in panoramic photography, the quality of the light, the harmony of colors or greyscales is maybe even more important.
You really need to wait until they're ideal...
Relative size of the subject / photo
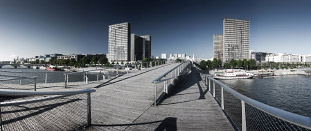
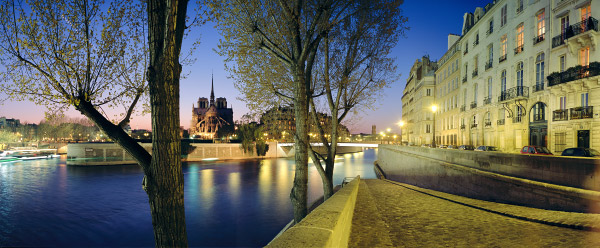
The main pitfall in panoramic photography is and remains the proportions of each element of the scene shot. Very often, a novice panoramic photographer, seduced by the panorama in front of him, forgets that, for instance, the sun will be far too small on his final picture! If you want the photographed elements to be big enough on the panorama, you need to get closer or use a longer focal. In the collective unconscious of photographers, : panorama = wide-angle. However, you shouldn't fear using a 50mm or more to shoot a panorama rather than the hard-earned 17 mm! So in panoramic photography, a sunset can make a very ugly picture!
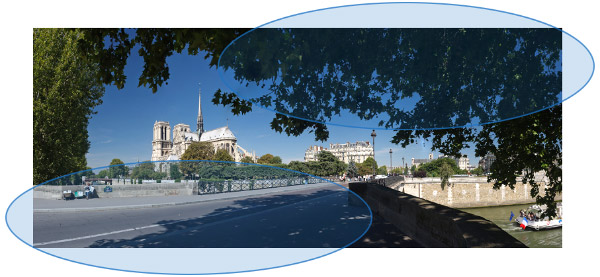
On this panorama shot with a 35mm, the interesting part of the picture is too small. If the trees allow to "shut" the picture, the street in the forefront is too prevalent and lacks interest. As a result, Notre-Dame de Paris looks very small in this picture.
Proportions - rule of thirds
About the proportions, it's interesting to remark that a panoramic composition where the famous rule of thirds will be applied, will always be a "well"-composed picture. With all the usual reservations, of course...
Hover your mouse to display a grid respecting the rule of thirds. We can see clearly that the apse of Notre-Dame de Paris as well as the tower Saint-Jacques are symmetric and on two "interesting" strong lines.
In 360° photography, the problem is maybe even more complicated. That's why I don't use it much. It's almost a specialty of its own. Franck Charel is, from my point of view, a reference.
Suggested reading... In addition to this tutorial, you can read this excellent post written by Herve©SENTUCQ on "galerie-photo.com". Hervé, specialist of 617 Fuji, details in this post composition with this camera or type of camera. Anyone creating panoramas by stitching will find valuable pieces of advice in it.
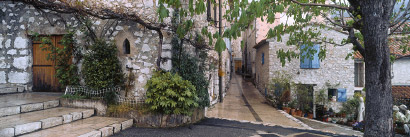
© Photo by Hervé©Sentucq - Village of Gourdon - Here is a truly beautiful composition in rectilinear format with a 1/3 ratio, format Hervé has come to master. |
|---|
Work of identification in panoramic photography
Is work of identification necessary? I obviously can't answer this question on behalf of all photographers. There are as many as ways to operate. As far as I'm concerned, if it doesn't seem accurate in photo journalism, it doesn't seem completely useless in landscapes panoramic photography, urban or natural! I will thus, in the following lines, present my way of doing.
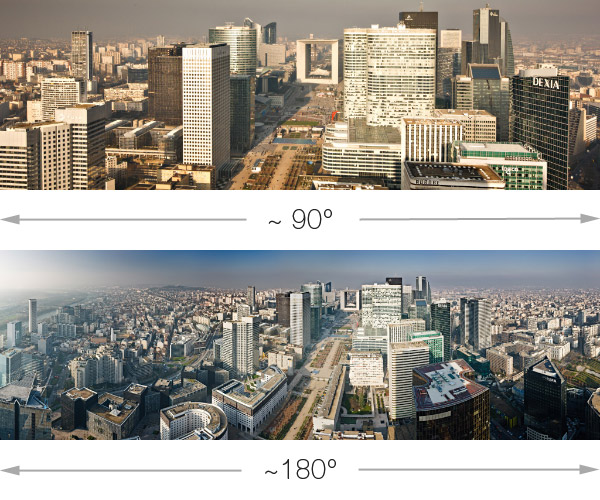
As many photographers, I'm always looking around me, with or without a camera and that's where the work of identification starts. I take my two separated finders with me very often when I'm having a walk. I then take notes about possible framings, ambients I like and I try to feel what kind of light - morning or evening, winter or fall, etc... - could produce a nice photo. And it's not always so easy to prettily fill an angle of view of 140°, especially in city landscapes because with this angle of view, you "pick up" lots of ugly stuff...
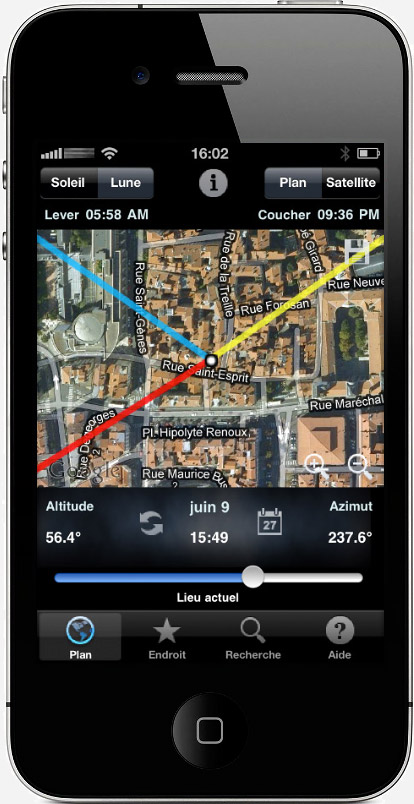
Here's why, unlike classic photography, I find it difficult to do work of identification on maps even very detailed. However, I now use very often the app LightTrac® on Iphone et Ipad. It allows me to know not only the hours of sunrise/sunset and moonrise/moonset but above all to know, on a Google map, by projection, where they are at a given time.
Appli Lighttrac for Iphone - Ipad This app is available at the price of 3.99 euros (IOS and Android).
© Lighttrac - Apple - The yellow line indicates the precise axis of sunrise; the red line its current position and the cyan one, its position at sunset. It's possible to go back and forward in time, for the moon and for the sun. It's handier to prepare a coverage on an Ipad it's so much more convenient on an Iphone once in the field! Please note that this app also allows to access Google Maps at any time... except when there's no coverage! |
|---|
In panoramic photography, I'll say it again, the angle of view is so wide that most of the work of identification via the app presented over here, though the final work of identification can only be done in the field. How indeed, foresee that the sun will, at a given time of the year, leave a particularly aesthetic shadow on a façade? The work of identification on a map only enables me to evaluate during what season will the situation be the more favorable. Anyway, there are always last minute surprises. Think about it, 140° in a city landscape! Either it's perfect on that very day, either it's a little early and you have to wait or it's already too late... and you have to come back six months or a year later.

Rising full moon from pont des Arts, Paris. This photo can be taken only during the month of August.
In the example of the moonrise over Paris from the Pont des Arts, it happens only twice a year along the axis I chose. And the weather must be clear this day!
To be remembered... |
|---|
On the next page, we'll now evoke the topic of geometric projections ![]()
![]()
 |
||||||||||||||||||
|
||||||||||||||||||


|
||||||||||||||||||||||||||||||||||||||||||||||||||||||||||||||||||||
|---|---|---|---|---|---|---|---|---|---|---|---|---|---|---|---|---|---|---|---|---|---|---|---|---|---|---|---|---|---|---|---|---|---|---|---|---|---|---|---|---|---|---|---|---|---|---|---|---|---|---|---|---|---|---|---|---|---|---|---|---|---|---|---|---|---|---|---|---|
|
||||||||||||||||||||||||||||||||||||||||||||||||||||||||||||||||||||

