Even if the measurement of the light is even easier than in panoramic photography by stitching, the choice of a good compromise is more delicate because you can only use one exposure time for all the photos. When you're making a simple panorama, you can make small exposure corrections between two consecutive photos, but not in virtual tour creation...
Important recommendation! When you're making a virtual tour, all the photos must receive the same exposure time because all vertical photos are in common to the zenith and nadir ones.
Here is thus maybe the most delicate part which will be done in three steps and depends a lot on the digital camera body you are going to use. In a first time, you'll have to measure the average quantity of light shining on the scene or in the room. Then, you'll have to measure contrast differences between the different important parts of the sphere to know if it the sensor dynamic will be sufficient and finally, you need to control differences between indoors and outdoors, through the openings, to know where you'll have to double or triple the exposure. Then, you need to set the white balance - essentially if you're working in JPEG - because the harmonization of the panorama's colors is always delicate in this file format, destructive.
The key points if you're a beginner...
Here are the key points to remember about the measurement of the light. The rest of this page is aimed at those who want to learn more.
Usually, between two consecutive photos, good panorama software tolerates a slight difference of luminosity they can harmonize thus "hide". But in virtual tour creation, because of the ceiling (zenith) and floor (nadir) photos, all the photos must receive the same amount of light. Indeed, these photos will be Stitchd with at least six other photos!
Since you're using one exposure time for all the photos, you'd better shoot with a recent camera and in 2018, rather a Nikon one, because they're the ones with the best dynamic. Between high and low lights, they're able to save more details in one photo. The record is held by the D850 and I'm still amazed by what a Nikon D7200 at $900 can do!
It is better to shoot in RAW. It is smoother and more tolerant then. In JPEG, the result is frozen once and for all! In RAW, you can rely on the improvement of demosaicing software like Camera Raw to improve the rendering in time. Seeing the difference between Camera Raw 6 and 7 is enough! A whole world...
If you're shooting in JPEG, don't stay in automatic white balance. In RAW, it doesn't matter. Another reason to work in RAW !
In a first time, it is thus about determining what overall exposure time will be globally the best for the spherical panorama. Depending on the contrast hence on the light shining on the panorama, one exposure time only could be enough but in most cases, you'll have to make exposure corrections in order to compensate luminosity gaps at the level of openings and windows. To measure it, you can use the photo cells built in your camera, which have several modes like matricial measurement, ESP, multizones, etc. that work pretty well in this case.
In a first time you need to evaluate an average value in the whole field of view that will give you a reference exposure time / diaphragm opening pair. To do that, I always take one measurement and one photo to analyze the histogram in the average zone of the scene shot - between the darker and the lighter part. Then, I hope my sensor dynamic will enable me to "fit" the whole scene, except for the openings, in my photos.
Important! Once you found the average exposure time, you'll need to check the corrections to make at the level of windows.
If you're shooting in JPEG, the choice of the final exposure will be made according to high lights that must above all not be "burned". Indeed, when high lights have been overexposed, they can't be corrected afterwards. In RAW format, you'll be able, depending on your camera, to overexpose up to 1,5 diaphragms, while keeping raw material in the high lights. This will mainly depend on the quality of your camera's sensor.
At this point it is important to avoid measuring the zones that are obviously more or less lit than the whole of the scene because this could cheat the photocell. You need to avoid, for example, to put a very luminous source in the field of the cell, as a street lamp or the sun.
Dynamic and new sensor
When a new digital body is released, one of the main points of interest, even if it's not as true anymore, is the number of pixels of the sensor.
I'm interested in sensor dynamic for a long time, meaning the number of diaphragms the sensor can save between black and white. The more important the dynamic, and the more high lights have raw material on one photo and the more the shadows are detailed. In this way, it is not so necessary to double certain photos anymore - normal exposure and under-exposed of at least 1.5 diaph. - because high lights are "burnt": visibly, new Nikon D7200, D650 and D850 are very good regarding that point.
Local measurement - contrast differences
Once you've decided on the general exposure time, you'll need to know where and how much you'll need to correct this average exposure in order to fix all or part of the high lights of a window or plate-glass window.
Outdoors
Except in cloudy or foggy weather (low dynamic), as soon as you're shooting a very wide angle as is the case in 360° virtual tour creation, you notice very often that there are important differences of contrast between sunny parts and shadowy parts. But for a short time digital sensors dynamic enables to save a whole scene dynamic with the same exposure, even in the sunlight. I especially think about the amazing Canon 5D Mark III which price is yet far from the $25.000 of a digital Hasselblad and its 11/12 diaphragms. In panoramic photography by stitching, an old proverb - yes, old already!!! - tells us to expose all the photos with "almost" the same exposure time in order not to have luminosity differences in the sky visible between two images, for instance, so that this exposure difference can't be seen in the stitching zone. To control this exposure, you need to work in MANUAL MODE. And some software are now able to harmonize small differences of luminosity and even less important differences, like with Autopano Giga. It will then be possible, in that case, to make corrections of 1/3 diaphragm on certain shots. BUT I have to remind you that because photos shot horizontally will all have two photos in common, the zenith and the nadir ones, it is compulsory to expose all the photos with the same exposure time if you don't want to have a superb iridescence on the final panorama, especially at zenith level, where it's the most visible.
Indoors
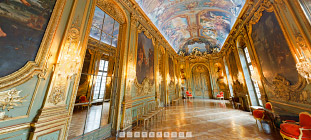
Indoors, most of the time, it is completely different. There are often photos that need to be doubled indeed, because of windows.
The process will thus be completely different. You'll have to shoot the whole serial with the same exposure time but every time that the camera will stop in front of a window for instance, you'll have to shoot a second and maybe even a third photo, WITHOUT ROTATING THE PANORAMIC HEAD, with an exposure correction of -1.5 diaphragms at least. The technique used is often quite similar to HDR photo then. You can then compile together the photos with different exposures in a first time, either in Photoshop - since they superimpose perfectly - or using software like Photomatix and in a second time, stitch this photo corrected and flattened for high lights with the rest of the serial. This second method is described extensively in the Cahiers du Designer n° 17 published by Eyrolles " Photos panoramiques par assemblage " and in the page edits before stitching.
Color temperature and white balance
Always an issue in film-based photography, the management of the color temperature of the photos is eased dramatically by the white balance of digital cameras.
In film-based photography, the photographer had to choose between two wide ranges of color films: the daylight films and the artificial light ones. Depending on whether he was working inside or outside, he opted for one or the other. But even if he picked a film for artificial light, the variety of inside lights often compelled him to use a thermocolorimeter to measure the exact color temperature lightning its subject. Thanks to an appropriate range of gelatine filters, he could correct all or part of the defects of a particular lightning.
This problem is reduced to a simple white balance with a digital camera, whether be it measured or chosen among predefined settings (sun, shadow, cloudy sky, tungsten, halogen etc. over here). Who still wants to work film-based?
In JPEG
I strongly advise you to choose it from the menu over there or to measure it inside thus to deactivate the automatic white balance. Indeed, when you're turning around your subject, the color proportions of the subject change and can cheat the photocell - even more if you're shooting with a Canon rather than a Nikon according to my experience -. So, as for measurement of the light, in colorimetry it's better to work in manual mode or predefined mode for the white balance to remain identical in all pictures to be Stitchd.
Caution! in JPEG, white balance corrections are very destructive and thus limited in Photoshop.
In RAW format
You can stay in automatic white balance without a problem. Indeed, when you reveal all the pictures of a same panorama, you'll only have to apply a one and only white balance to all the pictures and this in a click of the mouse with most demosaicing software. Very powerful and efficient, plus this operation is non destructive in RAW. A huge advantage of the RAW format when you try to create virtual tours!
All shooting parameters and settings are now ready. We can now shoot. The shooting
"Find the nodal point or no parallax point accurately in less than an hour"... whether you are photographing a simple panorama or a 360° photo - PDF of 100 pages -More information...
This website is almost entirely free and yet almost free of ads. Why? Because they look so bad! It is lucrative though, and enables many websites to keep on living. So I asked myself: what can I do? To keep on developing this website, I'm going to need a regular income just like everyone else. How can I keep on giving access to free information like I've been doing since April 2002?
And I finally found the answer: affiliation. Every time you click on a link from this site to one of my partners' shops, they know you've been referred by me and give me a small percentage on your purchase, be it something I recommend on my website or anything else. Remember to use my links when you shop on these sites! It doesn't cost you anything and it's a win-win deal – for me, them, and you!


 Important recommendation!
 In a first time, it is thus about determining what overall exposure time will be globally the best for the spherical panorama. Depending on the contrast hence on the light shining on the panorama, one exposure time only could be enough but in most cases, you'll have to make exposure corrections in order to compensate luminosity gaps at the level of openings and windows. To measure it, you can use the photo cells built in your camera, which have several modes like matricial measurement, ESP, multizones, etc. that work pretty well in this case.
In a first time you need to evaluate an average value in the whole field of view that will give you a reference exposure time / diaphragm opening pair. To do that, I always take one measurement and one photo to analyze the histogram in the average zone of the scene shot - between the darker and the lighter part. Then, I hope my sensor dynamic will enable me to "fit" the whole scene, except for the openings, in my photos.
In a first time, it is thus about determining what overall exposure time will be globally the best for the spherical panorama. Depending on the contrast hence on the light shining on the panorama, one exposure time only could be enough but in most cases, you'll have to make exposure corrections in order to compensate luminosity gaps at the level of openings and windows. To measure it, you can use the photo cells built in your camera, which have several modes like matricial measurement, ESP, multizones, etc. that work pretty well in this case.
In a first time you need to evaluate an average value in the whole field of view that will give you a reference exposure time / diaphragm opening pair. To do that, I always take one measurement and one photo to analyze the histogram in the average zone of the scene shot - between the darker and the lighter part. Then, I hope my sensor dynamic will enable me to "fit" the whole scene, except for the openings, in my photos. 
 Dynamic and new sensor
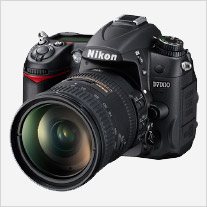
 In panoramic photography by stitching, an old proverb - yes, old already!!! - tells us to expose all the photos with "almost" the same exposure time in order not to have luminosity differences in the sky visible between two images, for instance, so that this exposure difference can't be seen in the stitching zone. To control this exposure, you need to work in MANUAL MODE. And some software are now able to harmonize small differences of luminosity and even less important differences, like with Autopano Giga. It will then be possible, in that case, to make corrections of 1/3 diaphragm on certain shots. BUT I have to remind you that because photos shot horizontally will all have two photos in common, the zenith and the nadir ones, it is compulsory to expose all the photos with the same exposure time if you don't want to have a superb iridescence on the final panorama, especially at zenith level, where it's the most visible.
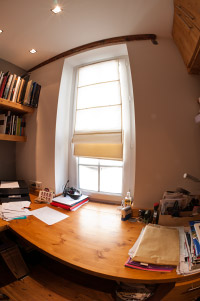 Indoors, most of the time, it is completely different. There are often photos that need to be doubled indeed, because of windows.
The process will thus be completely different. You'll have to shoot the whole serial with the same exposure time but every time that the camera will stop in front of a window for instance, you'll have to shoot a second and maybe even a third photo, WITHOUT ROTATING THE PANORAMIC HEAD, with an exposure correction of -1.5 diaphragms at least. The technique used is often quite similar to HDR photo then. You can then compile together the photos with different exposures in a first time, either in Photoshop - since they superimpose perfectly - or using software like Photomatix and in a second time, stitch this photo corrected and flattened for high lights with the rest of the serial. This second method is described extensively in the
Indoors, most of the time, it is completely different. There are often photos that need to be doubled indeed, because of windows.
The process will thus be completely different. You'll have to shoot the whole serial with the same exposure time but every time that the camera will stop in front of a window for instance, you'll have to shoot a second and maybe even a third photo, WITHOUT ROTATING THE PANORAMIC HEAD, with an exposure correction of -1.5 diaphragms at least. The technique used is often quite similar to HDR photo then. You can then compile together the photos with different exposures in a first time, either in Photoshop - since they superimpose perfectly - or using software like Photomatix and in a second time, stitch this photo corrected and flattened for high lights with the rest of the serial. This second method is described extensively in the  Always an issue in film-based photography, the management of the color temperature of the photos is eased dramatically by the white balance of digital cameras.
In film-based photography, the photographer had to choose between two wide ranges of color films: the daylight films and the artificial light ones. Depending on whether he was working inside or outside, he opted for one or the other. But even if he picked a film for artificial light, the variety of inside lights often compelled him to use a thermocolorimeter to measure the exact color temperature lightning its subject. Thanks to an appropriate range of gelatine filters, he could correct all or part of the defects of a particular lightning.
Always an issue in film-based photography, the management of the color temperature of the photos is eased dramatically by the white balance of digital cameras.
In film-based photography, the photographer had to choose between two wide ranges of color films: the daylight films and the artificial light ones. Depending on whether he was working inside or outside, he opted for one or the other. But even if he picked a film for artificial light, the variety of inside lights often compelled him to use a thermocolorimeter to measure the exact color temperature lightning its subject. Thanks to an appropriate range of gelatine filters, he could correct all or part of the defects of a particular lightning.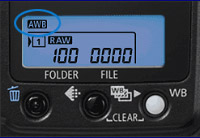 You can stay in automatic white balance without a problem. Indeed, when you reveal all the pictures of a same panorama, you'll only have to apply a one and only white balance to all the pictures and this in a click of the mouse with most demosaicing software. Very powerful and efficient, plus this operation is non destructive in RAW. A huge advantage of the RAW format when you try to create virtual tours!


