Certain photo edits or corrections have to be made before stitching the photographies if looking for the best final quality. Indeed, certain defects that might appear in the final image are almost impossible to correct in post-treatment. It's the case, above all, of optical distortions that we'll see in the next page that will be entirely dedicated to them. It's also the case of vignetting as you will see below. But to save time, it will be better to make the other corrections - levels etc. - on the stitched photo.
If you're a beginner...
A new part of this guide is now dedicated to you. There you'll find simple pieces of advice to implement to stitch nice panoramas, choose your software, your equipment...
Even if the first correction can be made directly on the final panorama hence once, the second, vignetting, must absolutely be corrected BEFORE stitching because panorama software can't do it for one good reason: they're unable to think!
Luminosity
Because they've all been taken in manual exposure mode, all the photos can have been globally over or underexposed - independently from the fact that there are differences of a third of diaphragm between two consecutive photos -. Either we'll edit them one by one by clearing/darkening them by applying them a level in Photoshop for instance from that point, either we'll do it on the final panorama hence on one image only.
Several elements of response must be considered:
The photos have been shot in RAW format and they must thus be developed before stitching even though certain pieces of panorama software like Autopano Giga know how to stitch RAW files, without previous development. I still don't see the point to it!
The photos have been shot in 16 bits (TIFF or RAW) and the panorama software manages them; the luminosity corrections must be made preferably on the final stitched image. (Caution, the stitching lasts longer and the final image is twice heavier!).
The photos have been shot in 16 bits (TIFF or RAW) but the panorama software can't manage them; the main corrections - important corrections of luminosity - will be made preferably in 16 bits files and the stitching from images converted to 8 bits.
The photos have been shot in 8 bits and in JPEG and this time, whatever the panorama software, we'll make the corrections on the final stitched image to go faster.
Vignetting
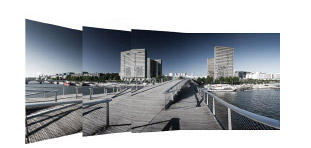
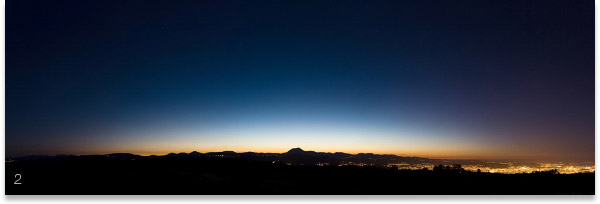
Because it's highly visible in digital photography - maybe even more than in film-based photography - and because whichever panorama software has trouble managing it and for a good reason - they don't have any reason to do it since each photo edge has the same luminosity -, you need to make sure to correct the vignetting of the photos BEFORE stitching. Indeed, a panoramic image which sources possess vignetting can be spotted right away from the darker vertical zones showing the stitching zone between two consecutive photos as we can see in the images below. So whichever editing software you use, it's almost compulsory to remove vignetting BEFORE stitching.
1 - The photos have been stitched without correcting the vignetting. Each overlap zone is marked. 2 - once corrected, very easy from RAW files by the way, and above all automatically in Camera Raw from Photoshop (since version 6.2), the final panorama doesn't show any marks in the areas of overlap zones in the sky.
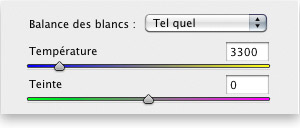
Color balance
One of the main advantages of digital cameras is their setting of color balance before shooting. It really works very well. But as for luminosity, corrections can be needed at home, in front of the computer screen. Here again, we'd better make them on an image in 16 bits and, better yet, if we want to work with belt and braces as my friend Maxime Champion says (!), work in RAW. Moreover, it is then very easy to harmonize a panoramic serial since all the photos can be synchronized with the reference photo. With that in mind and essentially if you stitch your photos with Autopano Giga, it will be easy to ask the software to fix a little correction, even if it hadn't been realized before stitching. But really, better to work in RAW!
Properties of the photos
By properties of the images I mean size of the file in pixels and format of the extension: JPEG, TIFF or PSD.
Image size
There's only one thing that seems really important to me: all the images must have the same size in pixels or the panorama software won't want them (with once again a notable exception: Autopano Giga). Once we decided on the size of our final image, at least in height and thus depending on the use we want to make of it (web or print), their size will have to be redefined. In Photoshop it's done via the Image/Image size menu. In the opening window, resolution must be defined (96 dpi for the web - even though it really doesn't matter! -, around 240 dpi for the print according to my own tries and preferences), the box "keep proportions" must be checked and bilinear interpolation if the photos are reduced and the size of the image is defined in centimeters or pixels. The software then works for us. The lighter the images, the faster the panorama software will work. It might thus not be necessary to feed it full resolution images if it's to print a postcard format or for a website. The fact that numerous images will be stitched and that the final weight, once stitched, can be very important and even go over 500 Mo mustn't be forgotten.
Remarks about resolutions: 72 dpi and others...
For a reason I don't know, I always hear about 72 dpi (ppi) for web images. But an image displayed on a screen will display the same in 72 dpi - its resolution - , more or less. Indeed, what matters here is only its definition. An image pixel will always be displayed in a screen pixel. A photo which definition is 800x600 will take 800x600 pixels on your screen, whether be it in 72 dpi or other. However, from 800x600 pixels this image can be printed in a more or less important size depending on its resolution (72, 96, 240, 300 dpi). At 256 dpi for instance, this image will be printed in 8x6 cm (since there are 100 pixels per centimeter in this resolution so 800 / 100 = 8 cm).
To finish convincing you, measure the size of your screen in centimeters - my Quato is 43cm wide - and calculate the resolution of your screen - my screen displays 1600 pixels in this width -. So my Quato has a resolution of: 1600/ (43/2,56) = 95 dpi (ppi)! Try at home to see...
Hopefully the resolution of an image to display it on the web has no importance because then all our images in 72 dpi should really lack sharpness! They should all be under-digitized, but of course, they aren't. Phew!
Image format
I draw your attention to the format of your images because even if each panorama software accepts JPG images, it's not the case of the format TIFF, 8 or 16 bits, PSD and even less of the RAW format - raw format, often proprietary -. The images should indeed maybe be converted before stitching. In certain cases, if we want to work on uncompressed images, we'll have to save them in BMP format because certain pieces of software don't even accept TIFF format. Less and less true though.
The healing brush/stamp tool
Numerous artefacts like grains of dust or flares won't necessarily end up at the same place in two consecutive pictures so the panorama software will automatically erase them without intervention. However, in certain cases, it's better to remove certain defects BEFORE stitching.
Dust grains
Whoever says stamp or healing brush tools means dust grains but here, point-and-shoot digital cameras with non-interchangeable lenses or even reflex cameras and their antidust system, since about 2008 and obviously very efficient, have a huge advantage: almost no dust! I'll let you imagine the amount of work it could suppose on 24×36 diapos scanned at 2900 dpi to make posters. Antidust systems of scanners should better work well! I sometimes happened to spend two hours on my scans of 120×50 mm diapos of the Noblex... I tried to remove the bigger at that point even if there are less and less since the Canon system works so well, without reaching the level of my old Olympus E1, perfect! You should also note that we're less and less able to correct dust grains as in the image here.
Annoying subjects
And of course, these tools can be used to remove annoying details mistakenly shot and this time, it will be something personal. As for myself, when I'm moved by a landscape, it's that there are no or few details annoying me and the edits of this kind are finally very marginal. However, in the city, the work can be necessary, particularly due to traffic signs, really ugly sometimes. And finally, when the tripod can be seen in the photo taken with fisheye lenses, I prefer to remove it at that point because the photo is not too distorted by the spherical projection.
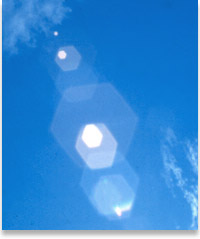
Sun halos
The flare effect - halos generated by the sun or any other very intense luminous source - strongly reduces the contrast in the photos and is, of course, very ungracious. As shown at the page 156-159 of Gérard Perron's book " Interactive photography " - sold out -, those are often very annoying to eliminate because they're very numerous and on important surfaces. Even if the new stamp tool of Photoshop ( J - Corrector ) is sometimes impressively efficient, it's not certain, without spending hours on it, that we'll manage to properly remove them. Well then, the given trick is to hide the sun with your hand or with a little black cap (as in a photo lab to realize a make-up) that we'll erase more easily with the stamp tool. Indeed, this cap will be in a zone of the sky that is widely overexposed hence without luminosity gradient. It will then be very easy to eliminate this cap by successive edits. The second method listed in the book consists in taking two images, one with the cap and one without and to stitch both together in an editing software while taking care of stitching only the top parts together.
Remark on lenses
After making numerous reviews with all kinds of lenses of good quality and of different makes, it clearly appears that they were not created equal before flare. So apart from the number of pixels, the intrinsic quality of the lens, in panoramic photography, protection against this defect is a major asset and manufacturers took consciousness of it and are now vigilant about it.
Recent lenses thus really have a better correction against this defect and the Canon 16/35 mm F 2,8 first generation, which was totally useless by night while the second version was perfectly corrected, proves it...
So, whether be it in terms of quality, flare correction or even separative power of the lenses, I always try to buy the last version of the focals I like.
Finally, certain edits can still be performed on the final stitched image. So it's not compulsory to correct each photo at that point.
Color management
Color management, extensively described on my personal website - Color-management-guide -, can't be summed up in a few lines but I'd still like to explain certain notions here.
The correct display of colors directly depends on a controlled color management. If the camera allows it, the photographer will preferably work in RAW in order to choose between four neutral color spaces while in JPEG only two would have been possible. Even if the choice is allowed, however, I draw your attention to the fact that very few pieces of panorama software besides PTGui or Autopano manage the color and the ICC profiles. Their only work color space is sRGB. If your images were saved in this space - with or without ICC profile incorporated - they'll display correctly. If your images have been saved in another space, wider, they'll appear dull and faded when you open them in the panorama software. This has no incidence on the intrinsic quality of your photos but only on their display. When the software saves the panorama, it won't manage the colors when saving better than when opening the images. So when you'll open this image in Photoshop with the correct settings, it will tell you that it doesn't include an ICC profile. You'll only have to assign it the ICC profile with which you developed the photos in Camera Raw, for instance, or else the one chosen in the menus of your camera if you've shot your photos in JPEG. Unfortunately, not only can't most of the pieces of panorama software read an ICC profile, but moreover they delete it!
To end up with Edits before stitching, we'll now see the correction of optical distortions of the lenses - Correction of optical distortions
"Find the nodal point or no parallax point accurately in less than an hour"... whether you are photographing a simple panorama or a 360° photo - PDF of 100 pages -More information...
This website is almost entirely free and yet almost free of ads. Why? Because they look so bad! It is lucrative though, and enables many websites to keep on living. So I asked myself: what can I do? To keep on developing this website, I'm going to need a regular income just like everyone else. How can I keep on giving access to free information like I've been doing since April 2002?
And I finally found the answer: affiliation. Every time you click on a link from this site to one of my partners' shops, they know you've been referred by me and give me a small percentage on your purchase, be it something I recommend on my website or anything else. Remember to use my links when you shop on these sites! It doesn't cost you anything and it's a win-win deal – for me, them, and you!


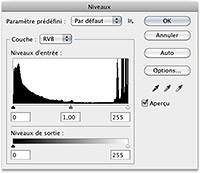 Because they've all been taken in manual exposure mode, all the photos can have been globally over or underexposed - independently from the fact that there are differences of a third of diaphragm between two consecutive photos -. Either we'll edit them one by one by clearing/darkening them by applying them a level in Photoshop for instance from that point, either we'll do it on the final panorama hence on one image only.
Several elements of response must be considered:
Because they've all been taken in manual exposure mode, all the photos can have been globally over or underexposed - independently from the fact that there are differences of a third of diaphragm between two consecutive photos -. Either we'll edit them one by one by clearing/darkening them by applying them a level in Photoshop for instance from that point, either we'll do it on the final panorama hence on one image only.
Several elements of response must be considered: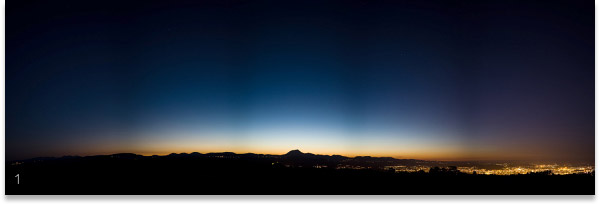
 One of the main advantages of digital cameras is their setting of color balance before shooting. It really works very well. But as for luminosity, corrections can be needed at home, in front of the computer screen. Here again, we'd better make them on an image in 16 bits and, better yet, if we want to work with belt and braces as my friend Maxime Champion says (!), work in RAW. Moreover, it is then very easy to harmonize a panoramic serial since all the photos can be synchronized with the reference photo. With that in mind and essentially if you stitch your photos with Autopano Giga, it will be easy to ask the software to fix a little correction, even if it hadn't been realized before stitching. But really, better to work in RAW!
  Remarks about resolutions: 72 dpi and others...
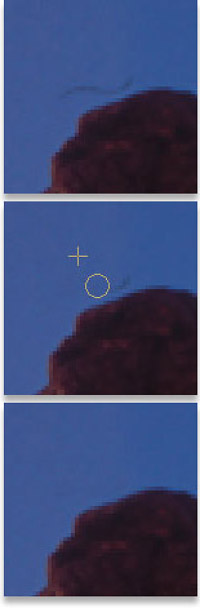
 The flare effect - halos generated by the sun or any other very intense luminous source - strongly reduces the contrast in the photos and is, of course, very ungracious. As shown at the page 156-159 of Gérard Perron's book " Interactive photography " - sold out -, those are often very annoying to eliminate because they're very numerous and on important surfaces. Even if the new stamp tool of Photoshop ( J - Corrector ) is sometimes impressively efficient, it's not certain, without spending hours on it, that we'll manage to properly remove them. Well then, the given trick is to hide the sun with your hand or with a little black cap (as in a photo lab to realize a make-up) that we'll erase more easily with the stamp tool. Indeed, this cap will be in a zone of the sky that is widely overexposed hence without luminosity gradient. It will then be very easy to eliminate this cap by successive edits. The second method listed in the book consists in taking two images, one with the cap and one without and to stitch both together in an editing software while taking care of stitching only the top parts together.
 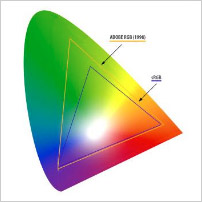 Color management, extensively described on my personal website -


