You now need to make the final settings. It is now, indeed, that we are going to set the body at the no parallax point and level the head - or not - depending on the photographic project you'll have in mind.
If you're a beginner...
A new part of this guide is now dedicated to you. There you'll find simple pieces of advice to implement to stitch nice panoramas, choose your software, your equipment...
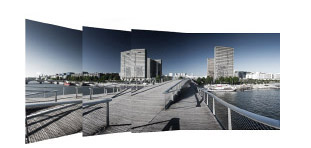
In panoramic photography by stitching, there are two settings of the lens that are very important. The first one is about the focusing and the second - which deeply influences the first - about the depth of field, as we'll see below.
Choice of the focusing
But let's go back to the focusing. Even if we saw that the focal could be changed on a zoom lens, well we also need to be very careful about the focusing in panoramic photography by stitching. Indeed, although it's almost invisible to the naked eye, there's a very light variation of focal when we slightly modify the point. This variation is only of a few pixels but it's fundamental in this present case. The panorama software doesn't find the same details belonging to two consecutive photos at the same place hence it can't stitch them perfectly. Quite like a moustache distortion or like the subject had moved.
Piece of advice! So once we made the focusing, we can't consider changing we can't consider changing if we want a high-definition stitching, except for defined artistic projects of course. Only one exception: the realization of gigapixel projects because here, we have to slightly change the point between two ranges of photos because the more the head tilts and the closer the subject is, especially with 300 or 600 mm of focal. We'll say that from 50 mm we have to reset the focusing slightly without it being really a problem.
Choice of the depth of field
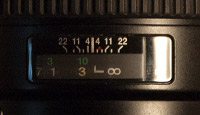
Since all images will need to be taken with the same focusing (see above), it won't be possible to vary the depth of field on a same photo. To choose the zone of neatness we'll thus use the depth of field of the lenses and sometimes the Hyperfocal if we want a maximal depth of field.
It's not unusual to close the diaphragm above f 8.0 in panoramic photography for that reason. Obviously, we can want an entirely different project but we'll still need to have in mind that there'll only be a one and only focusing distance on the whole of a panorama.
Leveling the head and the camera
Leveling the panoramic head is very important as we saw in the page dedicated to tripods and leveling bases. It can be done thanks to the settings of the arms of the tripod, thanks to the inclination of the central arm of certain photo tripods or even thanks to a leveling base.
On the tripod
If you have no particular leveling accessory, the leveling of the panoramic head will be done using, very classically, the independent setting of each arm of the tripod. You only have to raise and lower the three arms of the tripod in order to level the head. It's not very convenient nor accurate when you need to be quick...
On the central column of the tripod
Few tripods include that possibility, extremely convenient though - see page tripods and leveling bases. You only have to loosen one screw, on the side or under the central column, to unlock the central column or a half-ball that can then tilt at about 15°. It is then very easy to set your panoramic head perfectly horizontally. You place a double-axis bubble level on the base of the head and it does the trick! Gitzo tripods, of the serial LVL, give this possibility. Imagine when this asset is doubled with the lightness of carbon! Finally, Manfrotto tripods now have in their catalogue two central columns ref. 555B et 556B almost adaptable to their whole range. These central columns, that can go up and down 20/30 centimeters, include a 50mm-diameter half-ball and a bubble level placed at the top of the afore mentioned columns. The locking/unlocking is now done thanks to a handle placed at the inferior end of the central column.
On a leveling stage
There are several on the market. Manfrotto made several: the leveling base ref. 338, convenient but heavy and bulky and the leveling ball, ref. 438. It's less convenient than the central column and still heavy for what it is. However, its important width allows a great stability. EZ-Leveler-II is also a small-sized leveling base perfectly compatible with Nodal Ninja heads. To level the panoramic head, you only have to use the three screws placed at 120°. Nowadays, I prefer the solution of the tiltable central column.
Fastening the camera at the entrance pupil
To - almost! - always make a perfect stitching, I strongly recommend to place your camera at the ideal rotation point while keeping in mind the focal used (and, may I remind you, not to change the leveling during the serial). It is common to talk about nodal point to name it but it turns out this is incorrect. The exact term is entrance pupil. There is a nodal point and an entrance pupil in every lens but it's around the entrance pupil the camera needs to rotate. To ideally set the camera, we set it on a panoramic head as seen in the previous page: panoramic heads. If we really can't and still want to make a panorama as I explain it a the bottom of the page about the entrance pupil, we need to rotate around the camera and not to rotate the camera around us, while making sure the camera rotates around the same point relatively to the ground.
Tip! During gigapixel projects, with long focals, it's not so necessary to be at the entrance pupil but anyway, the entrance pupil is often close to the fixation point of the teleobjective lens.
Learn more about panoramic heads and the nodal point...
"Find the nodal point or no parallax point accurately in less than an hour"... whether you are photographing a simple panorama or a 360° photo - PDF of 100 pages -More information...
This website is almost entirely free and yet almost free of ads. Why? Because they look so bad! It is lucrative though, and enables many websites to keep on living. So I asked myself: what can I do? To keep on developing this website, I'm going to need a regular income just like everyone else. How can I keep on giving access to free information like I've been doing since April 2002?
And I finally found the answer: affiliation. Every time you click on a link from this site to one of my partners' shops, they know you've been referred by me and give me a small percentage on your purchase, be it something I recommend on my website or anything else. Remember to use my links when you shop on these sites! It doesn't cost you anything and it's a win-win deal – for me, them, and you!


 But let's go back to the focusing. Even if we saw that the focal could be changed on a zoom lens, well we also need to be very careful about the focusing in panoramic photography by stitching. Indeed, although it's almost invisible to the naked eye, there's a very light variation of focal when we slightly modify the point. This variation is only of a few pixels but it's fundamental in this present case. The panorama software doesn't find the same details belonging to two consecutive photos at the same place hence it can't stitch them perfectly. Quite like a moustache distortion or like the subject had moved.
 Piece of advice!
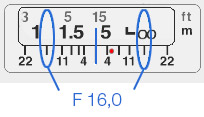
 Leveling the panoramic head is very important as we saw in the page dedicated to
  If you have no particular leveling accessory, the leveling of the panoramic head will be done using, very classically, the independent setting of each arm of the tripod. You only have to raise and lower the three arms of the tripod in order to level the head. It's not very convenient nor accurate when you need to be quick...
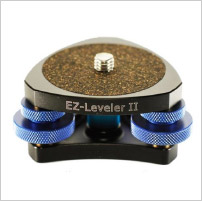 There are several on the market.
  Tip!
Tip! Learn more about panoramic heads and the nodal point...


