Interface and preferences in Panotour

Caution: this version 1.8 is the old version, now replaced by the 2.5. This tutorial is thus meant for old users who haven't made the update.
To create my virtual tours, I now only use Panotour / Panotour Pro, published by the French company Kolor, since February 2014 in its new version 2.0. This software marked a real step forward in terms of possible simplicity to create virtual tours without being a good developer. With version 2.0, the possibilities are almost infinite. In this tutorial, I only talk about the previous version, 1.8. Please note that the new version is the subject of a video tutorial I just uploaded (2h45 of free HD videos).
I really find it very easy to use. In a clear and sober interface, Panotour Pro 1.8 allows to create virtual tours from only one panorama, possibly gigapixels, or of course from numerous panoramas. The interactions that can be defined are very wide and bluffing sometimes. It is really a creation tool.
Through this tutorial dedicated to the version Panotour Pro 1.8 on several pages, I'll first present you the software and secondly, I'll show you how to start a new project and manage the display of each panorama, then in a third page we'll learn to create hotspots - images, videos, etc. - and finally, in the fourth page we'll make the final rendering of our interactive virtual tour.
This tutorial has the will to show you how to use Panotour / Panotour Pro 1.8 according to my experience in the field and as a coach. It doesn't pretend to be exhaustive in any case. For certain settings, I'll redirect you to Panotour's Wiki, very well done, by the company Kolor.
 Important! This tutorial just like the rest of the site is free because you're a lot to play the game of affiliation, which means buying your software and equipment from my affiliation partners, in this case the Kolor store. They're the ones remunerating me by giving me a small percentage on their margin and this won't cost you anything! Important! This tutorial just like the rest of the site is free because you're a lot to play the game of affiliation, which means buying your software and equipment from my affiliation partners, in this case the Kolor store. They're the ones remunerating me by giving me a small percentage on their margin and this won't cost you anything!
Download Panotour / Panotour Pro 1.8
It's not possible anymore to download this old version of Panotour.
New ! Panotour / Panotour Pro 2.5
The new version of Panotour 2.3 has now been released...
|
New! Panotour and Panotour Pro 2.5
| |
 |
€99.00 |
 |
|
| |
 |
€399.00 |
|
|
| |
(Contribute to the being free of this site by downloading Autopano from the link above.) |
 |
|
|

New features in Panotour Pro 1.8 ?
Unlike the previous version 1.6 that brought numerous new features, the version 1.7 only has few new features, almost "invisible" moreover, at least for an unexperienced user:
-
Use of the last version of Krpano 1.08.14.
-
New options of thumbnails piles: opening or shutting at the opening.
-
Reduction of the necessary amount of time for realizing a virtual tour;
-
Possibility to use the + and - of the keyboard to enlarge/reduce the image in hotspots editor;
-
IPAD / Iphone: possibility to use a panorama of less than 180° in height (from 45°x360°).
-
Improvement of the basic theme;
-
Several bugs fixed;
The new features in version 1.8 are not many:
Start well with Panotour Pro
Installation and saving are really easy and don't really need to be the subject of particular remarks. More information on Kolor's website, especially if you update Panotour Pro.
Interface
The interface of Panotour Pro logically bears the same background color as Autopano Giga, the panorama software. It doesn't stand out from the standards of professional photo editing software since it shows a dark grey background and flashier but well-designed icons. The interface looks like the image below, meaning, a menu bar, classic at the top, an icon bar below - shortcuts - and four distinct zones: a big central window on the left, three tabs on the right enabling to set the properties of the panoramas, the project, etc., a zone at the bottom left allowing to draw hotspots and finally, at the bottom right, a zone allowing to edit each panorama in 3D.
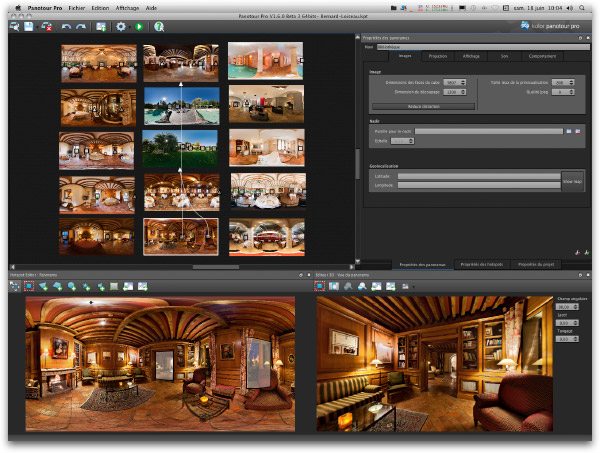
The interface of Panotour Pro 1.8, is perfectly customizable because each panel can be separated and moved, for instance, to another screen.
Central window
- This window gathers all the panoramas that must be stitched together in a virtual tour.
- It materializes the hotspots links as yellow lines placed between the panoramas.
Properties part
- Tab "Properties of the panoramas"
- Tab "Properties of the hotspots"
- Tab "Properties of the project".
Hotspots editor
- That's where you can draw hotspots zones on the panoramas;
- That you can add a flare effect under a source of light;
- That you can add a video on a TV screen, for instance;
- Or an image, a menu, a map, etc.
3D editor
That's where you can choose for each panorama:
- The place where you want to start the virtual tour;
- The default field of view of the panorama;
- The possibilities of zoom + and zoom - ;
- The arrival point from another panorama and the starting point of view when you're coming from this panorama. If several panoramas are linked to a panorama, the arrival in the latter will thus be different to avoid repetition hence boredom.
Enlarge the hotspots / 3D editor window
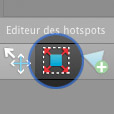 It's possible to enlarge and move to another screen the windows of the two editors at the bottom of the interface, Hotspots et 3D, at any time to work more comfortably, especially when you want to be precise when drawing the hotspots zones. Each block is independent and can thus be moved. It's not possible to save, as in Autopano Giga, your workspace. It's possible to enlarge and move to another screen the windows of the two editors at the bottom of the interface, Hotspots et 3D, at any time to work more comfortably, especially when you want to be precise when drawing the hotspots zones. Each block is independent and can thus be moved. It's not possible to save, as in Autopano Giga, your workspace. |
Preferences of the software
As each piece of software, Panotour Pro allows to define certain basic options for a an adapted functioning. These basic options are set via the Menu / Edit / Preferences with Windows or Panotour Pro / Preferences with Mac OS. Unlike Autopano Giga, it's essentially hardware settings:
Unlike Autopano Giga, there are not many preferences to set in Panotour / Pro.
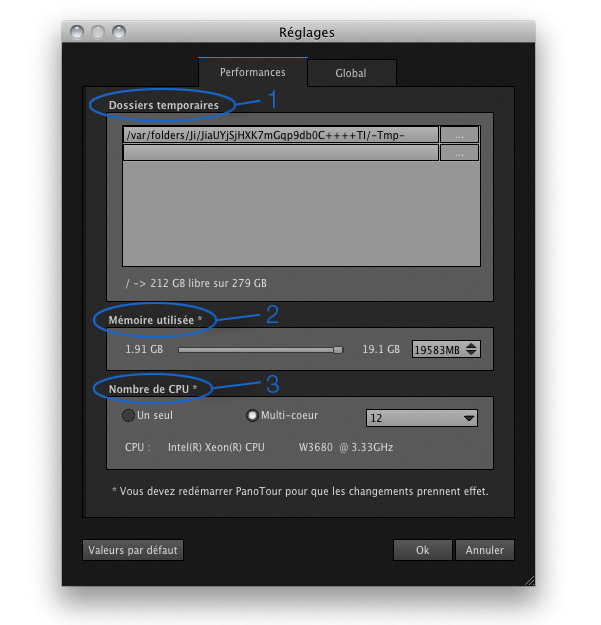
First tab: Performances
-
Temporary files (1) : temporary files can be placed on one or several partitions, possibly dedicated, which is better when creating large size projects. Indeed, Panotour Pro takes a lot of resources and it's better to place temporary files in separate partitions, themselves on hard drives different from the installation hard drive. The faster the drives (possibly in SSD mounted in RAID 0) the faster the software. That is, by the way, a rule that works with other pieces of software like Photoshop.
-
User memory (2) : it's also been optimized. It's possible to dedicate a big part of the RAM installed on your computer.
Tip! If you don't have much RAM and you're experiencing stitching problems, place the cursor at the minimum.
-
Number of CPUs (3) - the software is now completely multithreaded thus handles perfectly multicore processors as well as hyperthreading of Intel processors. If you have at least four cores, leave it at the maximum. I've tried numerous processors with this software, and I can tell you that the more processors or even cores your computer has, the faster the software stitches. It's even particularly fast with four cores or more! Please note that the software now tells you the name of the processor installed.
Second tab: Global
The second tab of preferences of Panotour Pro 1.8 enables to set visualization, quick export, language and theme or appearance options.
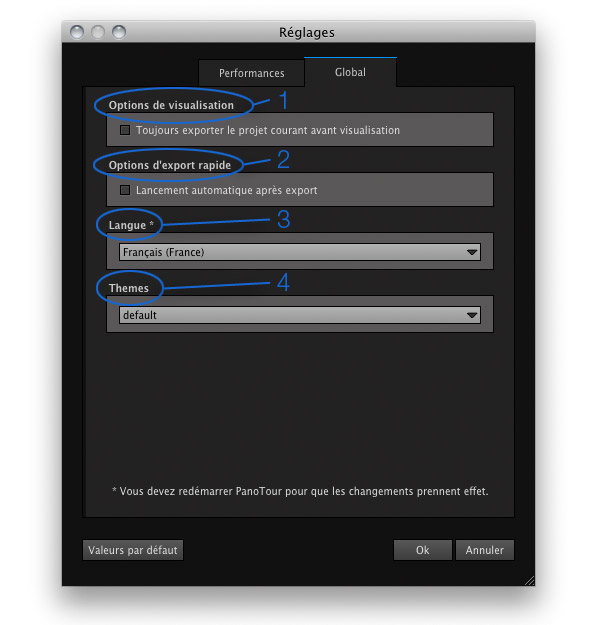
Second tab of preferences setting in Panotour Pro.
-
Visualization options (1) : check this option allows to re-export the project with a click on the button "Visualize" in the toolbar of the main interface.
-
Quick export options (2) : check this option to visualize the virtual tour automatically without opening it in a browser for instance. So convenient!
-
Language (3) : I just want to stress that there's a very wide choice of languages available. It's pleasant when you want to recommend it while others, even not free, only stick to English.
-
Appearance (4) : New - It is possible to go back to the old interface.
So here's how this part dedicated to the setting of preferences in Panotour Pro ends. In the next page, we'll start a new project 
New! Panotour and Panotour Pro 2.5
| |
|
€99.00 |
|
|
| |
|
€399.00 |
|
|
| |
(Contribute to the being free of this site by downloading Autopano from the link above.) |
|
|
|
Learn more with Kolor's documentation
Complete the information in this with the official documentation of the company Kolor: Panotour Pro's Wiki |

|