Export your virtual tour

It is time to complete the creation of your virtual tour and generate it. One of the main new features in the previous version PRO 1.5 has been export in a format compatible with new smartphones, especially those who don't work with Flash - Apple's iPhone and iPad -.
There are still a lot of limitations with these phones but it's impressive to see a virtual tour on these small devices and even more with the gyroscopic effect! You can also note that with the PRO version, you'll be able to generate a virtual tour from a gigapixel panorama like the photo Paris-26-gigapixels.com.
In this tutorial, I'll present all the settings in the tab "Properties of the project" that will enable you to customize and optimize your virtual tour, emphasizing the differences between Standard and Pro versions of Panotour and giving you a few concrete pieces of advice. It is also possible to read the company Kolor's Wiki about Panotour, very well done.

Complete your virtual tour
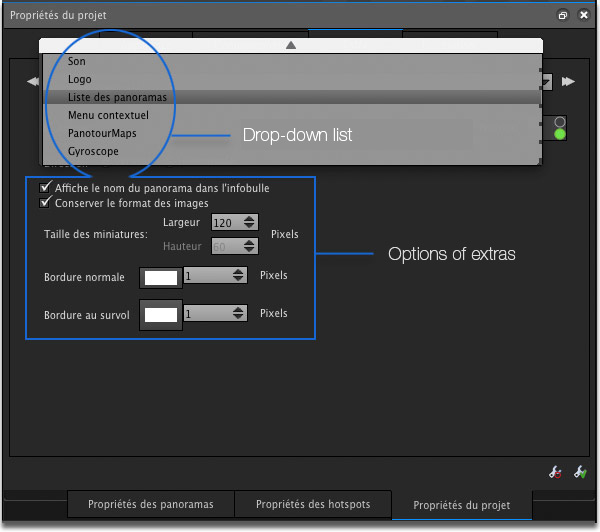
The tab "Properties of the project" will enable you to complete, optimize and above all customize your virtual tour. We'll now see in details the different options available.

Panotour Pro 1.8's interface is completely adjustable to your desires because each pannel can be separated and moved, for instance, to another screen.
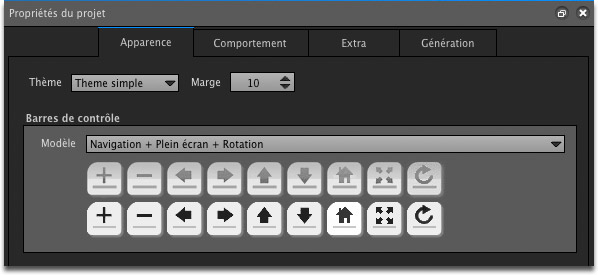
Appearance tab
As you would have guessed, you'll finally be able to choose the font, its size, the model of interactive buttons here, etc, hence customize your virtual tour.
Choice of the button theme + control bar
To see the chosen theme appear, you need to choose a control bar in the category just below first. Then, for this example, I chose a classic model including navigation, a full screen button, an autorotation button. Many combinations are possible. Some models allow to change the buttons' color like the theme 2D.
- 2D Theme: my favorite with the classic one. The color can be changed.
- 3D Theme: better to like three-dimensional buttons!
- Classic Theme: That's the former Krpano theme I like. The color can't be changed.
- Sketch theme: more original so less all-purpose.
- And finally, you can also create yours!
Create your own theme and install it by default
You can create your own theme and install it by default in Panotour. It isn't necessarily easy for who isn't used to navigating into the tree diagrams of the setup files of a piece of software but it isn't unattainable either. The process is described in Panotour's Wiki / subcategory "Models".
Panotour models' Wiki  |
-
Colors - With specific models of buttons, you can change the color if you've saved them in PNG.
-
Margin - you can choose the spacing between the bottom of your webpage and the button set in pixels - 10 pixels by default -.
Texts
Every time you write information in an information balloon, the text is written in Arial 16 dots by default. To customize your virtual tour, you can change numerous parameters about all of its texts.
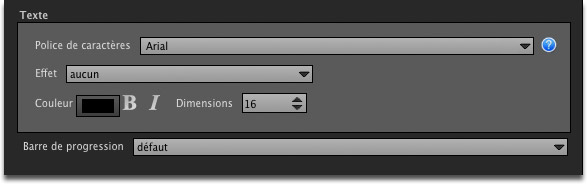
Since Panotour version 1.5, you can change text display parameters.
-
Text font: the list is very long so you just have to choose!
-
Effect: white or black shadow *
-
Color / Bold / Italic / Size: everything can be customized...
* Tip: if you choose one of these two options, then the white field framing the text disappears, which I find more elegant.
Piece of advice! If you choose a light font color, choose the black shadow and conversely.
Choice of the progress bar
The model of progress bar can be changed. It's the bar inviting you to wait when the download is a bit long!
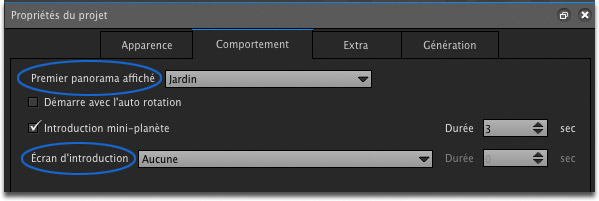
Behavior tab
-
First panorama displayed: choose among the list of your panoramas which one will appear first.
-
Start with autorotation: make an educated guess...
-
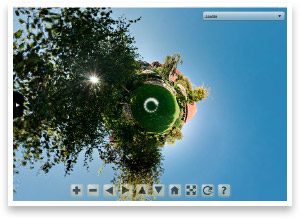
Little planet introduction - Pro Version: Try it and you'll love it! This effect brings a very original camera and zoom-in movement on the first panorama.
Caution! It can only be chosen if at least one panorama is a 180 x 360° panorama and then you have to choose this one.
Piece of advice! If you start with a little planet, don't put an éintroduction notch, just below. Indeed, the introduction screen would hide the little planet introduction movement because it would superimpose it.
-
Introduction screen: convenient to display a little menu describing the tour but above all giving directions for use of the navigation buttons for beginners. You can choose how long it should be displayed and the user can call it back anytime in the navigation bar.
Extra tab - Only accessible with the Pro version
The extras enable to add interactivity and many navigation elements, sound, gyroscopic compatibility with Iphone 4 / Ipad 2, a logo, elements in the contextual menu, Google Maps, etc. Each time, numerous customization parameters are available. Let's see this now...
Each extra can be widely customized.
Map
You can add a map in one of the corners of the virtual tour. It allows to access a panorama directly by clicking one of the spots drawn on it. It's convenient to give an impression of the whole virtual tour of a place for instance.
To install it, you just have to open the file (gif, jpg or png) that you'll have prepared. Then, you just need to place your interest spots and link them to each panorama. Then, remember to direct the radar correctly. New! A radar superimposes the map when the panorama is rotated in order to know which direction you're facing.
Thumbnails and piles - Since 1.6
 Still to make the navigation from one panorama to another easier, other than classic hotspots on the panorama, it is sometimes convenient to change panorama by clicking directly on a thumbnail in the Thumbnails column or the Pile if you want, for instance, to change rooms but the panorama can't be accessed directly by a hotspot in THIS panorama. For that, it is also possible to choose the Map described above. Still to make the navigation from one panorama to another easier, other than classic hotspots on the panorama, it is sometimes convenient to change panorama by clicking directly on a thumbnail in the Thumbnails column or the Pile if you want, for instance, to change rooms but the panorama can't be accessed directly by a hotspot in THIS panorama. For that, it is also possible to choose the Map described above.
Thumbnails and Piles options are almost the same:
- They can be activated or not;
- The place where they'll appear (which corner?) and their distance from the edges of the screen can be chosen;
- Presentation in column or in line; column of one or several photos;
- Choose their size in pixels or in percentage of the size of the screen;
- Define the order of thumbnails;
- If you choose thumbnails, you can choose to open or not the thumbnails panel at the start of the virtual tour;
Please note: Piles movements are very pleasant!
Panoramas list
This is a classic little unfolding menu that can be placed in a corner of the virtual tour to make navigation from one panorama to another by NAME easier. It's just a list which order can also be changed. Less elegant than piles but compatible Iphone/Ipad and convenient in certain cases.
Virtual tour sound
Ambient sound can be added to the virtual tour. If you've also put sounds in a panorama then it has priority. If you put a hotspot sound though, it will superimpose the sound of the panorama or virtual tour. Please note: the sound of the project is now compatible Iphone/Ipad.
Logo
You can plage a logo in one of the corners with a link to your site for instance!
Contextual menu
Information can be added to the contextual menu opening when you make a right-click of the mouse on a panorama. Three lines can be customized. The geometric projection mode of the virtual tour can also be changed on-the-fly.
Caution! suppressing the mentions "Realized with Panotour and Krpano" is not a free option.
Panotour Maps - Updated in August 2012.
Panotour Pro is compatible with geo-localization of panoramas and virtual tours in Google Maps, OpenStreetMap and Bing Maps. To work, this option required to have a Google Maps API or Bing Maps API key specific to the server of the site where the virtual tour would be placed. One key = one server or more simply one website. A key generated for your website won't work locally or with another site (if your site is on another server anyway). New! But a short time ago, Google stopped giving this key for Flash visits. If you already had a key for your server, it should still work.
Panotour Pro can also use OpenStreetMap or Bing Maps nowadays. Bing Maps looks a lot like Google Maps and thus requires an API key that can be downloaded from the website linked on the question mark. Once on the website, you just have to enter the full address of your site and the site will give you an API key to place in the key below.
Note if you use Google Maps or Bing Maps and you're watching your virtual tour locally, the geo-localization map won't display... but only when your virtual tour will be online.
Finally, it works without a key with OpenStreetMap but I have to admit that the maps are a bit less elegant...
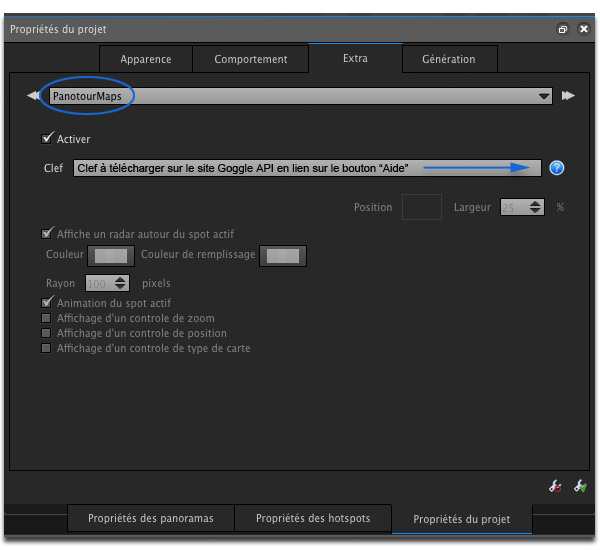
So firstly, you click the button "Activate" PanotourMaps. Then you'll choose "OpenStreetMap, Google Maps or Bing Maps".
Then you'll click the small map that just appeared at the top left in the central window part. New options appear at the bottom left in the hotspots editor (fig. below)... The last icon "interest hotspot tool (flag)" is active. You just have to move into the map below by zooming in or out and double-click on your place / interest spot. A yellow flag appears then. It can be moved as you want by clicking on it and maintaining the click while moving. Drop it where it suits you best.

Then, you have to link this map to the 360° photo related. To do so, click on the flag that must be yellow and not red. Then choose the panorama that should be linked to this flag in the unfolding list of the tab "Hotspots properties" / Link / Panorama - Your panorama. It is then displayed at the bottom right in the "3D editor".
Now, you need to direct the radar correctly with the direction of the panorama. For that, you click the icon "Compass" in the toolbar above in a first time. Then you click on the radar zone around the red flag (which is white with an opacity of 50%). The white radar zone becomes green. You just have to maintain it clicked while rotating it in the right direction relatively to the display of your panorama. When it's OK, you click the compass icon again to confirm your position.
To finish with, you choose to display a neutral item in the tab "Hotspots properties" / Display / Item / Neutral.
Then, you choose the different options you want to display.
Important remarks - When you're going to watch your virtual tour locally, Panotour Maps won't work because the site isn't on your website's server yet. You need to enter a random key for it to work TEMPORARILY on your computer - for instance "yourname" and it will work locally. You'll have to remember to reset the right key and then the virtual tour when you're ready to put it on your website.
Please note finally that several display options are available, among which a new animated radar around the active spot. For a place virtual tour, it's unbeatable!
Gyroscope - Only for Iphone 4 and Ipad 2 and next...
It's an option for smartphones with a built-in gyroscope - for now, Iphone 4 or l'Ipad 2 and next only. If you activate this option, you 'll be able to navigate in the virtual tour simply with the movements of your smartphone, like a Wii, without touching the screen. Impressive! Navigate with the finger is still completely possible. But boring after a while!
Generation tab
We're almost done! You just need to choose a few more options about capsulation of certain files before clicking on the button "Generate the tour", that we'll detail in the next paragraph.
-
Standard version (1) - Check to generate a Flash virtual tour. This version is compatible with all the browsers but not with tablets and smartphones.
-
Mobile devices version (2) - Check to generate a virtual tour compatible with all Apple's smartphones Iphone or Ipad tablets. Not compatible with Android. These devices can't handle Flash but it is possible to generate a virtual tour in Javascript, then perfectly compatible, even if there are still a few limitations for now. This exportation generates a krpanoIphone.js file by default.
Tip! A Javascript virtual tour is compatible with all browsers but will be generated in a small size if it's generated alone. (Cube sides of 512 pixels only).
Caution! If you generate a tour for Ipad or Iphone, the image file of the panorama mustn't be too large in pixels in order to generate a light enough virtual tour. 204x1024 already enables to realize a nice virtual tour with a good photo quality.
Piece of advice! If you want a maximum of compatibility, you'll have to check both buttons: "Standard tour" and "Iphone/Ipad tour". Two tours will thus be generated but they'll be selected automatically depending on the browser and the device used to view it.
-
HTML model - An HTML page that already includes your virtual tour can be generated for those who have trouble with this internet language. For that, you need to choose the template "generic.html or fullpage.html ". The generic template generates an html page where the virtual tour takes 90% of the space. A rough title is displayed above. As its name indicates, the fullpage template creates a virtual tour filling your html page (not your scree, because for that you would have to click the fullscreen button).
Tip! I always do it because it's the only way to make the navigation button "Fullscreen" active. Even if the Flash or Javascript virtual tour is perfectly visible directly in a web browser, even without being included in an HTML page, the "Fullscreen" button doesn't work then.
Finally, note that it is possible to generate your own HTML page template and to include it by default in Panotour. The explanation is given in the templates page of Panotour Pro's Wiki.
-
Export images - Leave it on Auto; This way, if you've generated your virtual tour once and you're making a change THAT DOESN'T HAVE AN IMPACT on the images, only the information changed will be regenerated. It will go a lot faster because what takes time virtual tour generation (so inevitably the first time), it's the calculation of cube sides of different resolutions.
-
Include all the data - If you check this option, the project can't be edited because all the data (photos, button images, menus, Flash files, XML files) except sound and videos are encapsulated in the Flash file (swf). This is a possible protection but above all less files to deliver your possible client who wouldn't know what to do with all these separate files!
The file Project_name.swf is then quite heavy and the visit can display slower because the whole swf file must be loaded.
Caution! Not recommendable with gigapixel projects.
If you uncheck this option, you generate a Project_name.swf file and a data folder with the same name. The data folder contains all the images cut into cube sides as well as all navigation graphic elements.
-
Incorporate XML files - If you know how to edit them, uncheck "incorporate xml files"; If you don't know what I'm talking about, leave it as it is. To learn more about XML files edition: Panotour or Krpano forums.
- Authorized domains - To view your virtual tour from your server only.
Everything is now ready to generate the virtual tour. But before that, a few remarks about this embedded technology and its use in Panotour and Panotour Pro. Without this technology, virtual tour creation from big panoramas would be impossible and visualization on the web much slower.
A few remarks about Panotour/Krpano
Panotour / Pro 1.8 is a virtual tour creation software based on a Krpano technology. This awesome technology enables to generate the virtual tour under an original form. Indeed, to view a virtual tour, six cube sides must be generated, as we saw earlier. These cube sides can be very big, hence heavy. Historically, there was a time when downloading a virtual tour, when high-speed was not available, wasn't a small matter. The immersive experience was thus laborious sometimes. Klaus Reinfled's was thus to cut these cube sides into small pieces, of different resolutions! This way, the web browser doesn't need to download more than pieces of images where the user's mouse is, depending on its situation and zoom-in level. The download is very fast since each piece of image is being downloaded.
So in my previous world record, PARIS-26-GIGAPIXELS, the final image measures 354 000 x 90 000 pixels. It's huge! But the software has chopped this enormous photo into 660,000 small pieces. So everyone, even with a bad connexion, can experience this virtual tour and the servers can handle it because the download requests are done by bits. |
Generate your virtual tour
Here we are! Everything's ready to create your virtual tour. The process is very easy but I have to make a few remarks. It is possible to use the icons in the menu bar but also to choose the classic way: File / Generate the tour menu or Generate the tour as...
Generate the tour...
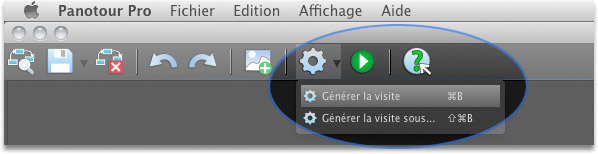
It is possible to generate hence to save or save as a virtual tour...
Generate / view button
 The button "generate" enables to generate but also to save the virtual tour on your hard drive. The button "generate" enables to generate but also to save the virtual tour on your hard drive.
 The button "View" enables, as for it, to view a virtual tour already generated once. The button "View" enables, as for it, to view a virtual tour already generated once.
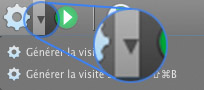
A - If you click the gear icon directly - and not the little black arrow just on the right - for the first generation, you'll save the virtual tour's file by choosing its NAME. So a new window will open, that we'll describe below.
Caution: The file, whether you chose Flash or Javascript, will have a .SWF name anyway. The Javascript file will shortcut the swf file.
B - If again, you click directly on the gear icon and the same project is still open, you'll overwrite the first files. The software won't ask you to name the files so the basic file: Project_name.swf.
 C - If you want to generate another virtual tour version from the same image files thus the same project, you'll have to click on the little black arrow to the right of the gear icon (Generate) to unfold the contextual menu and choose - Generate the tour as... -, the equivalent of Save as... C - If you want to generate another virtual tour version from the same image files thus the same project, you'll have to click on the little black arrow to the right of the gear icon (Generate) to unfold the contextual menu and choose - Generate the tour as... -, the equivalent of Save as...
|
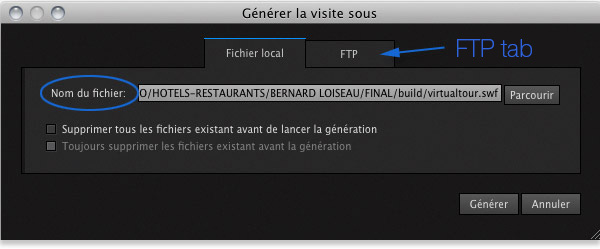
... and save both on the hard drive / Send to the server
When you generate the virtual tour and thus when you save it, a new window opens. It enables either to give it a name then choose where on the hard drive you are going to save it, either, furthermore, to send it directly to a server - yours or your client's -.
-
Local file tab - Give your file a name xxxxx.swf (may I remind you that's it's always named swf even if the tour is created for Iphone or Ipad and even though it won't be generated (!) ) and choose where you want to put the files and data folders. You can choose the option: Delete existing files before saving.
Piece of advice! Since there can be many files generated with the SWF file, (DATA, XML, HTML, JS), I recommend you to generate the virtual tour in a specific folder. This way, if you click on "Delete the files" meaning in the folder, you won't risk to delete all the files... on your desktop if that's where you place them!
-
FTP server tab - If you want, moreover, to send the files directly to an FTP server, a Menu opens so that you can fill its address / file.
About the files generated
A - If you want to create a regular virtual tour hence in Flash, with the option "Incorporate everything", Panotour will create:
- A file my_virtual_tour.swf (quite heavy)
- Possibly a file my_virtual_tour.html if you checked the option "html template".
- A swfobject folder containing an swfkrpano.js file
B - If you created a regular virtual tour hence in Flash but without incorporating everything, Panotour will create:
- A file my_virtual_tour.swf (very light)
- A folder my_virtual_tourdata (quite heavy)
- A swfobject folder containing a file swfkrpano.js
- One or several files my_virtual_tour.xml if you haven't also incorporated them.
- Possibly a file my_virtual_tour.html
C - If you want to create a virtual tour for mobile devices only hence in Javascript, Panotour will create:
- A file my_virtual_tour.html (possibly)
- A folder my_virtual_tourdata;
- A swfobject folder containing a file swfkrpano.js
- A file krpanoiphone.js
- A file krpanoiphone.license.js
- Several files my_virtual_tour.xml
It is impossible to incorporate everything in this format.
D - If you want to create a virtual tour compatible with all browsers AND iPhone/iPad, Panotour will create:
- A file my_virtual_tour.html (possibly)
- A folder my_virtual_tourdata (with a subfolder for iPhone and iPad);
- A swfobject folder containing a file swfkrpano.js
- A file krpanoiphone.js
- A file krpanoiphone.license.js
- Several files my_virtual_tour.xml |
Click on GENERATE! and go to the saving file or click the button "View" to view your masterpiece directly in your browser.
Here's how this tutorial dedicated to the creation of virtual tours with Panotour Pro ends.
New! Panotour and Panotour Pro 2.5
| |
 |
€99.00 |
 |
|
| |
 |
€399.00 |
|
|
| |
(Contribute to the being free of this site by downloading Autopano from the link above.) |
 |
|
|
Learn more with Kolor's documentation
Complete the information in this page with the official documentation of the company Kolor: Panotour Pro's Wiki |
|