Start a project...

We'll start a new project of virtual tour with Panotour Pro. Here, we will select and open the panoramas that will constitute this virtual tour. Then, we'll set the display parameters for each panorama - field of view, maximum zoom-in and out, etc.
In this page, we'll see how important it is to carefully set the parameters for each panorama for the aesthetics of the virtual tour, in order to make it more lively. In a movie, identical sequence shots that would follow would be quite monotonous, so it's important that each panorama doesn't open the same way, with the same point of view, the same field of view, etc. We'll thus see the parameters that avoid falling into this trap!

Select panoramas for your tour
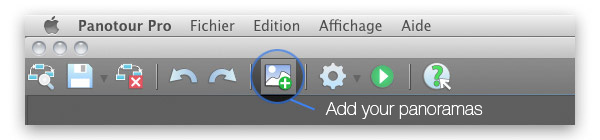
To select the panoramas of a virtual tour, you can unfold the classic File / Add a panorama menu. It's also possible to use the shortcut icon in the menu bar, just below.
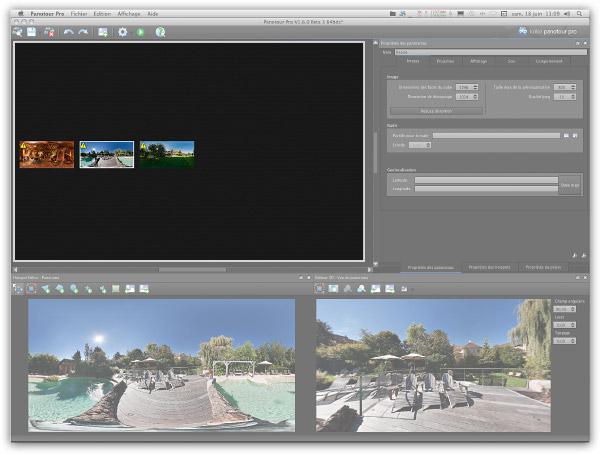
You only have to select them on your hard drive. They'll be added to the main window, at the top left.
Tip! You can reorganize the panoramas by right-clicking in the main window to open the contextual menu "Reorganize panoramas" - CMD + R or CRTL + R. It's done automatically and each time you use this shortcut, the panoramas move from one panorama to the right and so on.
Delete a panorama
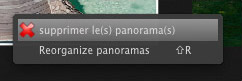
You might have to delete a panorama. To do so, you just have to click into the main window and right-click to open the contextual menu. In this menu, click "Delete a panorama".
|
The 3D editor
For the virtual tour to be pleasant to watch, it is thus important to choose the display parameters of each panorama carefully, independently from its neighbor. Let's see this now in the 3D editor, at the bottom right of the interface of Panotour Pro...
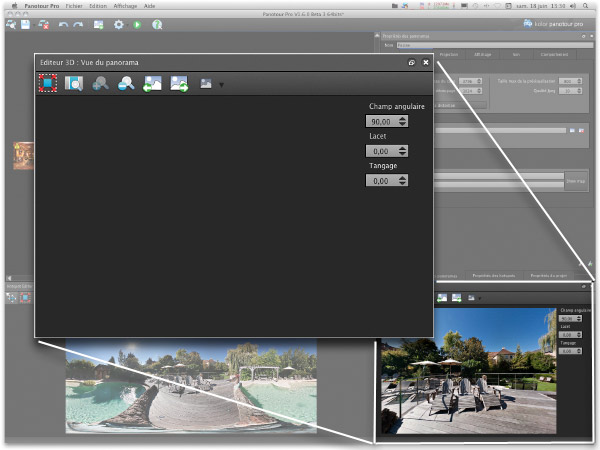
The 3D editor zone can be moved to another screen or enlarged in fullscreen, while you're making the different settings for each panorama.
Menu bar of the 3D editor

 The Enlarge button of the 3D editor enables, as you would have guessed by its name, to enlarge the editor in full screen. It allows to realize the distortions of the panorama better. The Enlarge button of the 3D editor enables, as you would have guessed by its name, to enlarge the editor in full screen. It allows to realize the distortions of the panorama better.
 The Default zoom button enables to choose the default view of the panorama. Either you choose a value - field of view box - either you play with the wheel of your mouse and click the icon. The Default zoom button enables to choose the default view of the panorama. Either you choose a value - field of view box - either you play with the wheel of your mouse and click the icon.
 The Max zoom-in button of the 3D editor isn't always accessible. We'll see why later. If it is, once the zoom-in is at its maximum, you click the icon to freeze it. The Max zoom-in button of the 3D editor isn't always accessible. We'll see why later. If it is, once the zoom-in is at its maximum, you click the icon to freeze it.
 The Max zoom-out button of the 3D editor enables to do the reverse setting for the panorama not to be too distorted. Click the icon when you don't want the user to be able to zoom out more. The Max zoom-out button of the 3D editor enables to do the reverse setting for the panorama not to be too distorted. Click the icon when you don't want the user to be able to zoom out more.
 The Previous button of the 3D editor enables to choose the previous panorama in the main window without minimizing the 3D editor if you've enlarged it to the size of your screen. Very convenient! The Previous button of the 3D editor enables to choose the previous panorama in the main window without minimizing the 3D editor if you've enlarged it to the size of your screen. Very convenient!
 The Next button of the 3D editor enables to choose the next panorama in the main window without minimizing the 3D editor if you've enlarged it to the size of your screen. The Next button of the 3D editor enables to choose the next panorama in the main window without minimizing the 3D editor if you've enlarged it to the size of your screen.
 The Quality button of the 3D editor enables to choose the display quality of the preview in this window. This has nothing to do with the JPEG compression of each panorama. The Quality button of the 3D editor enables to choose the display quality of the preview in this window. This has nothing to do with the JPEG compression of each panorama.
|
Field of view zone
The three fields allow to choose field of view or rather the default angle of view, the lace, meaning the right-left rotation relatively to the central point (first photo of the panorama thus point 0) and the tilting, meaning the tilting up or downwards relatively to the skyline.
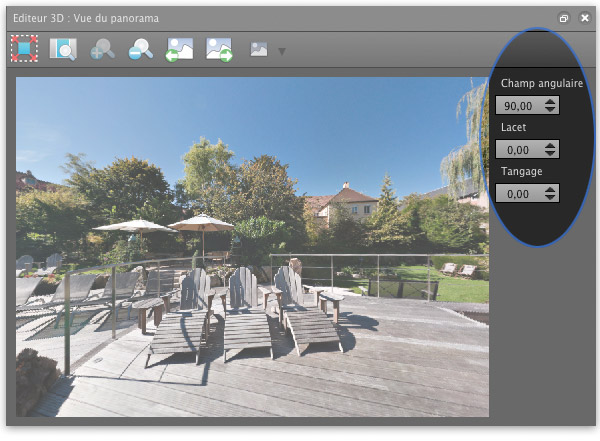
These numerical values are more interesting once the settings made with the mouse!
Set the display of the panoramas
The easiest solution is to work with the mouse. You select a panorama from the main window. It's displayed in the 3D editor. I recommend you enlarge the 3D editor zone on a second screen or on your main screen. This way, you visualize what you're doing or choosing much better. The order of the operations isn't compulsory!

1 - Choose the starting point of view - by rotating the panorama with your mouse. You can zoom in and out with the wheel of your mouse. Once you like the result, click the "Default view button" in the menu bar of the 3D editor described above or right-click in the center of the panorama and click "Default view".
Tip: you don't have to choose too wide an angle that would distort the images a lot in the corners!
2 - Choose the maximum zoom-in - The icon might be grey. That means that the software has already set the parameter in accordance with the quality of your panorama hence its definition (size in pixels). This setting has my favors. You can also zoom in to the maximum with your mouse in your panorama - that's why it's good to enlarge the 3D editor -, while keeping a visually satisfying result. It's not about showing the image grain as I see too often! You then just have to click the "Max zoom-in" icon or right-click with the mouse and choose the "Max zoom-in " contextual menu.
Tip: be careful not too zoom in too much; the image grain is often very ugly!
3 - Choose the maximum zoom-out - You just have to zoom out to the maximum with your mouse in your panorama - that's why enlarging the 3D editor is interesting -, while keeping a visually satisfying result. You don't want to distort the panorama too much at the edges of the screen! You just have to click the icon "Max zoom out" now or to right-click with the mouse and choose the "Max zoom out" of the contextual menu.
Tip: you don't have to choose too wide an angle that would distort the images a lot in the corners!
Then you have to do it again for each panorama and avoid repetition as much as possible, as I said in the introduction. To change panorama, click the "Next" icon in the menu bar of the 3D editor.
Properties of the panoramas
Once the "visual" settings of the panoramas chosen, you have to optimize them in a more technical way: size of the sides of the cube, JPG compression, possibly place a label at the nadir, place geo-localization elements, choose a soundtrack for each panorama - New! - or even choose individual autorotation values - New! -. To do so, you'll have to go to the properties zone, at the top right and click, if it's not already done, on the "Properties of the panoramas" tab.
The tab "Properties of the panoramas" has five tabs to set technical parameters precisely for each panorama.
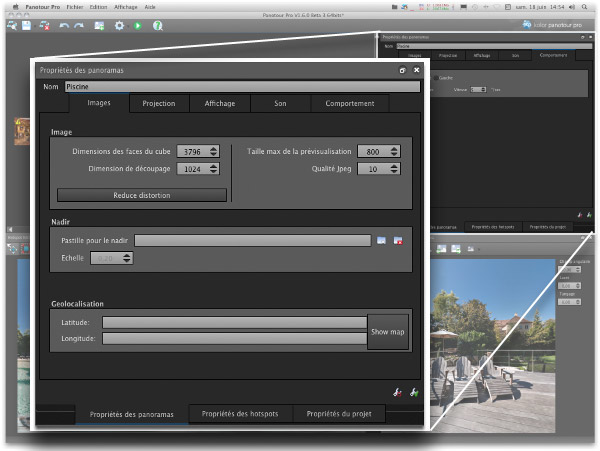
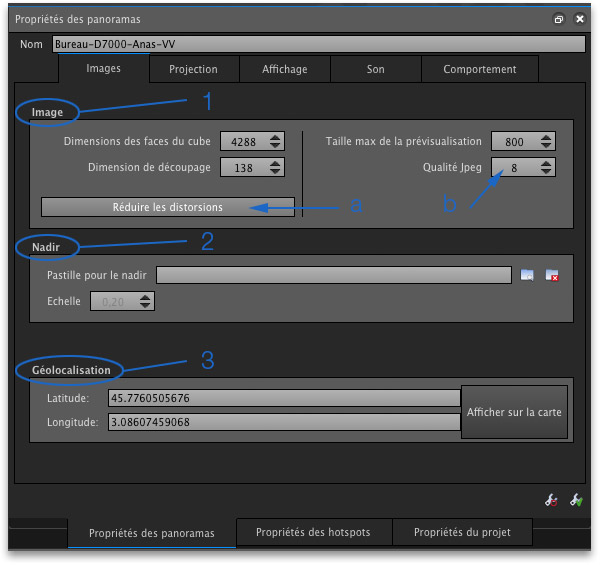
The tab Images (Properties of the panoramas)
The tab "Images" mainly enables to choose the JPG compression rate for each panorama individually or the geo-localization parameters in Google Maps.
-
Image (1) - The dimensions of the sides of the cubes are calculated automatically and that's perfect as it is! Caution! the maximum size of the cubes sides is only available by buying the Krpano licence. Cutting dimensions will question technicians and are developed on Kolor Panotour's Wiki. The button "Reduce distortions" (a) must be clicked by default because it optimizes the cutting of virtual tours hence their weight.
The "JPEG quality" (b) enables to adjust the weight of the virtual tour since it compresses the image files more or less. I like 8 as a compromise.
-
Nadir (2) - It is possible to place a label that you'll have drawn previously at the nadir in order to hide either the tripod, either the dark circle if you're lacking raw material. Then, it is possible to set the scale of this label very accurately for its dimensions to fit the panorama perfectly.
-
Geo-localization (3) - Since version 1.6 - If you know the longitude and latitude coordinates of your panorama, you can indicate them here in numerical values. If you don't know them, you can use the Google map "Show the map" and point it with a click of the mouse. Very simple and pleasant to use!
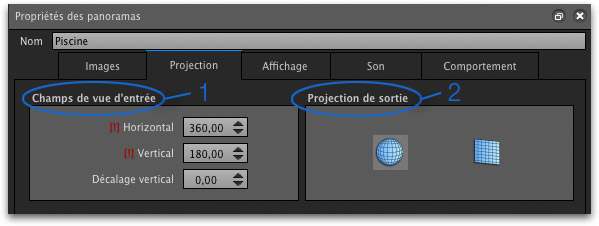
The Projection tab (Properties of the panoramas)
The tab "Projection" enables to set the field of view of the virtual tour - block the top and the bottom for instance if you haven't taken the photo on 360 x 180° or choose the type of output projection. Let's see this now...
-
Entry fields of view (1) - Size in degrees of your panorama. It's possible to change the default values if you want to limit the movement of the mouse in one direction. Example: if you write 300° instead of 360° in this example, the user won't be able to make a complete tour and will only be able to move from -150° to + 150° relatively to the central point you'll have chosen at the previous step. It's very convenient to edit a virtual tour accurately without giving to much importance to the panorama. Indeed, some panoramas shot on 360° aren't always fully interesting. It is easy to "eliminate" the ungracious or uninteresting part here thanks to this functionality.
Tip! - Note the red exclamation mark (!) next to horizontal and vertical values: this means that Panotour can't read EXIF data for the panorama. By the height/width ratio, it deduces the field of view. To confirm the values, you only have to click one of these two fields and confirm, quite simply!
-
Output projection (2) - Even if you'll let the software make this choice automatically most of the time, the spherical model works for ALL rotating virtual tours. The user can turn to all directions. This is the default projection. However, if you don't want to present a rotating virtual tour but rather a right/left sliding one, you have to choose the rectilinear projection, even if your panorama is curved when stitching and covers more than 100°.
Caution! Of course, this doesn't work with full 360 x 180° virtual tours.
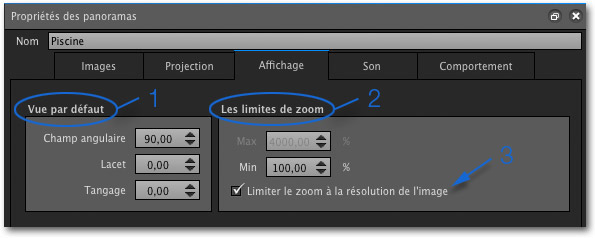
The Display tab (Properties of the panoramas)
The tab "Display" enables, as for it, to set the default angle of view of the virtual tour, as we saw earlier in this page, but above all that's where the button "Limit zoom-in to the image resolution" (3) which allows to limit the maximum zoom-in of the virtual tour accessible to the user, can be selected.
-
Default view (1) - That's where all the default display properties of the panorama depending on the movement and the zoom-in and out you'll have made and saved will be displayed.
Piece of advice! - I don't like it too much when the field of view goes under 80° because then the virtual tour is too distorted on WIDE screens.
-
Zoom-in limitations (2) - I almost always leave the button "Limit max zoom-in to the image resolution" checked because, naturally, it limits the zoom-in according to the definition of the panorama. It avoids virtual tours to be completely pixelated because of too important a zoom-in.
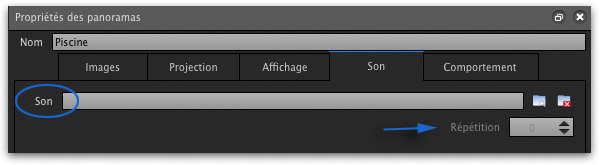
The Sound tab (Properties of the panoramas)
The tab "Sound" enables to choose a specific sound - even soundscapes sometimes - for THIS panorama and not only for the complete virtual tour. Then, it's possible to play it in a continuous loop.
Caution: The sound chosen for a panorama (that can be different for each panorama unlike the sound chosen in the tab "Properties of the project") over rides the project sound. However, a sound linked to a hotspot superimposes to a panorama or project sound.
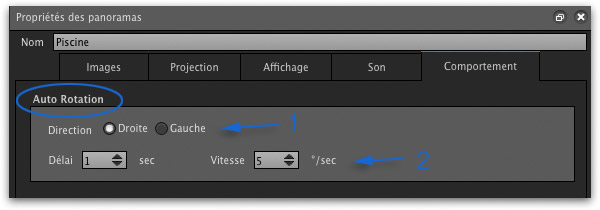
The Behavior tab (Properties of the panoramas)
The tab "Behavior" finally enables - since version 1.6! -, to set a different autorotation for each panorama. You can now choose a direction (1) and more classically a speed (2). It all moves towards an optimization of the virtual tour to make it more personal, original and as lively as possible.
And to finish with...
 A the bottom right of the Properties zone, two icons enable to save default parameters - and to go back to default values - if, from all the settings detailed in this page you systematically used one. They'll then be applied systematically to have more coherence and save time! A the bottom right of the Properties zone, two icons enable to save default parameters - and to go back to default values - if, from all the settings detailed in this page you systematically used one. They'll then be applied systematically to have more coherence and save time!
The next page describes how to create the famous hotspots, under all their forms and there are many! Create interactivity in your virtual tour... 
New ! Panotour and Panotour Pro 2.5
| |
 |
€99.00 |
 |
|
| |
 |
€399.00 |
|
|
| |
(Contribute to the being free of this site by downloading Autopano from the link above.) |
 |
|
|
Learn more with Kolor's documentation
Complete the information in this page with the official documentation of the company Kolor: Panotour Pro's Wiki  |

|