Roundshot VR Drive-II motorized head review
The motorized panoramic head Roundshot VR Drive II stands as a reference for professionals. Incredibly well-manufactured, of perfect versatility with its range of options - classic panoramas, shot very quickly, HDR, time-lapse, item on a turning table: what if it were the perfect panoramic head?
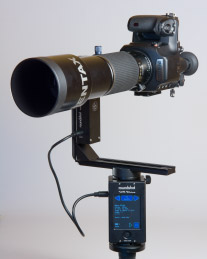
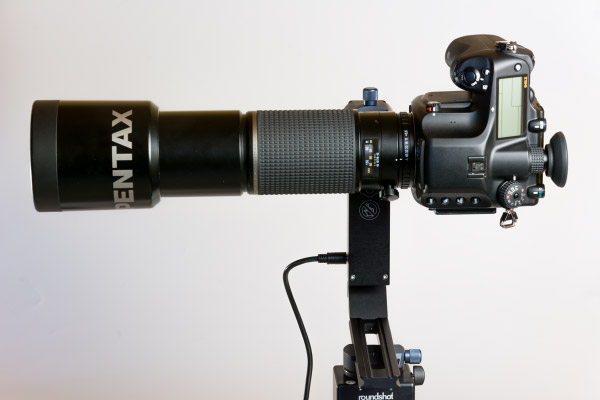
 The panoramic head Roundshot VR Drive is a so-called spherical head but motorized on one or two axis depending on which of the many declinations you'll choose. What is impossible to do with it? Except the nadir, I can't think of anything!!! It can even motorize my medium-format mounted with its 400 mm. The panoramic head Roundshot VR Drive is a so-called spherical head but motorized on one or two axis depending on which of the many declinations you'll choose. What is impossible to do with it? Except the nadir, I can't think of anything!!! It can even motorize my medium-format mounted with its 400 mm.
Three things are striking when you have it in your hands:
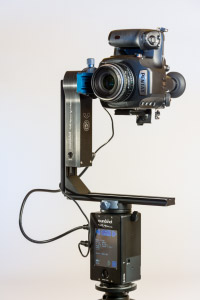
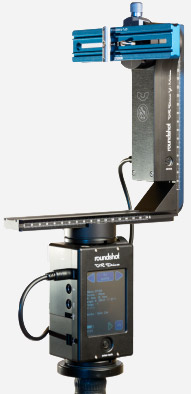
It's a dream tool I'm about to review! In the photo over here, I'm showing you the head in its full version (VR Drive Full) but many combinations exist depending on your use. Here's the complete list:
- VR Drive Full (double-axis motorization - "Quality" mode and "Speed" mode, very quick)
- VR Drive Semi (Motorized on the horizontal axis)
- VR Drive Video (Double-axis + additional L)
- VR Drive turntable (360° item)
- VR Drive linear unit (Rail + motorized base)
- VR Drive Dolly (Cart + motorized base).
If you can't find what you're looking for here! So as a minimum, you're buying the motorized base that contains the control program and you add vertical arms motorized or not, turntables, etc.
 Important notes! For this review, I used the Full version. It shows you the most complete possibilities that can be expected from such a motorized head. Secondly and because its possibilities are infinite, I'm not going to try to imitate a user manual but rather focus on the technical qualities of this VR Drive. The manual that can be downloaded for free from the website will explain you very accurately how to use it to get an idea of what one or another functionality means. It is thorough and very precise. A model in itself! Download the en EN manual Important notes! For this review, I used the Full version. It shows you the most complete possibilities that can be expected from such a motorized head. Secondly and because its possibilities are infinite, I'm not going to try to imitate a user manual but rather focus on the technical qualities of this VR Drive. The manual that can be downloaded for free from the website will explain you very accurately how to use it to get an idea of what one or another functionality means. It is thorough and very precise. A model in itself! Download the en EN manual

Presentation of the motorized head Roundshot VR Drive
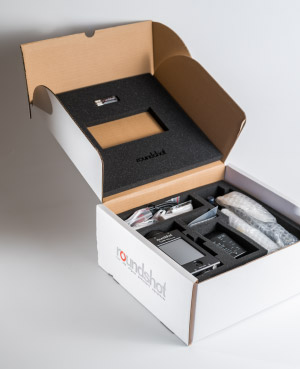 Panoramic head VR Drive Full Roundshot is thus a spherical head motorized on both axis. It is sold in a cardboard box, to my great surprise. I didn't say it was a problem, but it's surprising for a product sold over €4,000. Anyway, everything is protected perfectly and stored well. Panoramic head VR Drive Full Roundshot is thus a spherical head motorized on both axis. It is sold in a cardboard box, to my great surprise. I didn't say it was a problem, but it's surprising for a product sold over €4,000. Anyway, everything is protected perfectly and stored well.
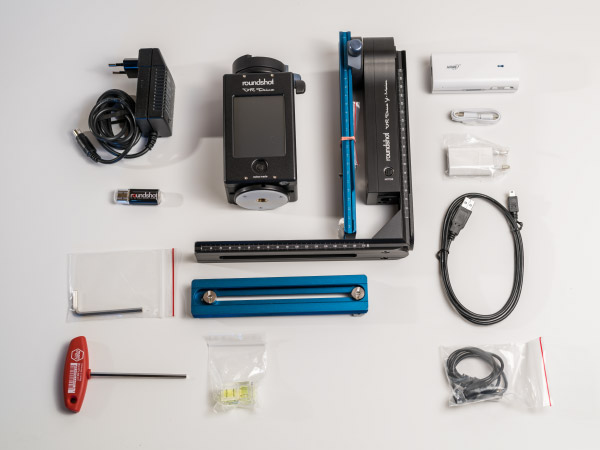
This box contains all the elements that are necessary to its right and immediate functioning (if you made sure to order the adapted wire for your camera):
- An x-motor of the VR Drive with a quick adapter, a touch screen and built-in Li-Ion batteries,
- A y-motor of the VR Drive with the connexion wire to the x-motor (optional - for the "full" version)
- A VR clip with a quick adapter,
- A long nodal rail (235 mm) to fasten all types of cameras and lenses (a shorter nodal rail - 185 mm - for fisheye lenses is also available as an accessory),
- A wire to release the shutter (Be sure to indicate the make and model of your camera),
- A USB wire (optional for the HDR mode),
- A universal 110-220V charger with a specific plug for each country (Europe, USA, Great Britain, Australia),
- A set of Allen wrenches to fasten camera and calibrate the VR Drive,
- A bubble level (that must be inserted in the flash's shoe adapter on the camera),
- A WiFi router for remote control (optional).
Technical specifications
| |
Roundshot VR Drive |
Average price: $3.,529.35 excl.taxes (Full version) |
|
Quick fastening |
Possible |
| |
Maximum load |
20 Kg / 44 lb |
| |
Height of use |
10 inches |
| |
Range of motion of the plates |
100 mm upwards and 100 mm downwards |
| |
bubble level |
Yes |
| |
Can be dismounted |
Yes - in two parts - Motorized base + vertical arm in L-shape. |
| |
Number of notches |
Infinite! |
| |
Material |
Aluminium |
| |
Weight |
About 2.7 Kg |
|
Company |
|
|
Buy the motorized head Roundshot VR Drive
| |
|
Shop |
Price
Excl. taxes |
 |
| |
|
|
$3.529.35 |
|
| |
|
|
|
|
|
Dimensions and robustness
This head is rather bulky, dismounted and even more stitched. Here are a few values I measured:
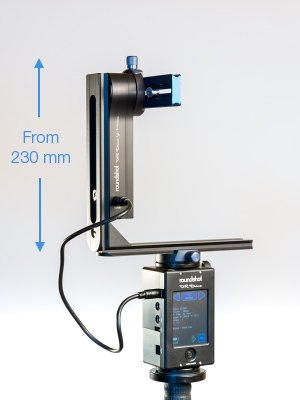
- The vertical motor can slide on 120 mm in height and thus be 230 to 350 mm high in itself! Here's what to point downwards even with a long lens!
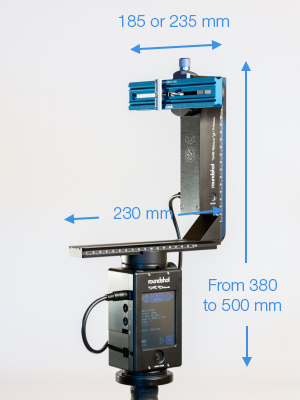
- The whole head (apart from the box) can be 380 mm high as a minimum and reach over 500 mm. It's becoming impressive!
- The horizontal arm can slide on 230 mm, which is more average... and enough.
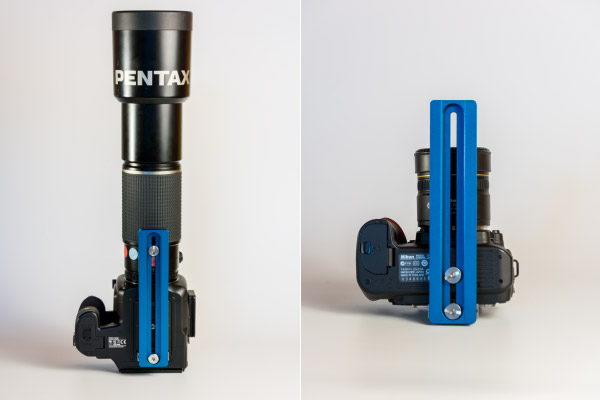
- The head is sold with a sliding plate to fasten the camera that measure 235 mm but it's possible to buy a shorter, different one that is 185 mm long as an option.
 My advice: 185 or 235 mm for the rail? Paradoxically, even with long telephoto lenses, the 185 mm plate will be sufficient. The long plate will rather be used to fasten a wide-angle zoom, like the new 24-70mm F2.8 from the last generation (2016), very long and which entrance pupil is usually located very close to the front lens at 24 mm. You would then have to use the 235 mm long plate. My advice: 185 or 235 mm for the rail? Paradoxically, even with long telephoto lenses, the 185 mm plate will be sufficient. The long plate will rather be used to fasten a wide-angle zoom, like the new 24-70mm F2.8 from the last generation (2016), very long and which entrance pupil is usually located very close to the front lens at 24 mm. You would then have to use the 235 mm long plate.
The most annoying thing when carrying it is that it's impossible to separate the horizontal plate and the vertical arm that holds the Y motor easily. It's important to note that if you're going on a trek, it is still possible to separate them because both plates are held by two screws but it's not the least bit funny!
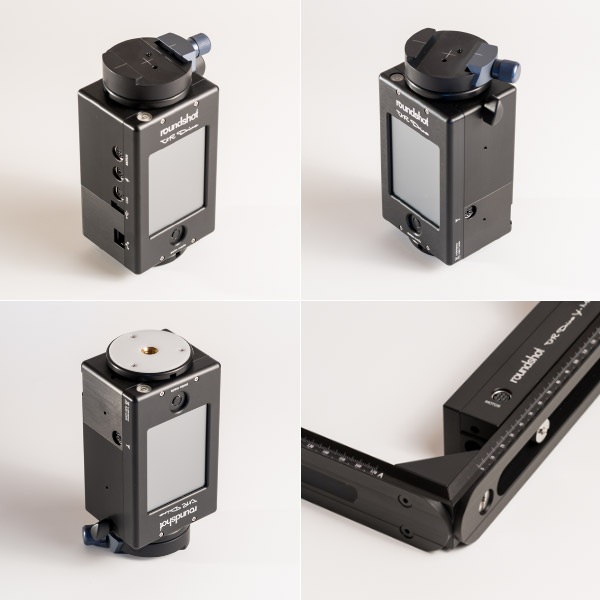
A few shots of the motorized base of the VR Drive - Stored from above - Stored from below: base turned upside down for a use with a turntable and the two fastening screws of the vertical arm on the bottom plate (Allen wrench).
What about stability?
 Even if the head's stability when you mount a light camera with a fisheye for instance is entirely sufficient (even if a manual head would do better), it is completely different with heavy telephoto lenses, bulky and inducing an important overhang. In these conditions, you need to wait a good three seconds before the vibrations stop completely. It's long! The motors can pull along 20 kg well-balanced, sure, (see below: balance of telephoto lenses) but I can already see the pictures shot at 1/15 sec. with my medium format!!! It is absolutely necessary to target short exposure times and activate temporization for at least three seconds before shooting. Even if the head's stability when you mount a light camera with a fisheye for instance is entirely sufficient (even if a manual head would do better), it is completely different with heavy telephoto lenses, bulky and inducing an important overhang. In these conditions, you need to wait a good three seconds before the vibrations stop completely. It's long! The motors can pull along 20 kg well-balanced, sure, (see below: balance of telephoto lenses) but I can already see the pictures shot at 1/15 sec. with my medium format!!! It is absolutely necessary to target short exposure times and activate temporization for at least three seconds before shooting.
|
The battery
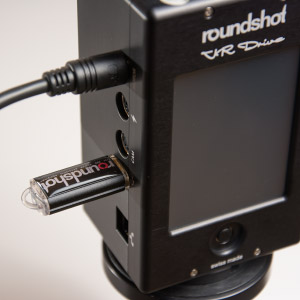
 The battery (Lithium-ion) built in the base is loaded via a power cord sold in the box. (Photo at the top of this article). The battery (Lithium-ion) built in the base is loaded via a power cord sold in the box. (Photo at the top of this article).
A full charge is given 7 hours of non-stop shooting by the manufacturer. In other words, more than enough. When I made Paris26gigapixels, the shooting lasted five hours and we hadn't used this head at this time, way faster!
The embedded computer: the program VR Drive
All versions of VR Drive are based on the basic module, module that integrates the horizontal axis' motor and the embedded computer. It is a touch screen, very convenient, but it is possible to use a pen cap for instance. The program is available in nine languages among which English, of course. The full description of the program starts on page 28 in the manual.

Like all programs, it can be updated thanks to the flash drive provided. The manuals explains this with details on page 108.
Wire connecting the camera to the motorized head to automatize the shutter release
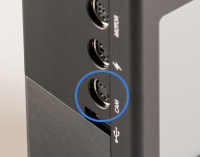  Watch out! Before buying this head, make sure it is compatible with your camera or in other words, that the connecting wire does exist! My Pentax 645Z isn't compatible, for example. You'll find the list in this page Watch out! Before buying this head, make sure it is compatible with your camera or in other words, that the connecting wire does exist! My Pentax 645Z isn't compatible, for example. You'll find the list in this page
When you place your order, be sure to indicate which wire you'll need!
Special wire for the HDR shooting option
The Full version reviewed here enables to shoot a panorama where each photo is bracketed to stitch an HDR panorama.
Note! This means you have to plug two wires to shoot HDR photos with the VR Drive: one that controls the "classic" shot, photo by photo AND another one to control the bracketing function depending on the number and the exposure change wanted. Note that in some cases, only the USB wire will be enough. Try it!
What about manufacturing quality?
Superlative! Nothing is random. A plate is needed? Let's take it from Novoflex! You'll admit it could be worse! And everything follows the same logic... except for the cardboard box. Well... it's a detail! |
Use of the head Roundshot VR Drive
Like all panoramic heads, the sliding plates of the head VR Drive Roundshot are used to place the entrance pupil of your lens above the rotary axis of the head and in the tilting axis of the vertical arm to get perfect overlap zones in multirange photography. This head being very versatile, there are many ways to make these settings, depending on your equipment: short focal length lens or long telephoto lens.
Fastening the VR Drive head on a tripod
Logically, you need to fasten the motorized base to a tripod (rather a very stable one). The screw thread is a standard Kodak 3/8. For the base module to be fastened well, use the Allen wrench with the red handle to finish clamping it. There's indeed a hole at the base of the module of the diameter of this Allen wrench.
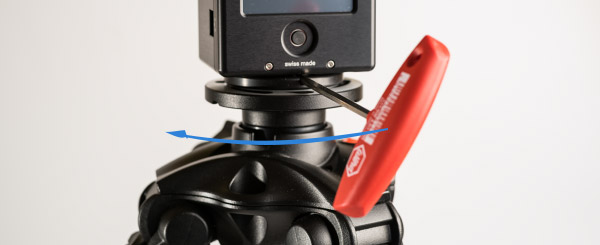
Turn clockwise to clamp the base tightly on your tripod.
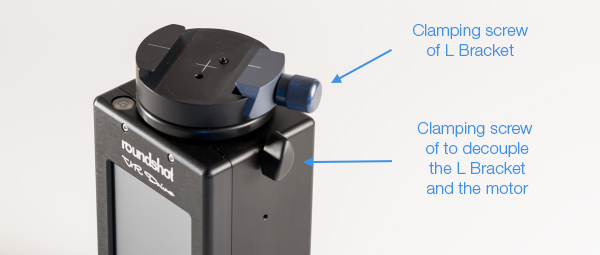
Then place the L on the base. Note that the clamping screw on the right side (with the screen in front of you) enables to make the L Bracket rotate independently from the engine.
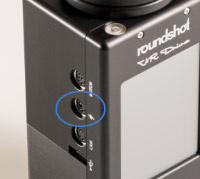
Then fasten the wire connecting the two motors X and Y.
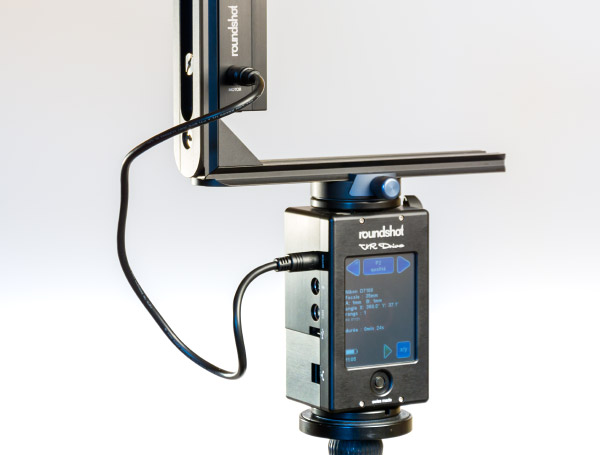
Note that the wire can be fastened on the vertical arm on both sides. Well thought!
Setting the head at the entrance pupil
1 - Let's start by fastening our camera (or our telephoto lens' bracket if it's a telephoto lens) on one of the two plates (18.5 cm or 23.5 cm Novoflex):
a - The camera is a telephoto lens (for gigapixels shots): the short plate will most often be sufficient because, despite a common belief, the entrance pupil of telephoto lenses is often very close from their fastening bracket. That's lucky, it's also close to the gravity center!
My advice! While it is fundamental to set your camera at the entrance pupil with short focals to get artefacts-free stitchings (or almost), it is really not as important when you're shooting with a telephoto lens and the reason is very simple: the entrance pupil is important because it is about stitching together perfectly and at the same time a neat foreground and background. But when you're shooting with a telephoto lens, the foreground or the background will necessarily be blurred relatively to one another! The program will stitch together the neat parts.
b - The camera is mounted with a short focal ("Classic" panoramic photography or virtual visits): even if the 18.5 cm plate will most often be enough, especially with fisheyes, it will be too short if you use zoom lenses with short or very short focals because due to the advances in the lenses field, they're getting longer and more voluminous, since the number of lenses they contain is rising.
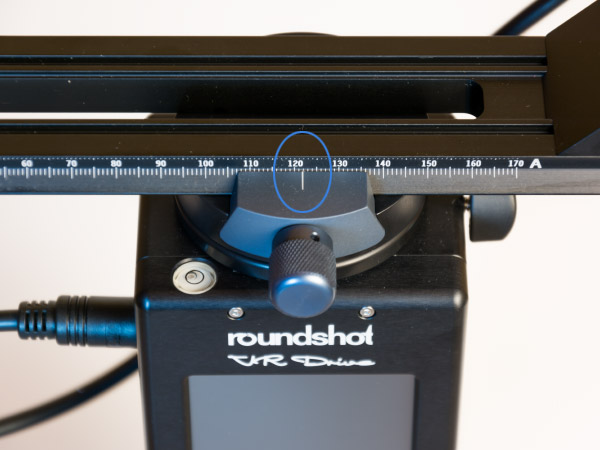
2 - Place the center of the lens just above the VR Drive's rotary axis - To do so, I guess you don't need an explanation! Just one piece of advice: make this setting with a short focal or a macro lens because then you'll be able to make your focus on the X materializing the center of the motorized base.
Tip! To make sure that you've centered your camera above the horizontal rotary axis of the VR Drive, shoot a photo downwards then, in Photoshop, select the whole photo (CRTL+A or CMD+A) then click CRTL+T or CMD+T (to make a transformation). This tool materializes the center of the photo with a cross that must overlap with the VR Drive's. You're groping around here...
Once it's done, you only have to write down the value you found on the reglet:
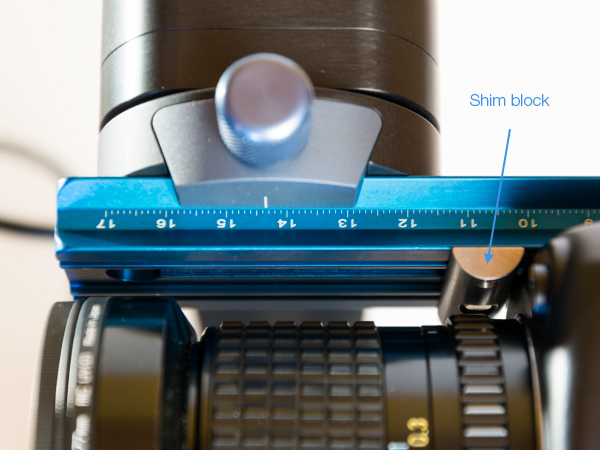
Once it's done, you need to find the setting in depth depending on your lens and if it's a zoom one, the settingS depending on the focals you use mostly. It can be done using the upper plate, very simply!
3 - Place the entrance pupil (also called nodal point) of your lens above your panoramic head's rotary axis - Note that the center of your lens must be in the tilting axis of your panoramic head.
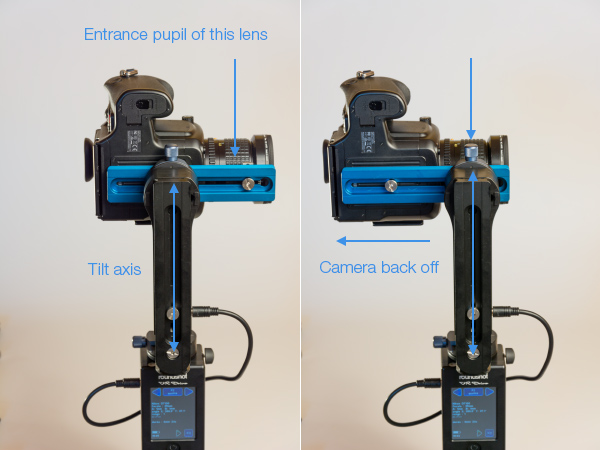
The nodal point (entrance pupil) is perfectly set on all axis hence in 3D on this panoramic head for this lens. You just need to write down the settings on the marked reglets below.
Balancing the head VR Drive Roundshot?
When you're shooting with short focals, no need to argue: you need to place your camera/lens pair at the entrance pupil of your lens in order to obtain stitchings as accurate as possible, without worrying about balancing the whole set not to overuse the motors, especially the tilting axis one. When the head is well-built as it is the case with this VR Drive, the slight overhangs will be perfectly handled by the robustness of the whole set.
But what about bulkier sets with heavy telephoto lenses when you want to make gigapixel photos for instance? Is it possible to place your camera at the entrance pupil without generating too important an overhang?
Important note! Well by an incredible change, the entrance pupil of telephoto lenses is more or less at the balance point of the camera / telephoto lens set, precisely where lenses manufacturers place their tripod fastening T. So the entrance pupil of telephoto lenses coincides more or less with the tripod fastening of the lens hence with the balance point of the whole set.
And by a second strike of luck, I'd like to precise that the entrance pupil is fundamental when you're shooting two sharp grounds at the same time but, with a telephoto lens, only the fore or the background is sharp considering how low the depth of field is. So even if the background (or the foreground) isn't exactly at the entrance pupil, it won't be visible in the final stitching since the zone is completely blurred!
So here's my tip! When you use a telephoto lens with a long focal, be sure to center your camera seen from front with the horizontal plate hence the bottom one (see § 1) AND be sure to balance carefully your telephoto lens / camera set on the vertical arm for the vibrations to be as minimized as possible. Even though it's Roundshot and can handle 20 kg, it's not a reason!
Fastening of the wire connecting the camera to the motorized base
The VR Drive needs a wire to connect your camera to the motorized base containing the control program of the whole set. The list of compatible cameras can be accessed above. I note here again that the "HDR shot" functionality requires a different, USB wire.
Setting the program VR Drive
As I was saying in my introduction I'm not going to rewrite the user manual here, very well documented and explained, but rather give my opinion or a few pieces of advice about the settings for an optimal use.
1 - Choice of the model of camera - It is not really important to give the good model here, but rather to indicate the sensor format (APS, APS-C, 24x36, etc.) to calculate the right overlap rate and thus the number of photos necessary to the realization of a good panorama according to the desired field of view. If you're doing HDR photography, it is important to select a camera that not only does have a sensor of the same format but essentially that possesses this functionality. Low-range cameras don't always integrate it.
2 - It is possible to create a program: shooting sequence - It is obviously one of the program's striking qualities. You're going to choose:
- Your camera (format and size of the sensor),
- the focal,
- the overlap percentage,
- "angle" mode: the horizontal and/or vertical field of view, etc.
- the number of ranges and the number of images per range!
- the sequence: the movement of the head (zigzag, where it starts from and in what order it shoots the pictures, ...)
- self-timer, acceleration of the engine to reach its next target, pose or not before shooting the photo, etc.
- rotation speed, with or without stop, temporization, etc.
- Bracketing functionality (up to 13 photos!) but for to 2 f-stops max. only),
- HDR mode (32 bits) to go over these 2 f-stops and choose the number of photos to achieve it,
- "Quality" mode (slow), "Speed" (very fast), or HDR.
- when to start a sequence,
- the X/Y position at the beginning of a sequence,
1 - Note about Quality, Speed and HDR modes - With the "Quality" mode, selected by default, the head makes a pose (which duration can be set) before shooting a picture to avoid blur due to movement. It is essential with telephoto lenses because then the head is not very stable (because of the important overhang), even on a big tripod. In "Speed" mode, the head is rotating continually in order to shoot the photos as quickly as possible, on a report scene for instance. This kind of shot is shot with a very wide angle or even a fisheye in general, very less sensitive to vibrations problems. Depending on the time selected to make a full 360°, the exposure time will have to be shorter or longer: if you want to make a full turn in less than 6 sec (you can also choose 10 or 20 sec), then the exposure won't get under 1/1500 sec. Lots of light will be needed! And finally, the "HDR" mode contains all the options of number of photos to shoot and with what exposure difference between each photo.
Example of speed / shooting time: in Quality Mode of a complete spherical view with a Nikon D7100 + a 10.5mm fisheye (6 views + 1 zenith + 2 nadir) + one second of stabilization delay: 55 seconds!
- A sequence can be stopped anytime using the "Pause" key.
2 - Note about the "Angle" mode - There are four possibilities: cylindric, spherical, manual and visual. In spherical mode, it is possible to force or not the shooting of the nadir.
3 - Note about the number of images - it is possible to choose the number of photos to shoot depending on the selected range, for the nadir.
4 - Note about the order in a sequence (zigzag) - There are eight possibilities + one manual one. I note that sequence 3, "Top/bottom zigzag", is interesting for those who use Autopano Giga as a stitching program because this sequence is part of the module "Import images" that I'm describing in my Autopano Giga tutorial.
3 - USB wire (compatible with a few Nikon and Canon cameras) - It is thus possible to command an HDR sequence but for that you need to add the provided USB wire.
Shooting with exportation of the shooting data (XML file on Roundshot flashdrive)
 You are now about to shoot all your photos. But before getting back your memory card, you will also possibly get back the file that saved the whole shooting sequence (order of the photos, overlap, etc.) in order to feed it to the stitching program if it enables it like Autopano Giga for instance. This way, it will know what shooting sequence was used so that it can pre-place the images even if there's no raw material where to set checkpoints. Very useful for pictures that show only the sky for example. You are now about to shoot all your photos. But before getting back your memory card, you will also possibly get back the file that saved the whole shooting sequence (order of the photos, overlap, etc.) in order to feed it to the stitching program if it enables it like Autopano Giga for instance. This way, it will know what shooting sequence was used so that it can pre-place the images even if there's no raw material where to set checkpoints. Very useful for pictures that show only the sky for example.
Important note! The flashdrive must be connected to the VR Drive BEFORE starting it.
The menu you'll use to get the data is called "Export". The option "Papywizard" enables to get the XML that contains the position of all the photos of a sequence. Here's also why it is clever to name the VR Drive program.
Special case: stitching with Autopano Giga using the XML Papywizard file
My advice - this case concerns the case when you're going to shoot numerous photos, on several ranges, among which some don't contain any raw material (cloudless sky) or very repetitive patterns (architecture). The precise position of images without having to place checkpoints will be made a lot easier. In other cases, I'll let you check my many tutorials - Autopano , PTGui, Hugin, Photomerge -.
Once you saved your photos on your hard drive, that you possibly developed your RAW files, then comes the time of stitching. Open Autopano Giga. Open the Menu > Import images... or hit the icon "Import images" in the menu bar. You open a new window of "Importation assistant".
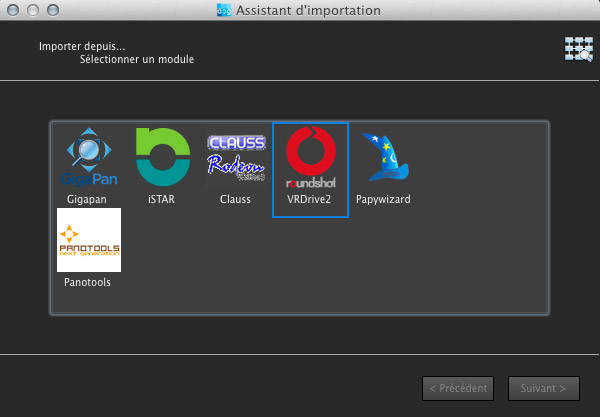
Click on "Roundshot VRDrive2" to select it then hit "Next" at the bottom right. It opens a new window: "the importation assistant".
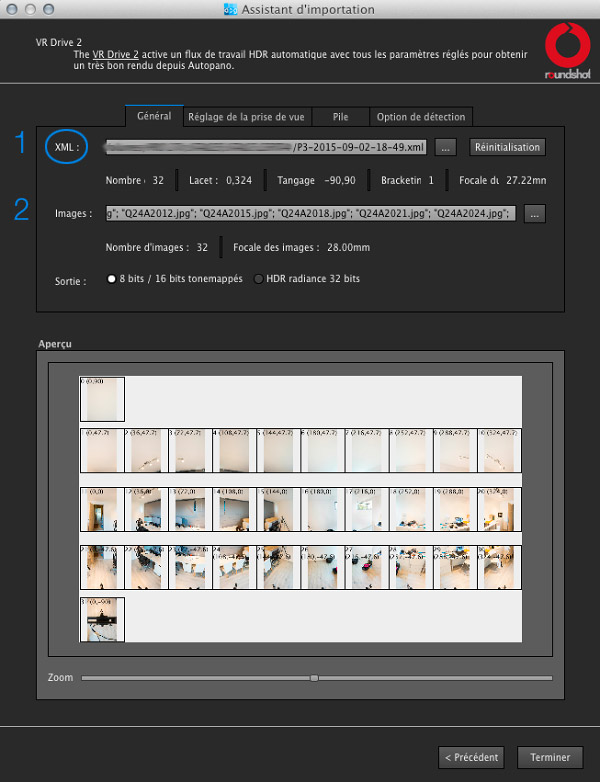
1 - Load your XML file - Note that the XML file isn't same depending on whether you shot your photos in HDR mode or not (so you didn't shoot the same number of photos).
Be sure to save one XML for each if you're always using the same number of steps because you use the same lens. You'll create your own XML library!
2 - Select all the photos in the sequence - You'll see that they place themselves "naturally" in the preview window right below. Then all you have to do is press the button "Finish" and let Autopano Giga start its pre-stitching job. You'll then see the image appear rather quickly in the right column, the panoramas one. I'll let you read my detailed Autopano Giga tutorial for the next steps...`
Conclusion and rating!
Nowadays, the head VR Drive bears the status of reference. This review is confirming it! Only the lack stability, especially with telephoto lenses, can be regretted. With that said, it is in the average of motorized panoramic heads for this criterion. But unlike the feeling that its manufacturing quality gives, it's surprising. Not easy to be stable with only one vertical arm and an equipment in overhang... For the rest, it is pure happiness... for the ones who can afford, meaning very few people apart from professionals unfortunately!
Ratings
| |
VR Drive Roundshot |
|
|
|
Manufacturing quality |
|
|
| |
Robustness |
|
|
|
| |
Stability |
 |
 |
|
| Light camera |
Telephoto lens |
| |
Bulkiness when mounted |
|
|
| |
Bulkiness dismounted |
|
|
| |
Program functionalities |
|
|
| |
Value for money |
|
|
| |
I LOVE... |
- Great design and manufacturing quality
- Robustness,
- Stability with light equipment,
- Versatility,
- Customization of the program: you can do and set almost everything to your tastes,
- Speed mode for very fast shooting (without pose),
- HDR mode,
- Power of traction of the engines (20 kg, 44 lb),
- XML importation file for Autopano Giga,
- Possibility to create a reliable model easily with Autopano Giga: XML file + .PANO,
- Possibility to control the head using your iPhone or a remote control,
- Real crush!
|
|
| |
I REGRET... |
- Like all motorized heads, it lacks stability, but only with heavy and long telephoto lenses here. You'd rather not try it on a windy day!
- Rather bulky because the horizontal plate and the vertical arm can't be separated (it reinforces robustness, stability and reduces the overall weight)
- The vertical arm can't be turned upside down easily,
- No marks to place the head at the entrance pupil very quickly...
|
|
| |
OVERALL RATING |
9.5 / 10 (and 9.0 with a telephoto lens) |
|
|
My opinion: The reference... Even if I wouldn't mind a little bit more stability for a gigapixel use with a telephoto lens and given its price. About the price, by the way, it is expensive but completely "OK" given the quality of this product. It's expensive but justified by its top-range quality...
Buy the head VR Drive Roundshot
| |
|
Store |
Price Excl. taxes |
|
| |
|
|
$3.529.35 |
|
| |
|
|
|
|
|
|