Until the version 2.6 of Autopano Giga, you had to wait till that step to finally know the verdict for your stitching. Even if it's not the case anymore, this step remains compulsory and the rendering options, numerous, must be chosen wisely.
In the last part of this tutorial dedicated to photo stitching with Autopano Giga, we'll finally render the panorama. In the window "Launch rendering" we'll decide upon a certain number of parameters of our panoramic file: the size of the final file, the stitching mode, multiband or anti-ghosting, the file format thus the possibility or not to encapsulate layers with the panorama and finally, without it being a detail, of the hard for saving said file as well as its name. Let's now see that in detail...
The window "Launch rendering"
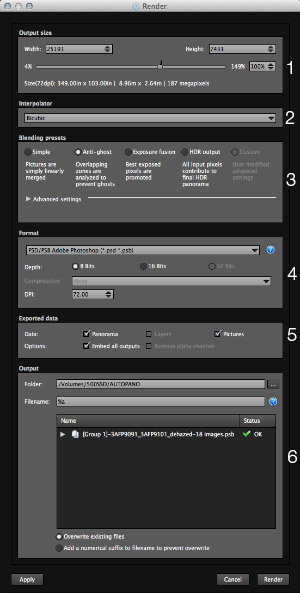
This rendering window into several distinct part allowing to make the last important adjustments regarding the final file hence our panorama.
1 - Output size
It's possible to choose the size of the file in pixels or in percentage. When comparing closely the original files and the ones stitched by Autopano Giga, we can see that the stitching is of very high standards and doesn't spoil the original files apart from the simple distortion they can undergo. It's very pleasant. Tip! The size of the file in centimeters shown just below the percentage cursor depends on the resolution chosen in the "Format" frame below.
2 - Interpolator
There are very few differences between the interpolators. This influences very slightly the increase rate of the final rendering. I prefer leaving it in bicubic by default and make the increase myself in Photoshop. Piece of advice! When I make a rendering below 60 % of the original I choose, as in Photoshop, the bilinear mode, invented to reduce the images unlike the bicubic mode. Let's remember it's been created to enlarge the size of small files coming from scanners.
3 - Blenders profiles
The choice of the blender will be made automatically when you open the rendering window anyway, but it's possible to choose a different one. Several options are possible:
Simple - This rendering, very fast but far from being perfect remains interesting for pedagogy. More or less, it allows to see the stitching we'd have made by stitching layers in Photoshop - I'm not talking about Photomerge that is a real piece of panorama software -. Defects are visible almost all the time.
Anti-ghosting - By far the most powerful rendering. The goal of this blender is to remove automatically most ghost images due to the moving of subjects between two photos and keep only what is still. It's chosen by default almost all the time. It mixes the old Smartblend that removed as many ghost images as possible and the old Multiband that was trying to harmonize color shades between two consecutive photos. It's a really remarkable tool.
Exposure fusion - Option to choose if you stitched several bracketed photos, if only on one image, in order to reduce contrast. It's a tool close to HDR but able to work correctly on two bracketed photos only. Very powerful!
HDR output - As its name says, it's the default mode when you activate the HDR rendering meaning that you bracketed several times all the images in a panorama in order to drastically reduce the contrast and that we want to make a .hdr rendering.
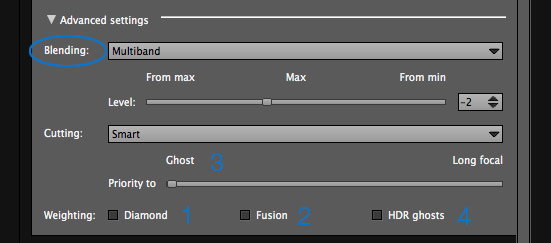
Advanced - allows to choose manually all possible options as you can see below.
Blender - three options: none, linear, multiband. As its name says, "None" doesn't apply any blender. This way, we'll see the neat demarcation in the sky, for instance, between two consecutive photos if there's been a slight exposure difference. "Linear": basic stitching. Not perfect but educational. "Multiband": by default, currently the most powerful algorithm to harmonize luminosities and colors when there's been slight differences between two consecutive photos. When you open advanced settings, you can set "Multiband level". It allows to choose the range of the influence zone of a pixel, else said the width of the overlap zone in pixels for each image taken into account to make color and luminosity blend as perfect as possible. And that's when it becomes complicated! To make it short, the higher the level and the wider the blending zone. 0 being the maximum zone. Piece of advice! What you want to remember is that the default value is fine for most cases and DEPENDS on the size in pixels of each of your photos. It's calculated automatically relatively to your images. The bigger each photo of your future panorama, the lower the value (here -4 for individual images of 21 megapixels). In fact, the value displayed by default for your panorama doesn't matter much, what matters is that if you want to widen your influence zone, you need to raise this value (-3, -2, etc.) and if you want to reduce your harmonization zone, you need to lower this value. Piece of advice! Ever since anti-ghosting and multiband tools are paired, stitchings have become of a great harmonization quality.
Weight in diamonds (1): The pixels at the center of the image have more importance hence more influence than the pixels at the edges. Especially interesting in "Linear" mode thus very specific. Leave it unchecked.
Anti-ghosting (2): Important if you're shooting moving subjects. Their luminosity can change between two photos - they can be lit differently - BUT since we're in the overlap zone, the blender mustn't be influenced by these differences and reflect on the whole harmonization zone for still subjects. Leave it checked.
Exposure fusion (3): Must definitely be checked if you want to stitch bracketed photos on at least one image of the panorama. The software is then able to tell the difference between luminosity differences in a defined zone because there are two photos that received a different exposure and the rest of the panorama. To make it short, the dark photo (underexposed) won't influence the rest of the panorama but only the same photo normally exposed.
Anti-ghosting - HDR - (4): As for 2, it's all about not letting images that have moved during bracketing influence, obviously even more than in an HDR project where all the photos are multi-bracketed.
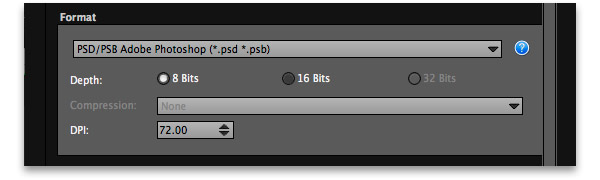
4 - File format
JPG: In 8 bits only, it is of course possible to choose the compression rate from 1 to 12. Caution! Maximum size 64 000 x 64 000 pixels knowing that Photoshop can't open files of more than 30 000 pixels in this format. Finally, it doesn't save multilayers panoramas.
PNG: image format mainly used to get a transparent image. Close to the characteristics of JPG.
PSD/PSB: PSB for Bold hence heavy is a PSD extension for panoramas of more than 2 Go. It often happens with Autopano Giga! This format is the royal format to keep 16 bits, multilayers and a big size of file, limited to 300,000 pixels in Photoshop though. The choice between PSD and PSB is of course automatic in Autopano Giga.
TIFF: Close to PSD, it doesn't have a limitation in size, but in weight: 2 Gb max (or even 4Gb). The possibility to make a ZIP compression is interesting.
HDR: The big difference with TIFF files is the ability to save the files in 32 bits, that ca be opened in Photoshop, Photomatix or FDRTools, for instance.
EXR: another HDR format.
KRO: Format created by Kolor during the making of the world record paris-26-gigapixels.com in order not to be limited in size (reminder: Photoshop still can't handle files of more than 300,000 pixels).
Last precision about DPIs: this option is of low interest here if not to inform you about the printing size of your file in centimeters in the first block "File size".
5 - Data to export
When you choose file formats compatibles with multilayers in the list above, it's possible to choose what will be encapsulated and how:
Data: If you want a panorama, you need to check "Panorama", of course. If you're working in a format compatible with multilayers (TIFF, PSD, PSB, etc.), you also need to check "Images". It's this option that will enable to get the stitched panorama AND the individual images in the same file on superimposed layers. Caution! For that, you absolutely need to check "Incorporate all" below.
Options: As detailed above, you absolutely need to check "Incorporate all", in multilayers mode, if you want the panorama AND the images on superimposed layers in the same file. (Suppress the transparency is only interesting in PNG format).
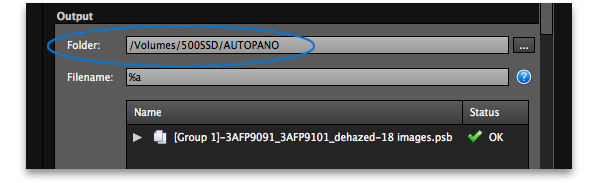
6 - Output
Then, you'll give your output file a name but above all choose where you want to save it. This point is essential because because it determines for a big part the rendering speed of your panorama. You really need to choose your faster hard drive. You'll save precious time, especially for the writing of big files. As for the name, I have nothing more to say!
Importance of the output hard drive
The speed of the output hard drive will be determining for the rendering speed. The faster your drive, the faster the writing of your file, sometimes (very) heavy. After trying, I listed the reference times below:
- Writing on a classic work hard drive but very recent, at 7,200 tours: 2'30
- Writing on a cluster of 4 SSD hard drives mounted in RAID 0 on PCI card: 1'30.
QED!
Nowadays, thanks to the democratization of SSD hard drives, it's not as essential as before to carefully separate, for big projects, the images on one hard drive, the software on another, the temporary files on a third and the final panorama on a fourth. Unfortunately, these hard drives are still quite expensive. They're noticeably more powerful though. One last example: to write 10 Gb of image date from my SSD cluster to a cluster of three hard drives Velociraptor 600 at 10.000 tours mounted in RAID 0 with the Apple Raid card, I need less than 30 sec.! Hence 3 seconds per Gb and I'm limited by the cluster of Velociraptors!
Launch rendering
When everything is OK, you just have to either click the button "Render" to indeed launch rendering and open a new window "rendering batch processing" described below, either click the button "Apply" to save the project and make the final rendering later.
Batch processing window
A new window opens. It's the rendering batch processing window. It's interesting for those who want to have statistics about panorama stitchings or for the management of batch processing.
Rendering statistics
If you want to have advanced stats about the benches of THIS rendering, you only need to click the name of the project in the left column and a list of statistic data opens in the right column, especially on rendering times for the different steps. This can prove very useful when you're looking to optimize your hardware settings for instance.
Rendering batch processing
It's possible for a long time now to make these renderings by batches in panorama software. Not such a long time ago, the power of computers was not sufficient to render a panorama in a reasonable amount of time when they were big size projects. The possibility to treat projects by batches was thus almost essential to make these final renderings when you're not in front of your computer, at night for instance. It's less true now. A stitching of the same number of images, the same size and the same rendering that was performed in 45 minutes three/four years ago is now made in 25 secondes! The progress of Autopano Giga and of hardware have been there!
Batch processing menu bar
The button Open a project in the menu bar enables to look for a .pano file on your hard drive in order to make its final rendering now.
The button Save a project allows to save a .pano file that will be stitched later. It can be processed by batches or individually.
The button Add a project enables to add a .pano project already saved to the list of batch processing to come.
The button Remove a project allows as you could have imagined to remove a .pano project from the list of files to be processed by batches.
The button Launch rendering simply allows to launch rendering or batch processing if there's a waiting list in the left column of the batch processing window.
The Pause button, of course, allows to pause the final batch processing.
The button Stop batch processing enables as you would have guessed to stop batch processing!
The button Open a projects folder allows to open a folder directly - if you've created one - where all your .pano are gathered.
The button Help, when it's clicked, enables you to know more about an icon when you hover your mouse over it.
As a conclusion...
Autopano Giga / Pro version 2.5 is a very powerful and sometimes complex piece of software. Multiple things can be done very easily if you know where to look. I hope this tutorial will have helped you optimize your use of this incredible piece of software, especially thanks to pieces of advice.
Here is how this part dedicated to the use of Autopano Giga and Pro ends. In the appendixes page, you'll find information about history, saving of a project, panorama editor preferences...
"Find the nodal point or no parallax point accurately in less than an hour"... whether you are photographing a simple panorama or a 360° photo - PDF of 100 pages -More information...
This website is almost entirely free and yet almost free of ads. Why? Because they look so bad! It is lucrative though, and enables many websites to keep on living. So I asked myself: what can I do? To keep on developing this website, I'm going to need a regular income just like everyone else. How can I keep on giving access to free information like I've been doing since April 2002?
And I finally found the answer: affiliation. Every time you click on a link from this site to one of my partners' shops, they know you've been referred by me and give me a small percentage on your purchase, be it something I recommend on my website or anything else. Remember to use my links when you shop on these sites! It doesn't cost you anything and it's a win-win deal – for me, them, and you!


 This rendering window into several distinct part allowing to make the last important adjustments regarding the final file hence our panorama.
 Tip!
Tip!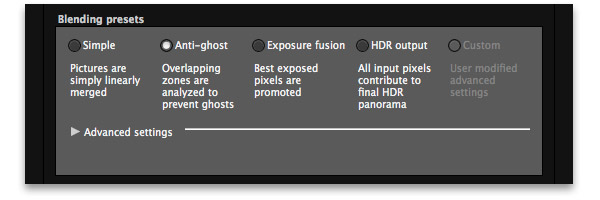

 Importance of the output hard drive
 The speed of the output hard drive will be determining for the rendering speed. The faster your drive, the faster the writing of your file, sometimes (very) heavy. After trying, I listed the reference times below:
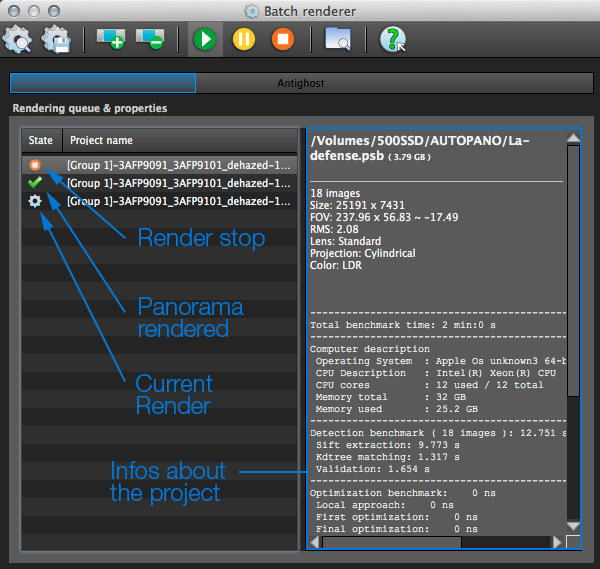
 It's possible for a long time now to make these renderings by batches in panorama software. Not such a long time ago, the power of computers was not sufficient to render a panorama in a reasonable amount of time when they were big size projects. The possibility to treat projects by batches was thus almost essential to make these final renderings when you're not in front of your computer, at night for instance. It's less true now. A stitching of the same number of images, the same size and the same rendering that was performed in 45 minutes three/four years ago is now made in 25 secondes! The progress of Autopano Giga and of hardware have been there!
 The
The  The
The  The
The  The
The  The
The  The
The  The
The  The
The  The
The 


